Secure an app and/or your Otoroshi UI with LDAP
Before you start
If you already have an up and running otoroshi instance, you can skip the following instructions
Let’s start by downloading the latest Otoroshi.
curl -L -o otoroshi.jar 'https://github.com/MAIF/otoroshi/releases/download/v17.13.0/otoroshi.jar'
then you can run start Otoroshi :
java -Dotoroshi.adminPassword=password -jar otoroshi.jar
Now you can log into Otoroshi at http://otoroshi.oto.tools:8080 with admin@otoroshi.io/password
Running an simple OpenLDAP server
Run OpenLDAP docker image :
docker run \
  -p 389:389 \
  -p 636:636  \
  --env LDAP_ORGANISATION="Otoroshi company" \
  --env LDAP_DOMAIN="otoroshi.tools" \
  --env LDAP_ADMIN_PASSWORD="otoroshi" \
  --env LDAP_READONLY_USER="false" \
  --env LDAP_TLS"false" \
  --env LDAP_TLS_ENFORCE"false" \
  --name my-openldap-container \
  --detach osixia/openldap:1.5.0
Let’s make the first search in our LDAP container :
docker exec my-openldap-container ldapsearch -x -H ldap://localhost -b dc=otoroshi,dc=tools -D "cn=admin,dc=otoroshi,dc=tools" -w otoroshi
This should output :
# extended LDIF
 ...
# otoroshi.tools
dn: dc=otoroshi,dc=tools
objectClass: top
objectClass: dcObject
objectClass: organization
o: Otoroshi company
dc: otoroshi

# search result
search: 2
result: 0 Success
...
Now you can seed the open LDAP server with a few users.
Join your LDAP container.
docker exec -it my-openldap-container "/bin/bash"
The command ldapadd needs of a file to run.
Launch this command to create a bootstrap.ldif with one organization, one singers group with John user and a last group with Baz as scientist.
echo -e "
dn: ou=People,dc=otoroshi,dc=tools
objectclass: top
objectclass: organizationalUnit
ou: People

dn: ou=Role,dc=otoroshi,dc=tools
objectclass: top
objectclass: organizationalUnit
ou: Role

dn: uid=john,ou=People,dc=otoroshi,dc=tools
objectclass: top
objectclass: person
objectclass: organizationalPerson
objectclass: inetOrgPerson
uid: john
cn: John
sn: Brown
mail: john@otoroshi.tools
postalCode: 88442
userPassword: password

dn: uid=baz,ou=People,dc=otoroshi,dc=tools
objectclass: top
objectclass: person
objectclass: organizationalPerson
objectclass: inetOrgPerson
uid: baz
cn: Baz
sn: Wilson
mail: baz@otoroshi.tools
postalCode: 88443
userPassword: password

dn: cn=singers,ou=Role,dc=otoroshi,dc=tools
objectclass: top
objectclass: groupOfNames
cn: singers
member: uid=john,ou=People,dc=otoroshi,dc=tools

dn: cn=scientists,ou=Role,dc=otoroshi,dc=tools
objectclass: top
objectclass: groupOfNames
cn: scientists
member: uid=baz,ou=People,dc=otoroshi,dc=tools
" > bootstrap.ldif

ldapadd -x -w otoroshi -D "cn=admin,dc=otoroshi,dc=tools" -f bootstrap.ldif -v
Create an Authentication configuration
- Go ahead, and navigate to http://otoroshi.oto.tools:8080
- Click on the cog icon on the top right
- Then
Authentication configsbutton - And add a new configuration when clicking on the
Add itembutton - Select the
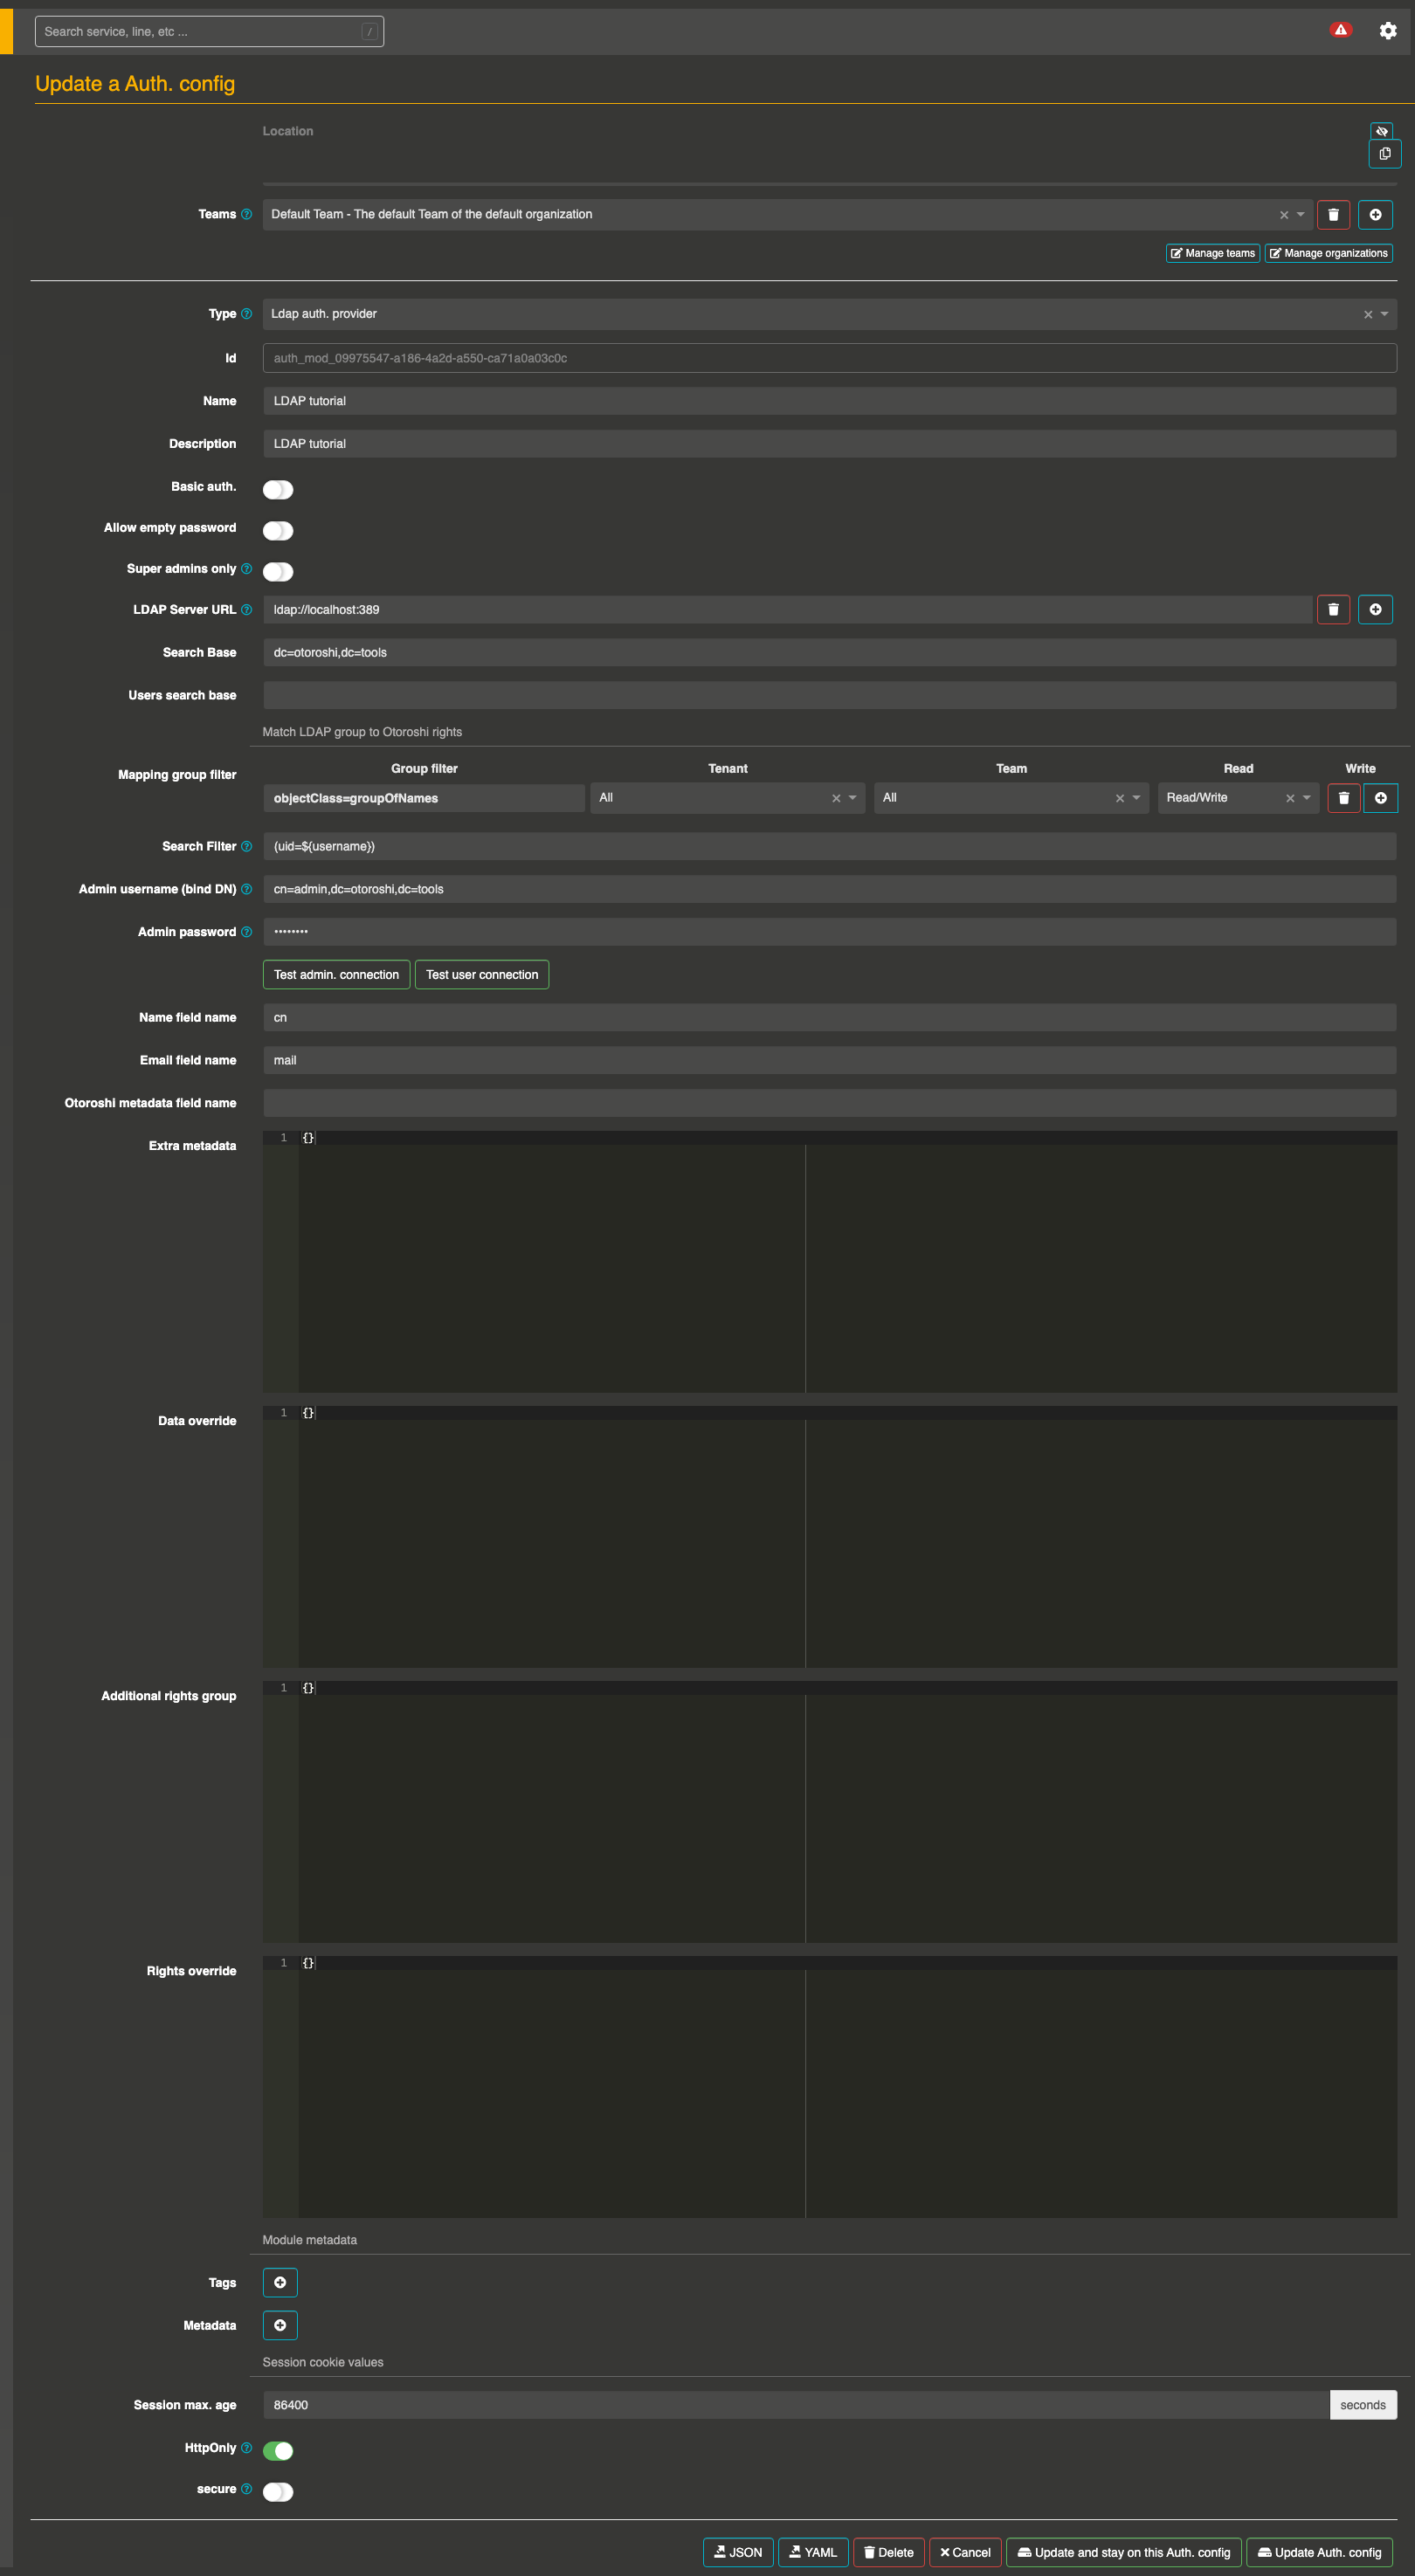
Ldap auth. providerin the type selector field - Set a basic name and description
- Then set
ldap://localhost:389asLDAP Server URLanddc=otoroshi,dc=toolsasSearch Base - Create a group filter (in the next part, we’ll change this filter to spread users in different groups with given rights) with
- objectClass=groupOfNames as
Group filter - All as
Tenant - All as
Team - Read/Write as
Rights
- objectClass=groupOfNames as
- Set the search filter as
(uid=${username}) - Set
cn=admin,dc=otoroshi,dc=toolsasAdmin username - Set
otoroshiasAdmin password - At the bottom of the page, disable the
securebutton (because we’re using http and this configuration avoid to include cookie in an HTTP Request without secure channel, typically HTTPs)
At this point, your configuration should be similar to :
Dont’ forget to save on the bottom page your configuration before to quit the page.
-
Test the connection when clicking on
Test admin connectionbutton. This should show aIt works!message -
Finally, test the user connection button and set
john/passwordorbaz/passwordas credentials. This should show aIt works!message
Dont’ forget to save on the bottom page your configuration before to quit the page.
Connect to Otoroshi with LDAP authentication
To secure Otoroshi with your LDAP configuration, we have to register an Authentication configuration as a BackOffice Auth. configuration.
- Navigate to the danger zone (when clicking on the cog on the top right and selecting Danger zone)
- Scroll to the BackOffice auth. settings
- Select your last Authentication configuration (created in the previous section)
- Save the global configuration with the button on the top right
Testing your configuration
- Disconnect from your instance
- Then click on the Login using third-party button (or navigate to http://otoroshi.oto.tools:8080/backoffice/auth0/login)
- Set
john/passwordorbaz/passwordas credentials
A fallback solution is always available in the event of a bad authentication configuration. By going to http://otoroshi.oto.tools:8080/bo/simple/login, the administrators will be able to redefine the configuration.
Secure an app with LDAP authentication
Once the configuration is done, you can secure any of Otoroshi routes.
- Navigate to any created route
- Add the
Authenticationplugin to your route - Select your Authentication config inside the list
- Save your configuration
Now try to call your route. The login module should appear.
Manage LDAP users rights on Otoroshi
For each group filter, you can affect a list of rights:
- on an
Organization - on a
Team - and a level of rights :
Read,WriteorRead/Write
Start by navigate to your authentication configuration (created in previous step).
Then, replace the values of the Mapping group filter field to match LDAP groups with Otoroshi rights.

With this configuration, Baz is an administrator of Otoroshi with full rights (read / write) on all organizations.
Conversely, John can’t see any configuration pages (like the danger zone) because he has only the read rights on Otoroshi.
You can easily test this behaviour by testing with both credentials.
Advanced usage of LDAP Authentication
In the previous section, we have define rights for each LDAP groups. But in some case, we want to have a finer granularity like set rights for a specific user. The last 4 fields of the authentication form cover this.
Let’s start by adding few properties for each connected users with Extra metadata.
// Add this configuration in extra metadata part
{
  "provider": "OpenLDAP"
}
The next field Data override is merged with extra metadata when a user connects to a private app or to the UI (inside Otoroshi, private app is a service secure by any authentication module). The Email field name is configured to match with the mail field from LDAP user data.
{
  "john@otoroshi.tools": {
    "stage_name": "Will"
  }
}
If you try to connect to an app with this configuration, the user result profile should be :
{
  ...,
  "metadata": {
    "lastname": "Willy",
    "stage_name": "Will"
  }
}
Let’s try to increase the John rights with the Additional rights group.
This field supports the creation of virtual groups. A virtual group is composed of a list of users and a list of rights for each teams/organizations.
// increase_john_rights is a virtual group which adds full access rights at john
{
  "increase_john_rights": {
    "rights": [
      {
        "tenant": "*:rw",
        "teams": [
          "*:rw"
        ]
      }
    ],
    "users": [
      "john@otoroshi.tools"
    ]
  }
}
The last field Rights override is useful when you want erase the rights of an user with only specific rights. This field is the last to be applied on the user rights.
To resume, when John connects to Otoroshi, he receives the rights to only read the default Organization (from Mapping group filter), then he is promote to administrator role (from Additional rights group) and finally his rights are reset with the last field Rights override to the read rights.
{
  "john@otoroshi.tools": [
    {
      "tenant": "*:r",
      "teams": [
        "*:r"
      ]
    }
  ]
}