AWS - Elastic Beanstalk
Now you want to use Otoroshi on AWS. There are multiple options to deploy Otoroshi on AWS, for instance :
- You can deploy the Docker image on Amazon ECS
- You can create a basic Amazon EC2, access it via SSH, then deploy the otoroshi.jar
- Or you can use AWS Elastic Beanstalk
In this section we are going to cover how to deploy Otoroshi on AWS Elastic Beanstalk.
AWS Elastic Beanstalk Overview
Unlike Clever Cloud, to deploy an application on AWS Elastic Beanstalk, you don’t link your app to your VCS repository, push your code and expect it to be built and run.
AWS Elastic Beanstalk does only the run part. So you have to handle your own build pipeline, upload a Zip file containing your runnable, then AWS Elastic Beanstalk will take it from there.
Eg: for apps running on the JVM (Scala/Java/Kotlin) a Zip with the jar inside would suffice, for apps running in a Docker container, a Zip with the DockerFile would be enough.
Prepare your deployment target
Actually, there are 2 options to build your target.
Either you create a DockerFile from this Docker image, build a zip, and do all the Otoroshi custom configuration using ENVs.
Or you download the otoroshi.jar, do all the Otoroshi custom configuration using your own otoroshi.conf, and create a DockerFile that runs the jar using your otoroshi.conf.
For the second option your DockerFile would look like this :
FROM openjdk:11
VOLUME /tmp
EXPOSE 8080
ADD otoroshi.jar otoroshi.jar
ADD otoroshi.conf otoroshi.conf
RUN sh -c 'touch /otoroshi.jar'
ENV JAVA_OPTS=""
ENTRYPOINT [ "sh", "-c", "java $JAVA_OPTS -Djava.security.egd=file:/dev/./urandom -Dconfig.file=/otoroshi.conf -jar /otoroshi.jar" ]
I’d recommend the second option.
Now Zip your target (Jar + Conf + DockerFile) and get ready for deployment.
Create an Otoroshi instance on AWS Elastic Beanstalk
First, go to AWS Elastic Beanstalk Console, don’t forget to sign in and make sure that you are in the good region (eg : eu-west-3 for Paris).
Hit Get started
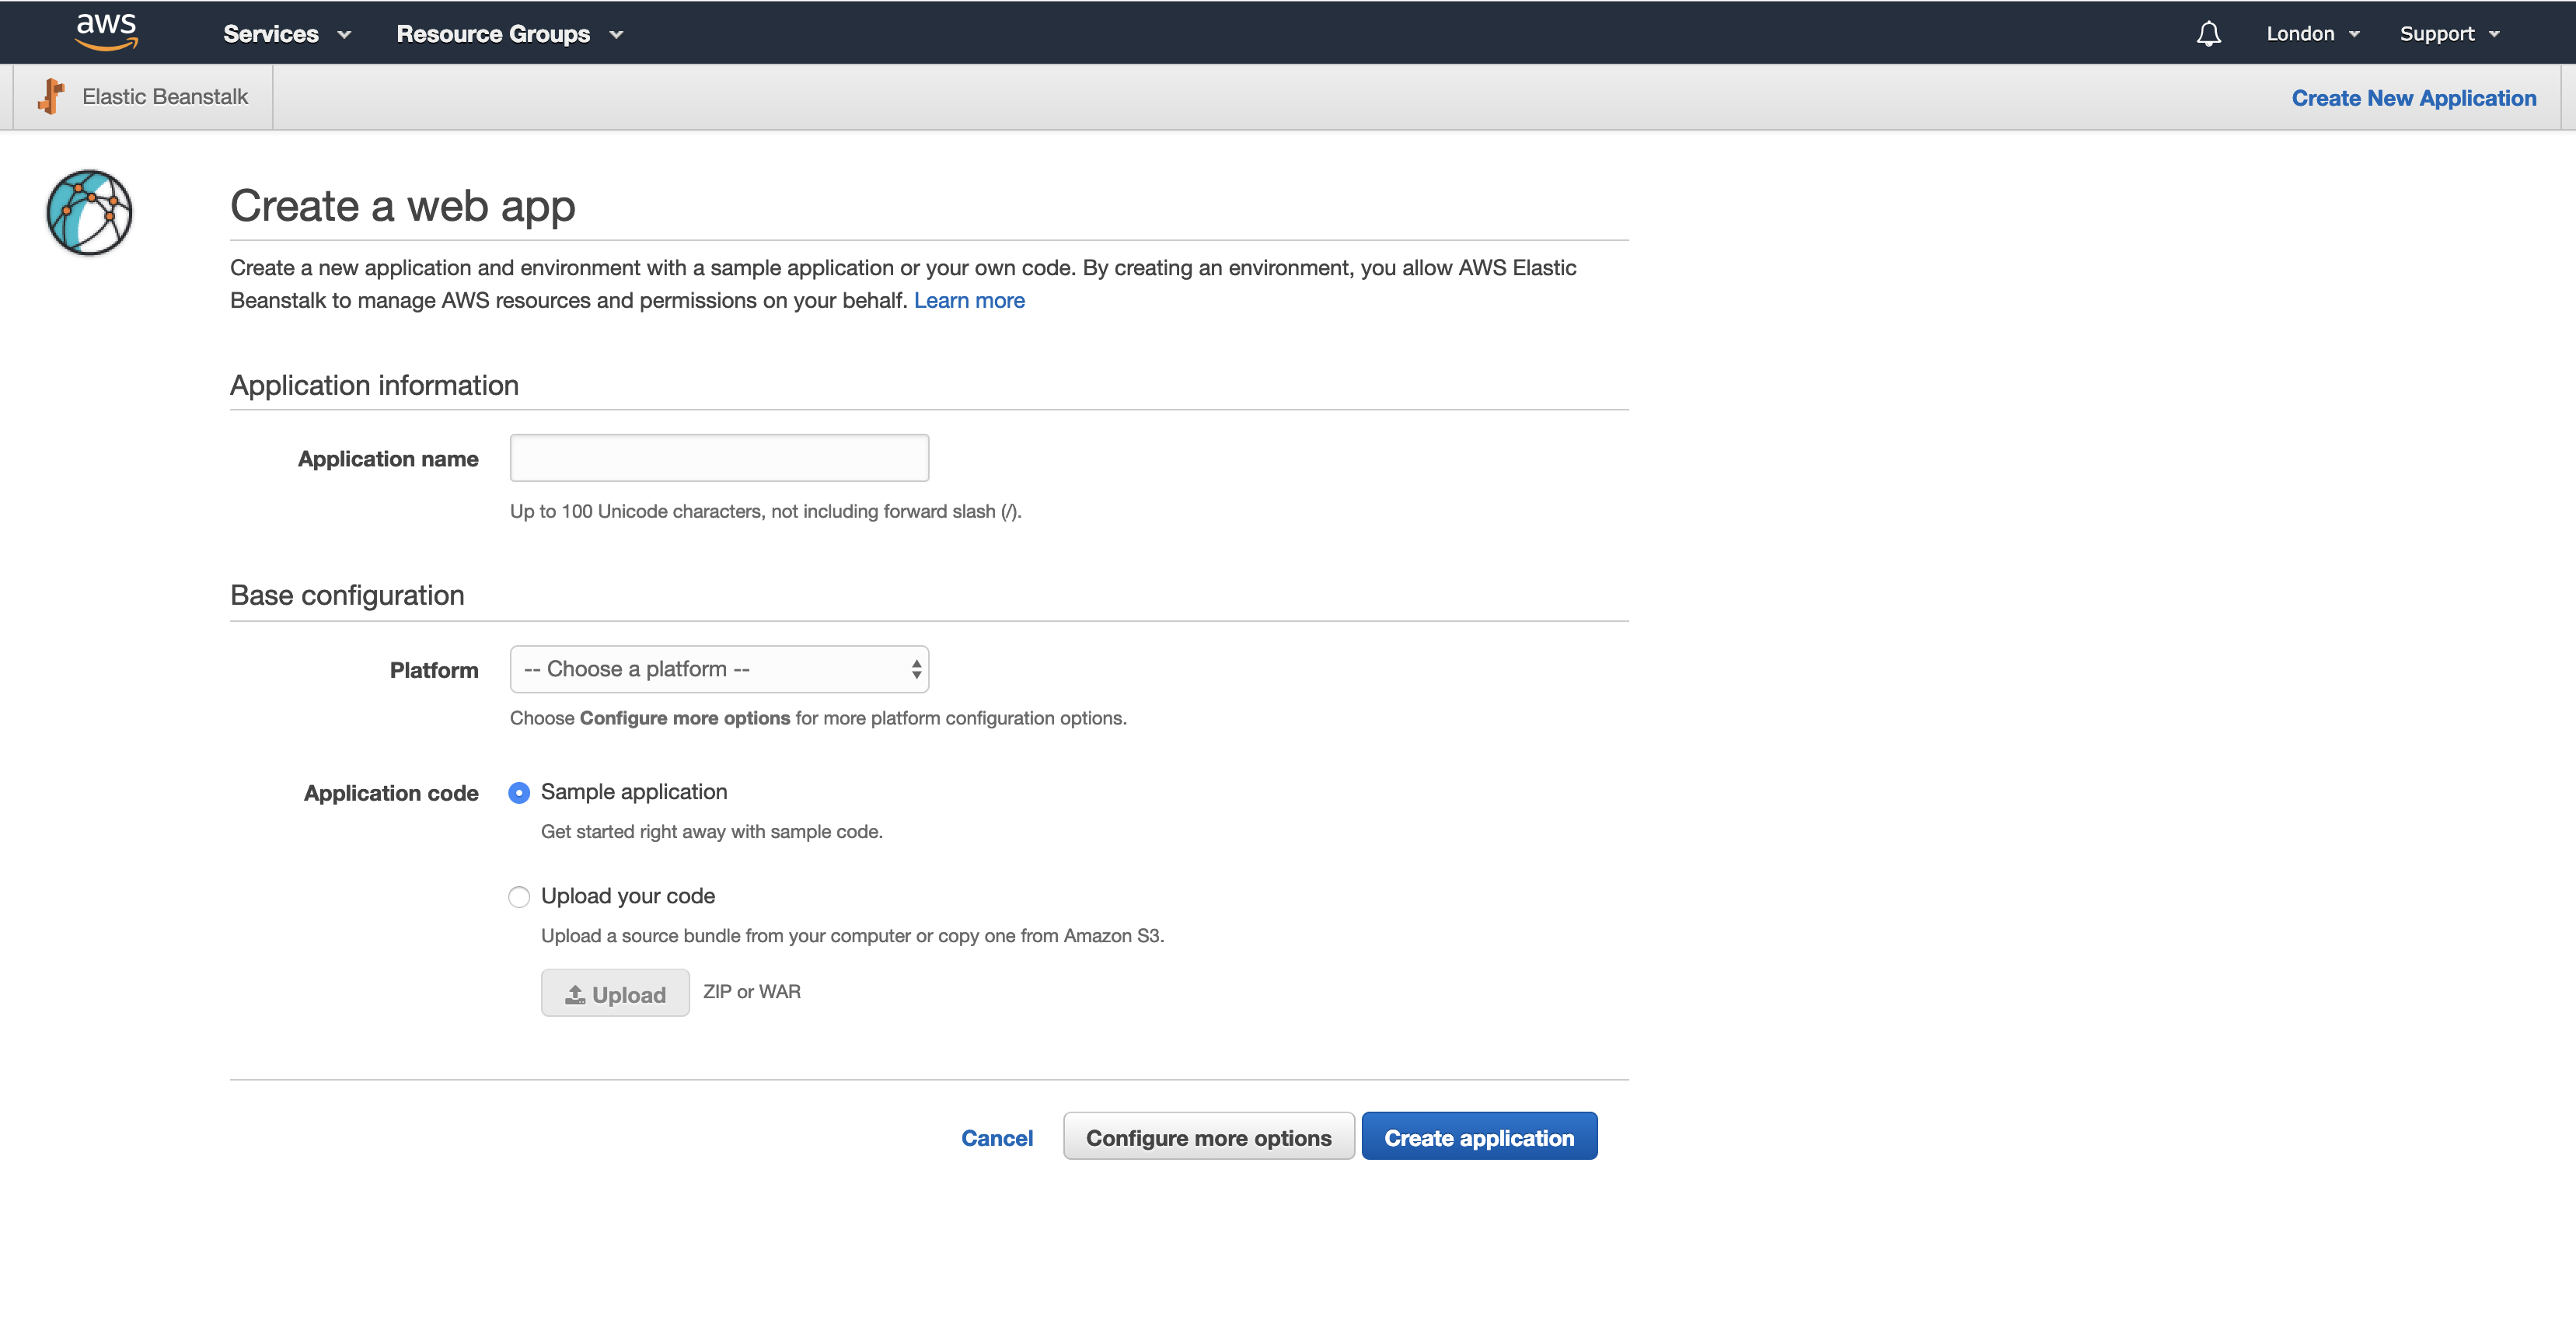
Specify the Application name of your application, Otoroshi for example.
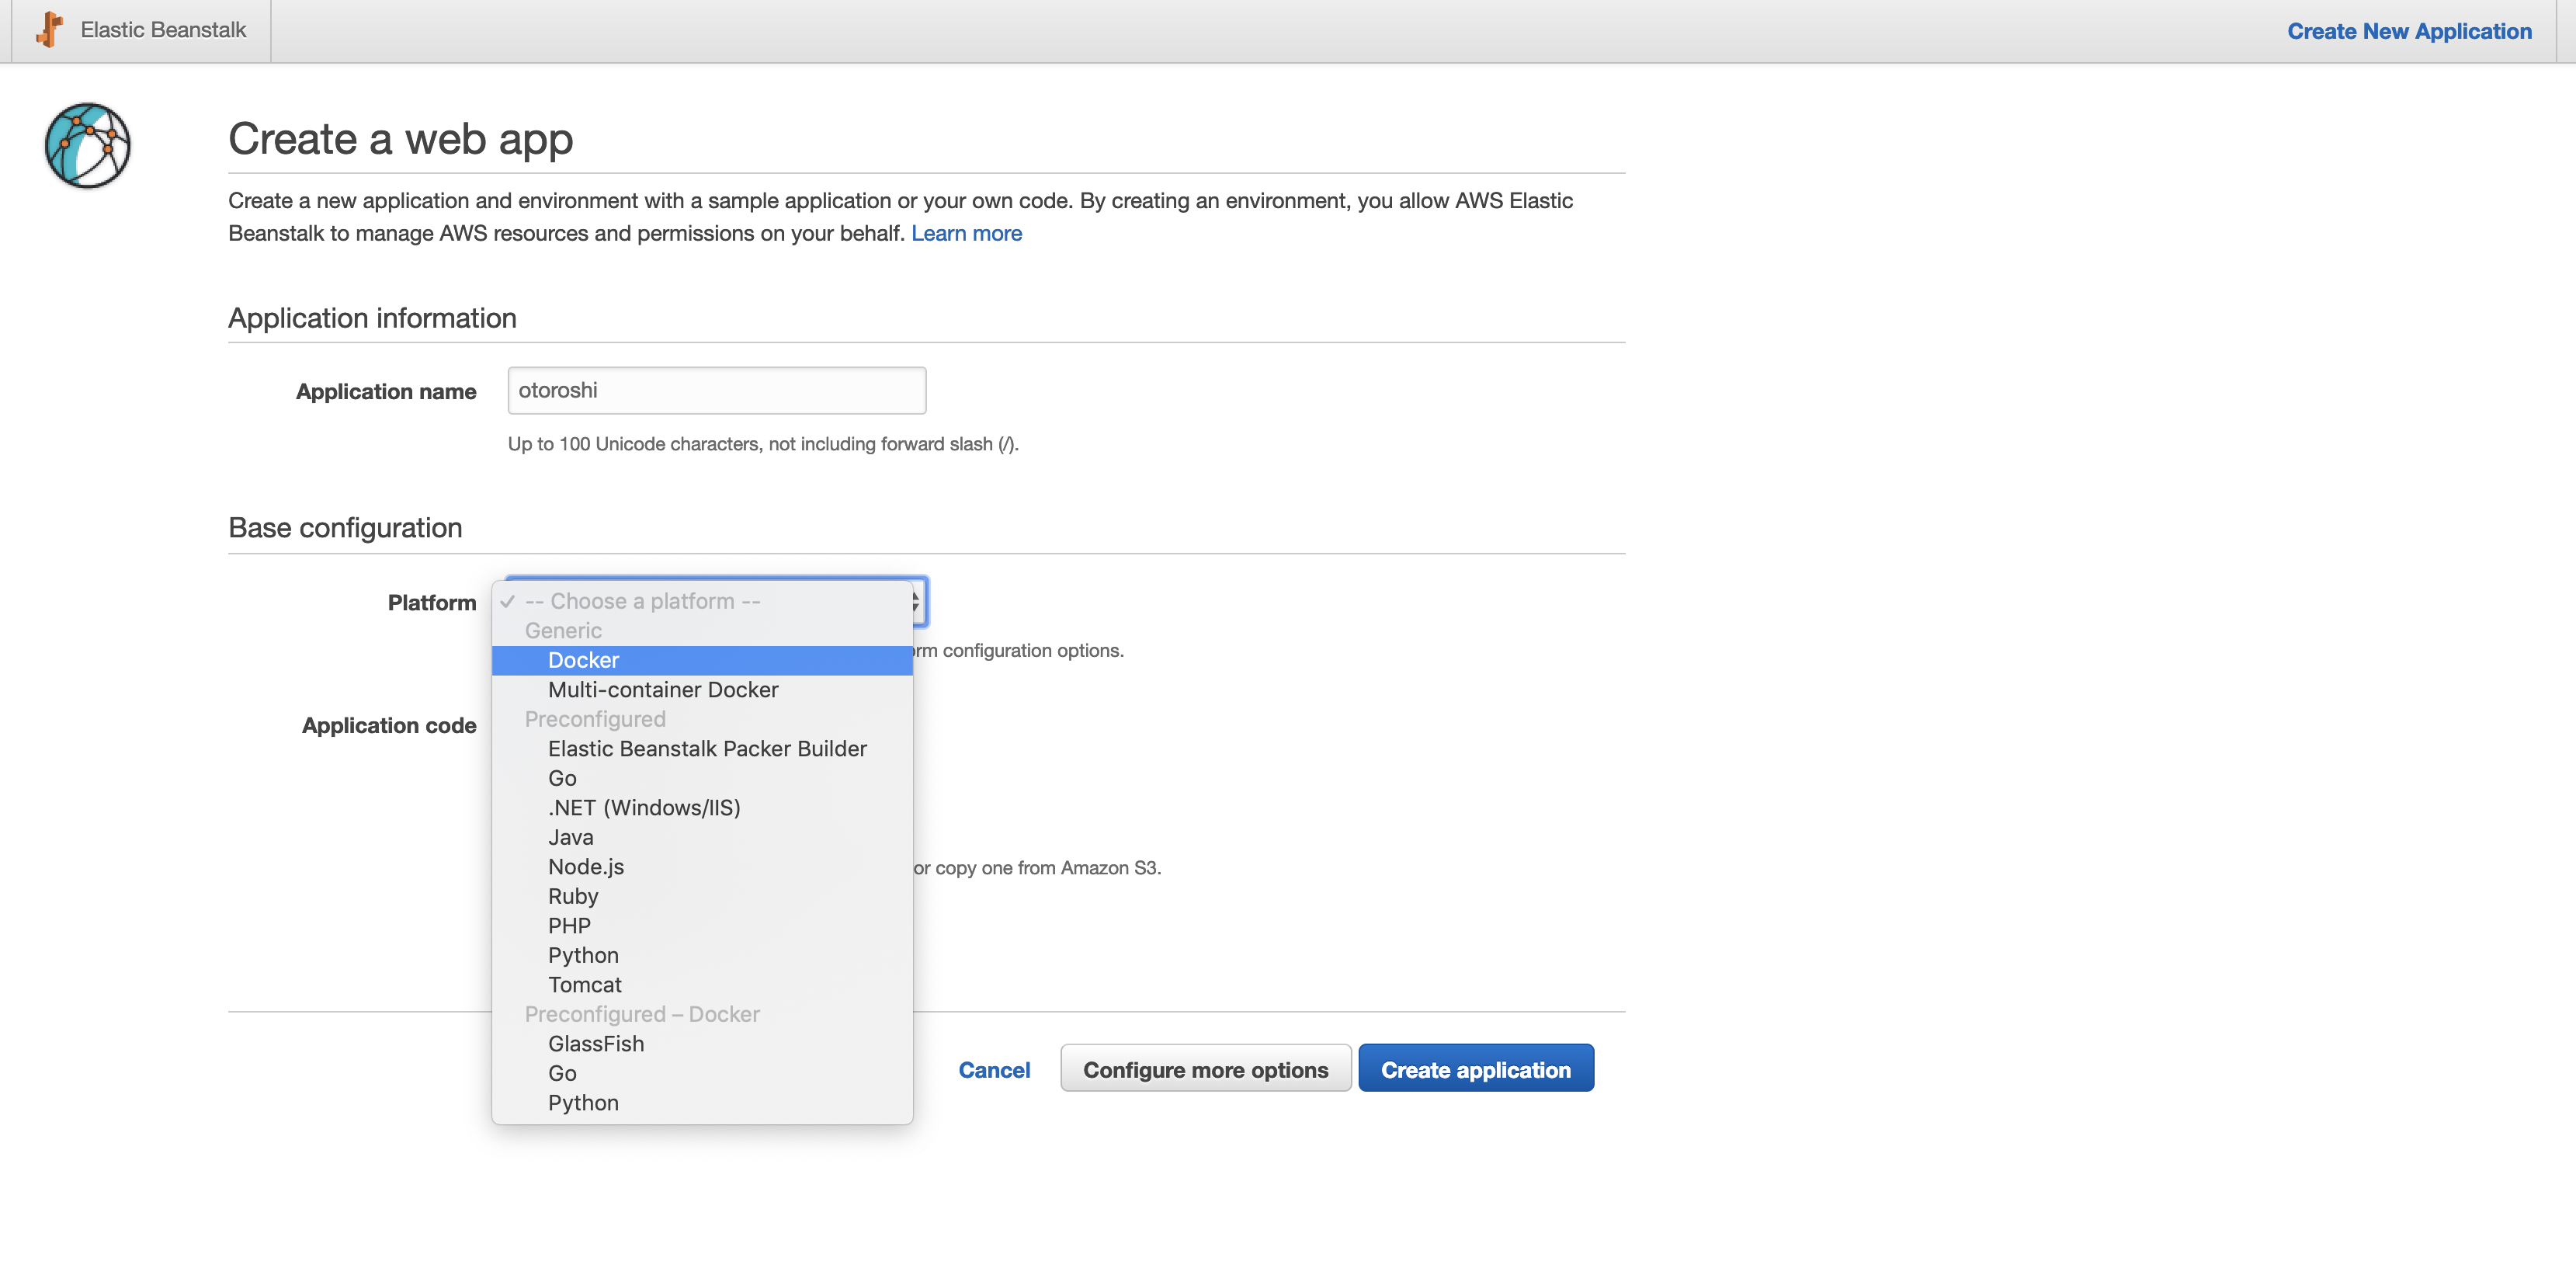
Choose the Platform of the application you want to create, in your case use Docker.
For Application code choose Upload your code then hit Upload.
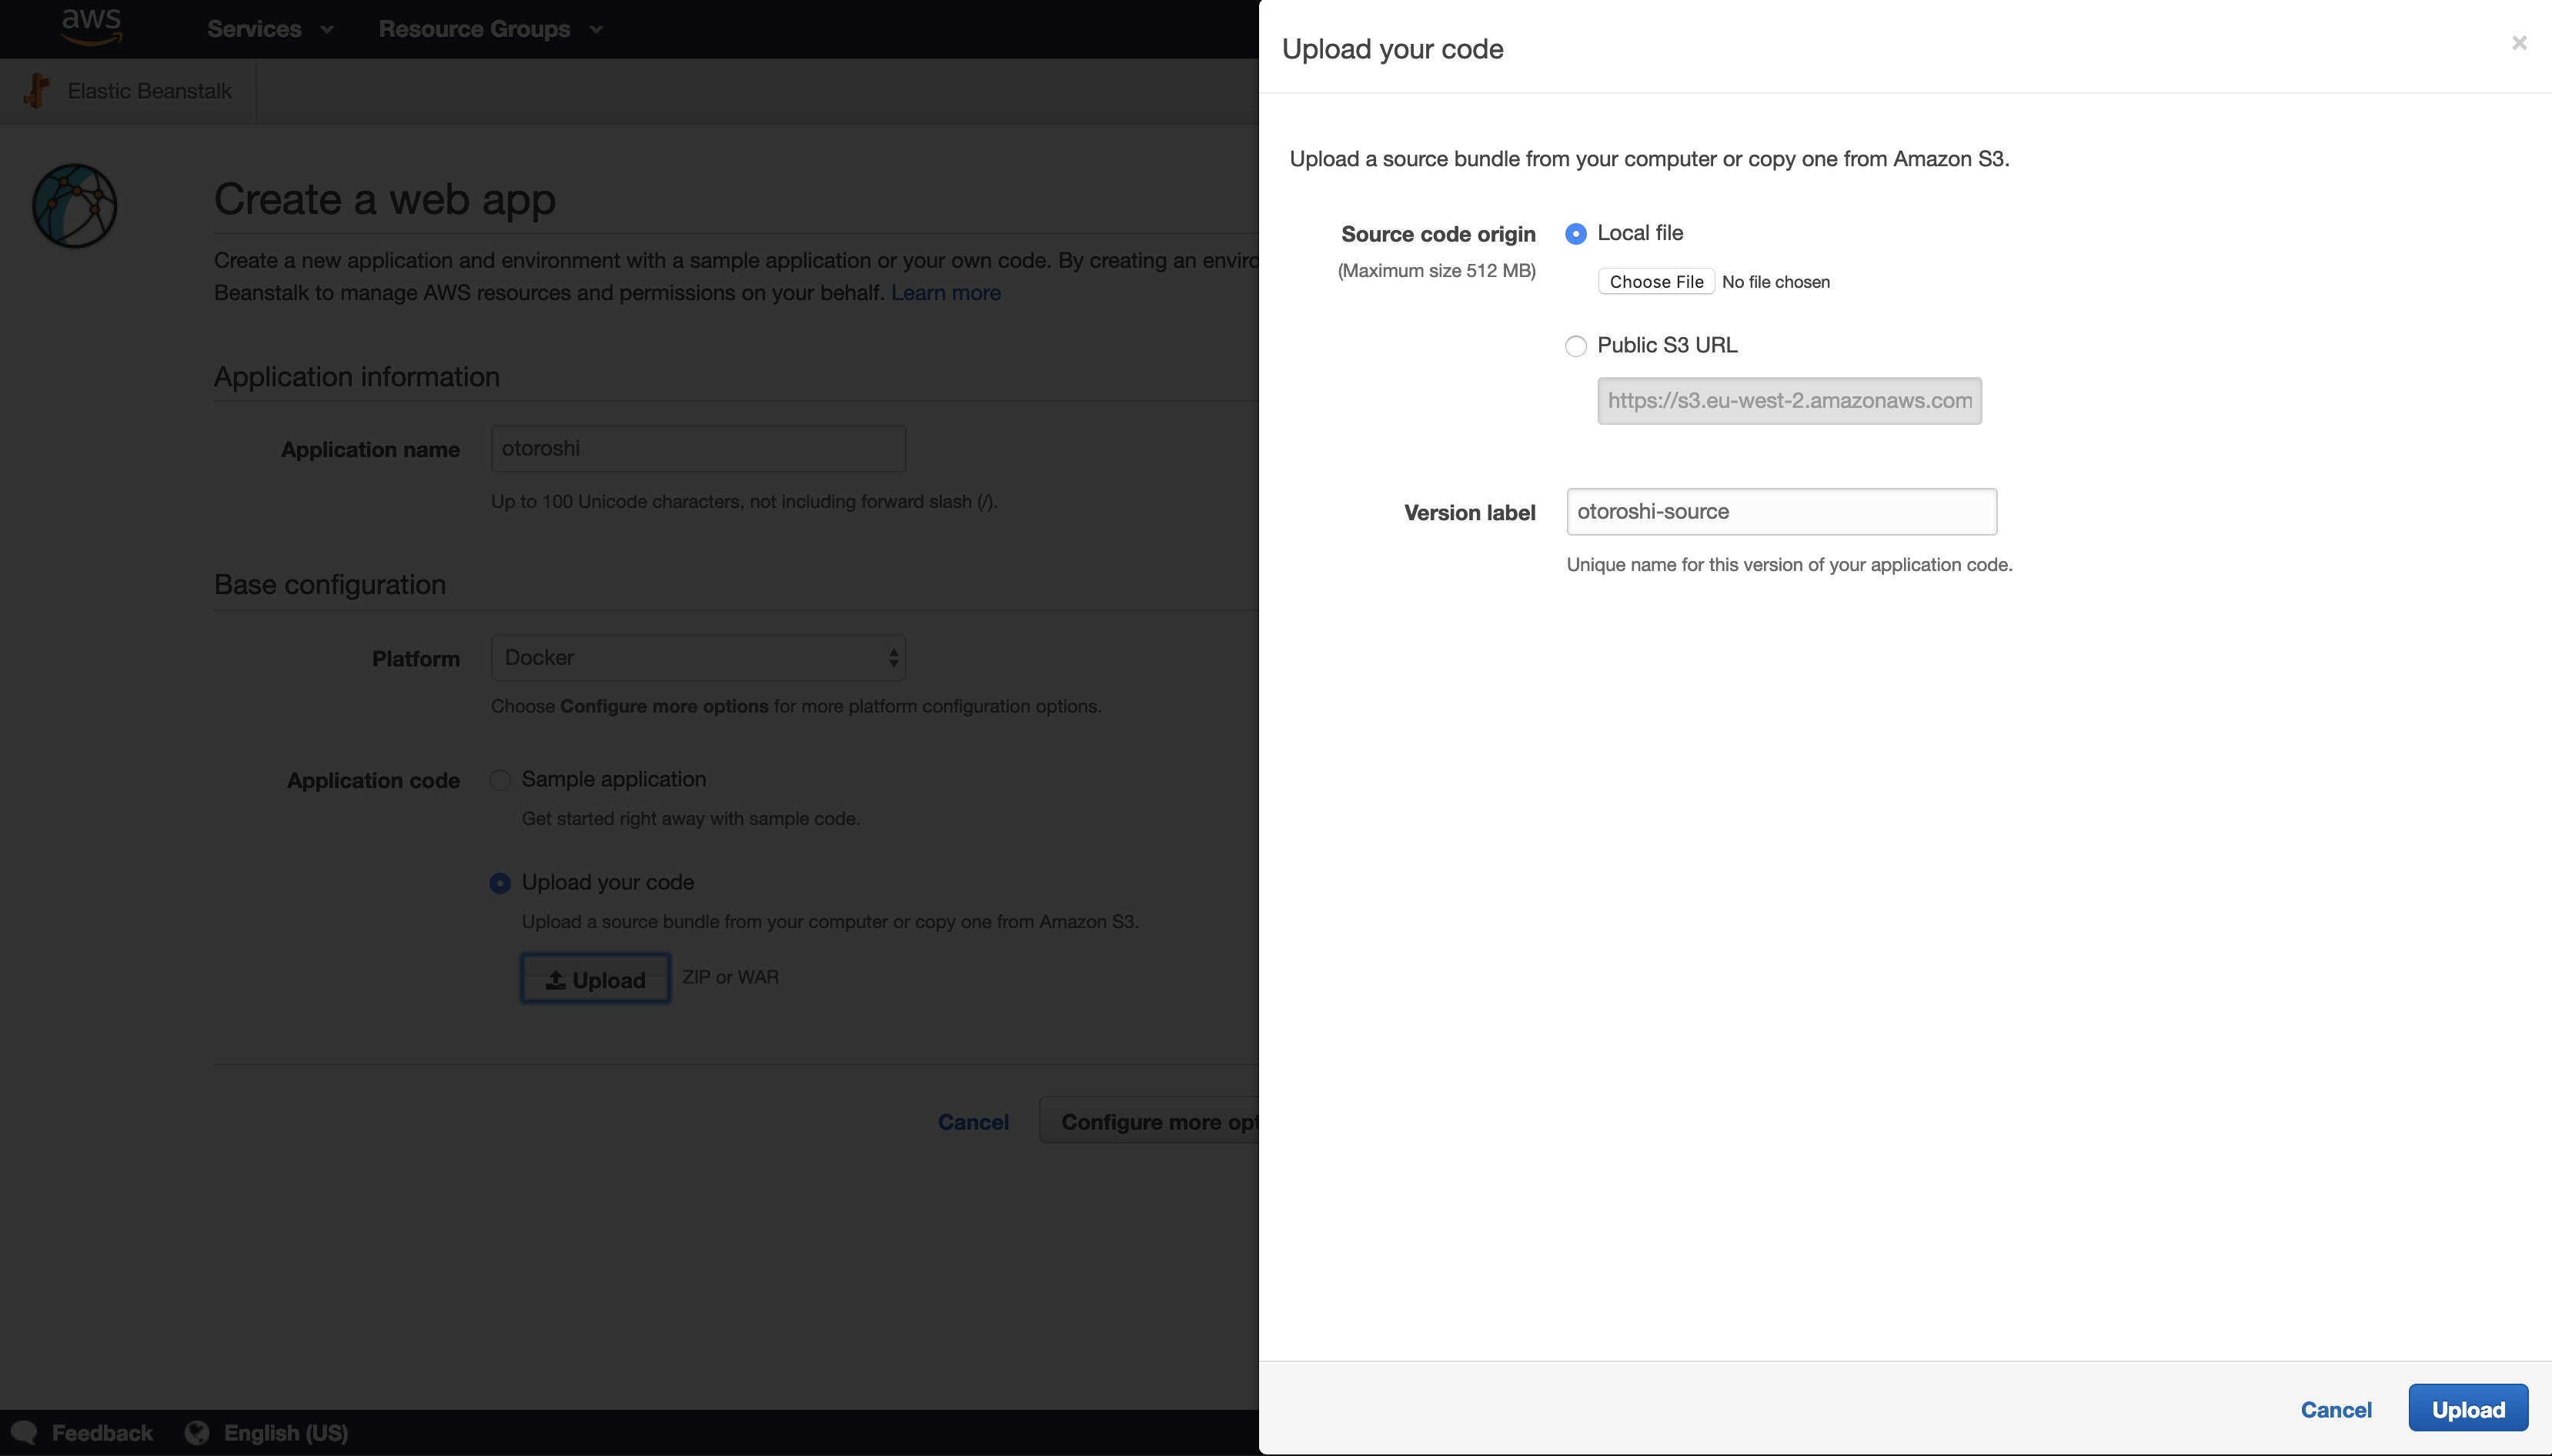
Browse the zip created in the previous section from your machine.
As you can see in the image above, you can also choose an S3 location, you can imagine that at the end of your build pipeline you upload your Zip to S3, and then get it from there (I wouldn’t recommend that though).
When the upload is done, hit Configure more options.
Right now an AWS Elastic Beanstalk application has been created, and by default an environment named Otoroshi-env is being created as well.
AWS Elastic Beanstalk can manage multiple environments of the same application, for instance environments can be (prod, preprod, expriments…).
Otoroshi is a bit particular, it doesn’t make much sense to have multiple environments, since Otoroshi will handle all the requests from/to backend services regardless of the environment.
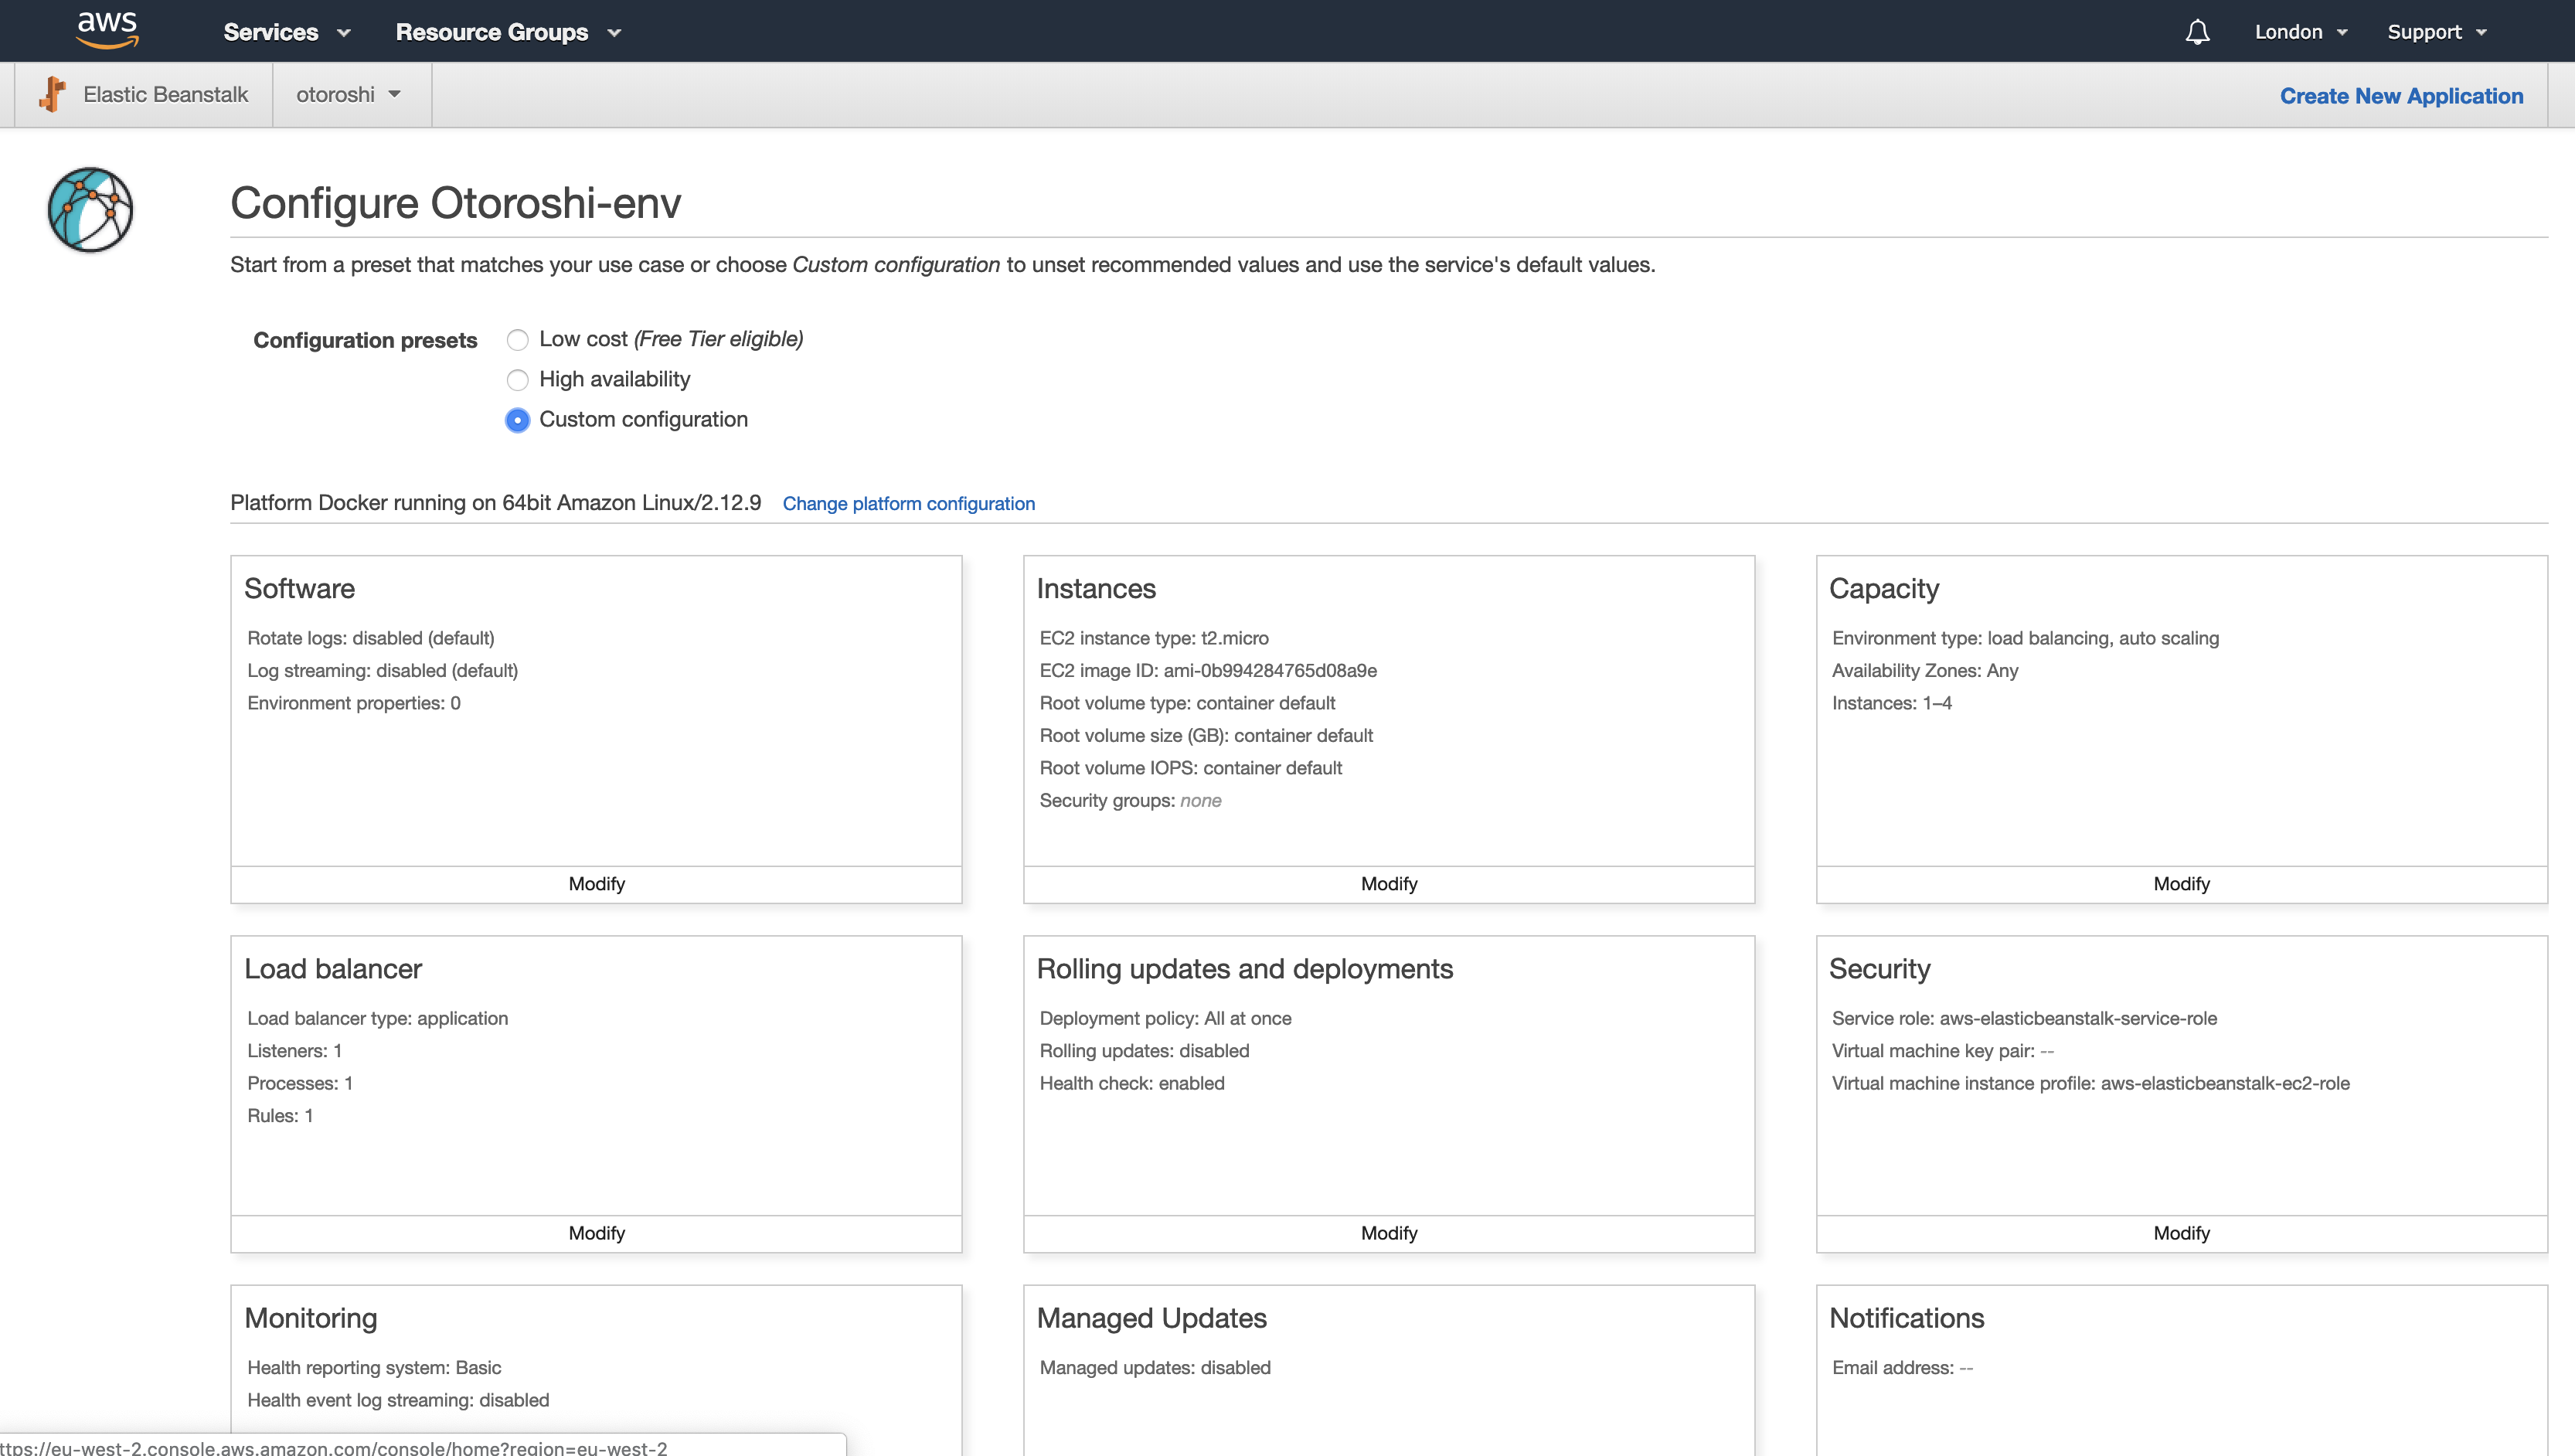
As you see in the image above, we are now configuring the Otoroshi-env, the one and only environment of Otoroshi.
For Configuration presets, choose custom configuration, now you have a load balancer for your environment with the capacity of at least one instance and at most four. I’d recommend at least 2 instances, to change that, on the Capacity card hit Modify.
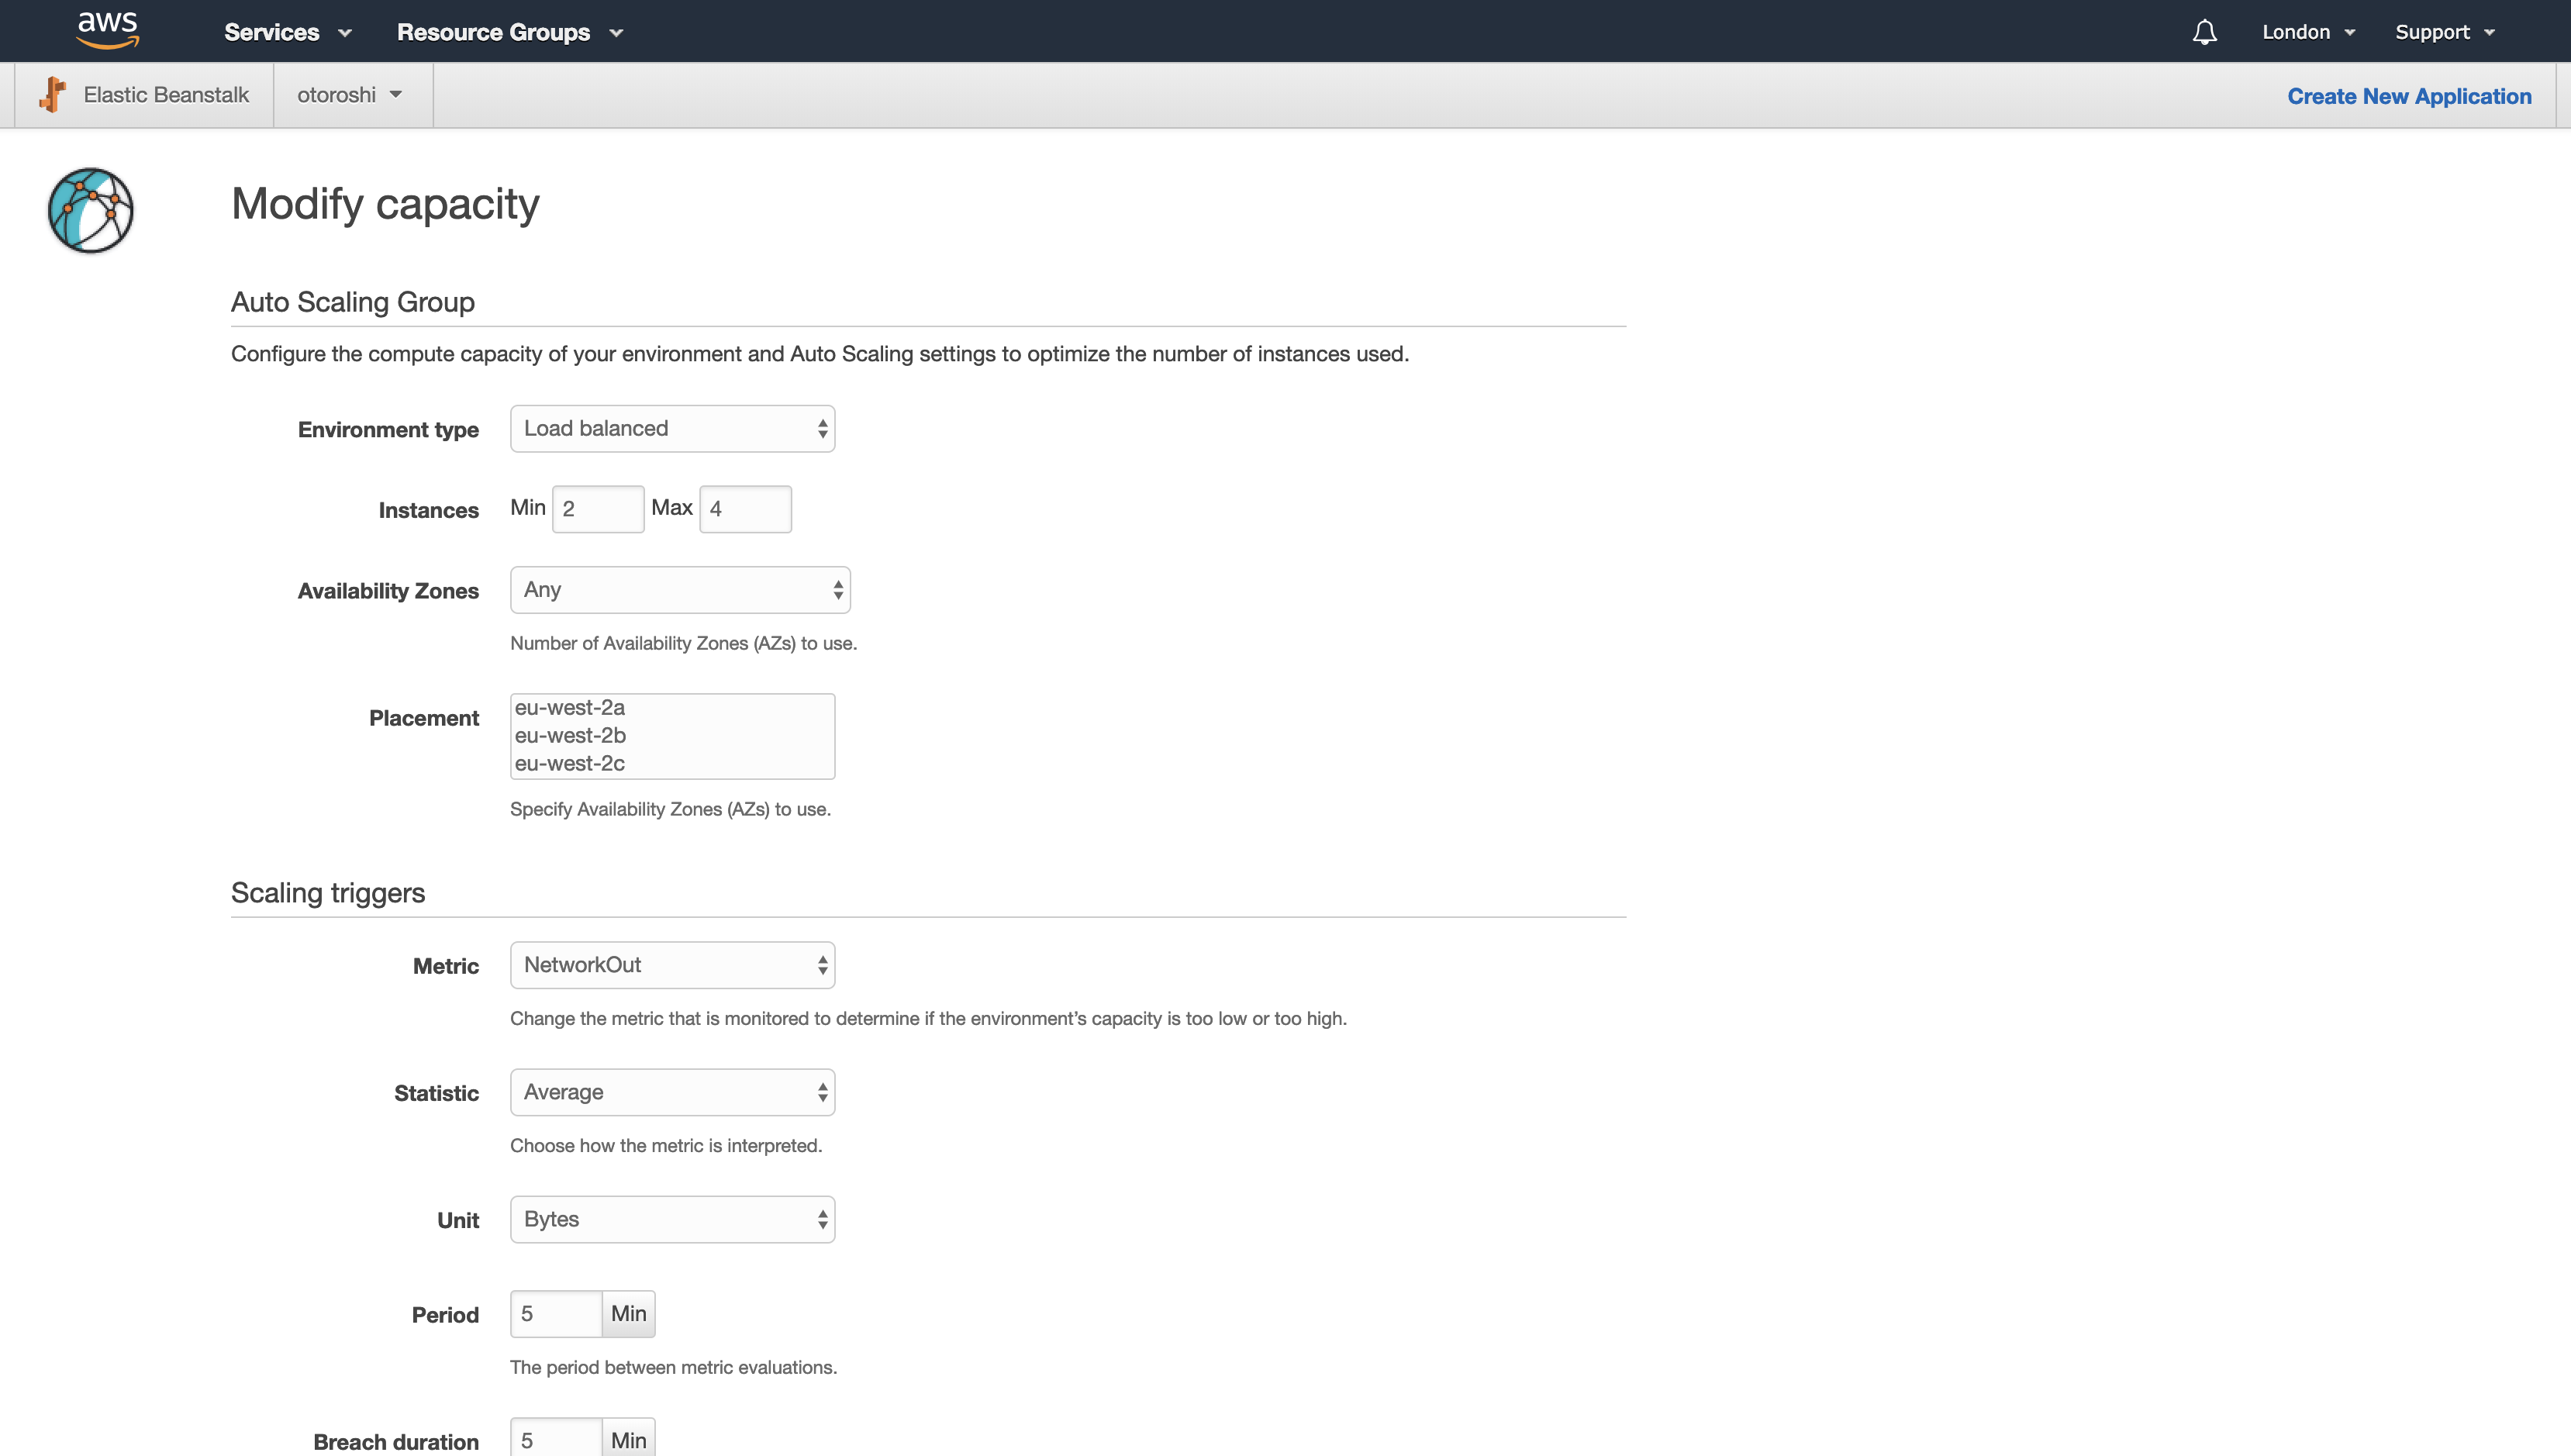
Change the Instances to min 2, max 4 then hit Save. For the Scaling triggers, I’d keep the default values, but know that you can edit the capacity config any time you want, it only costs a redeploy, which will be done automatically by the way.
Instances size is by default t2.micro, which is a bit small for running Otoroshi, I’d recommend a t2.medium.
On the Instances card hit Modify.
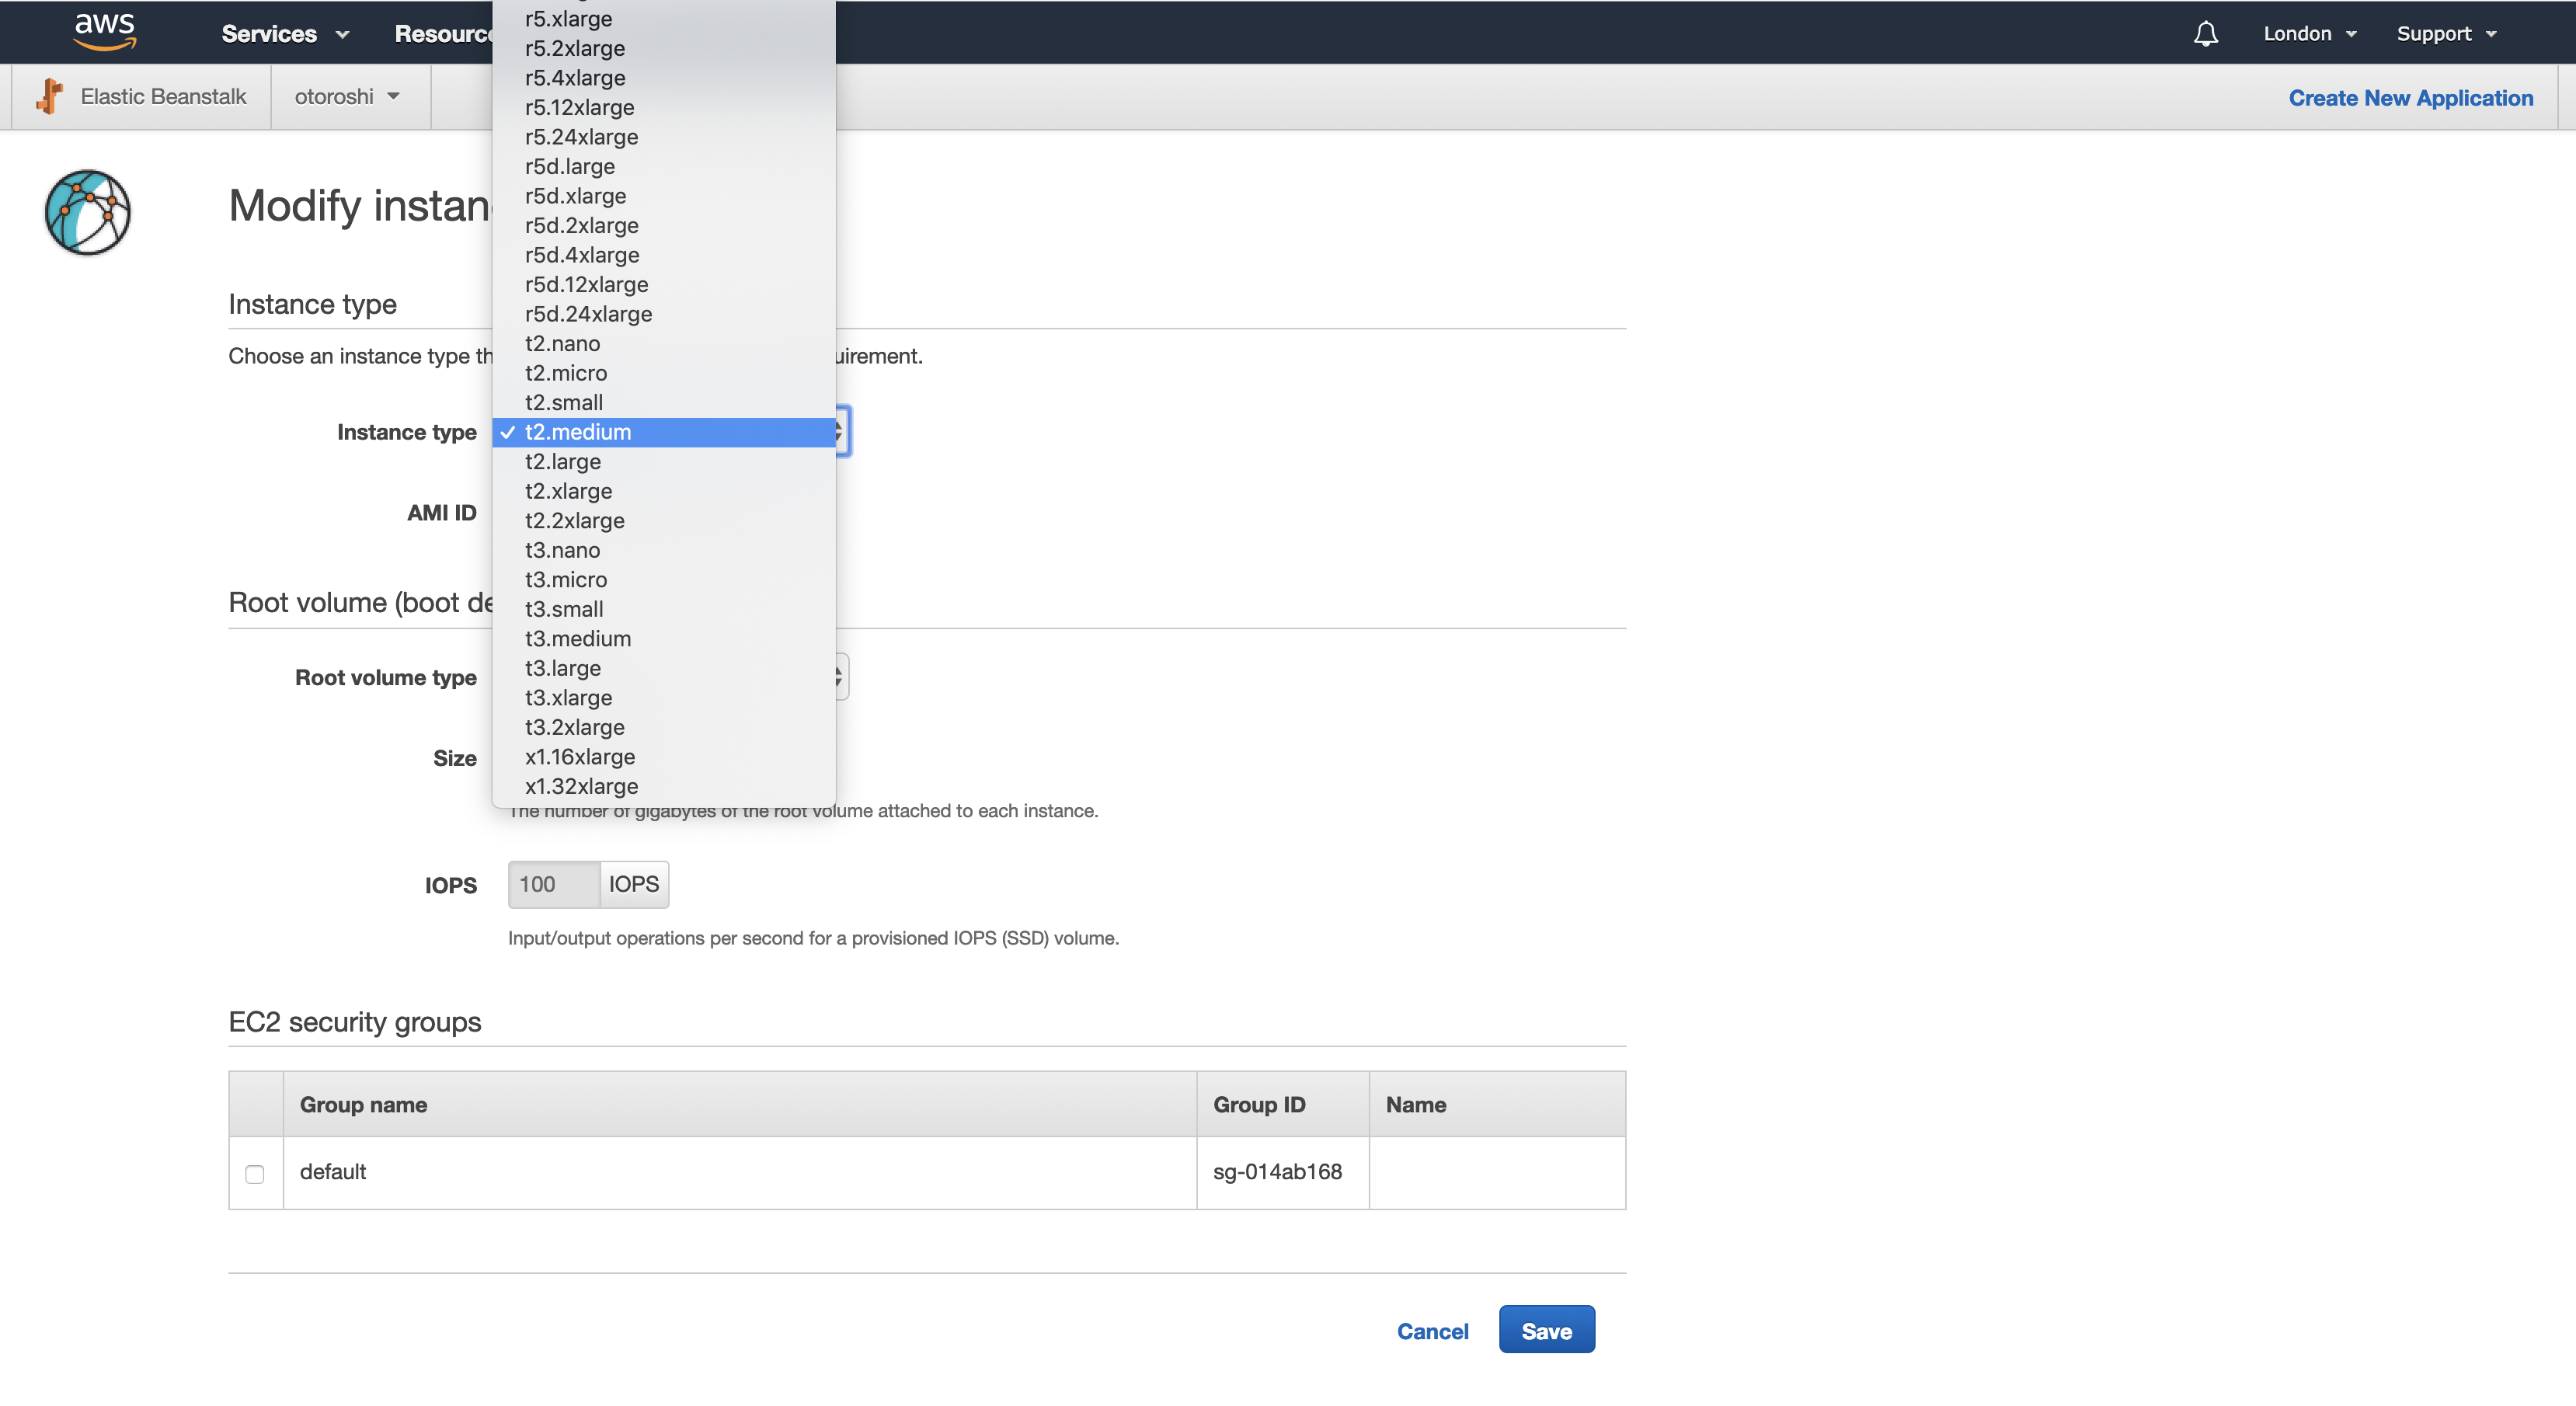
For Instance type choose t2.medium, then hit Save, no need to change the volume size, unless you have a lot of http call faults, which means a lot more logs, in that case the default volume size may not be enough.
The default environment created for Otoroshi, for instance Otoroshi-env, is a web server environment which fits in your case, but the thing is that on AWS Elastic Beanstalk by default a web server environment for a docker-based application, runs behind an Nginx proxy. We have to remove that proxy. So on the Software card hit Modify.
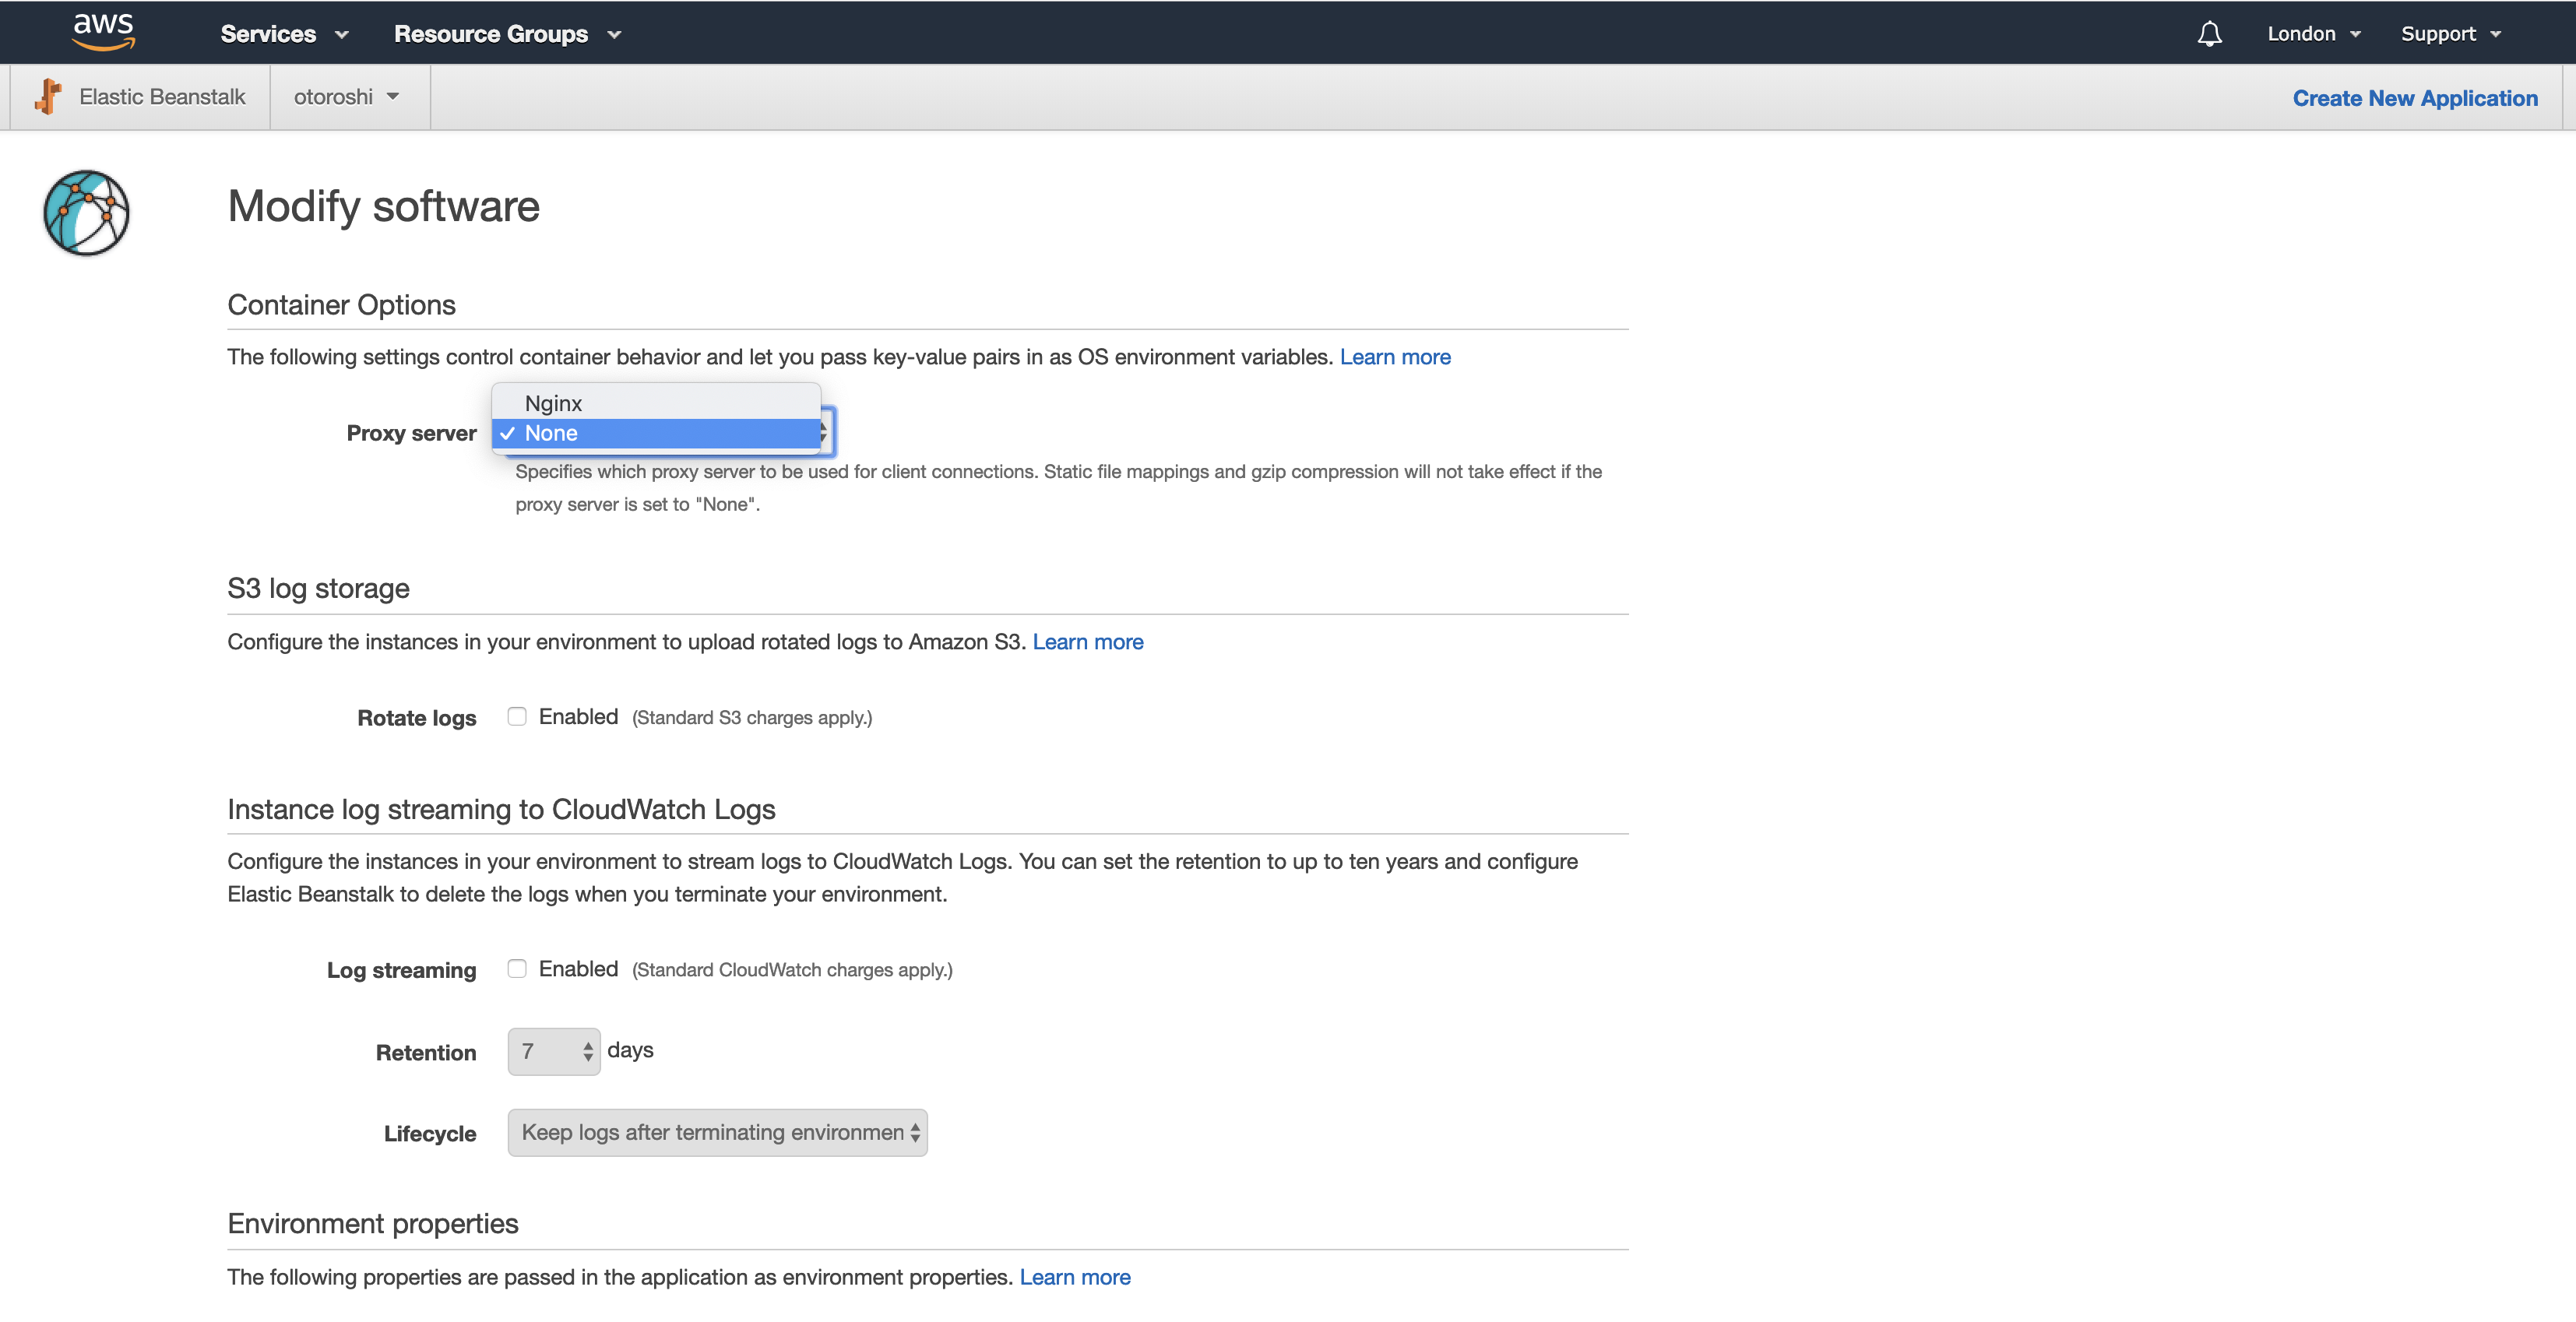
For Proxy server choose None then hit Save.
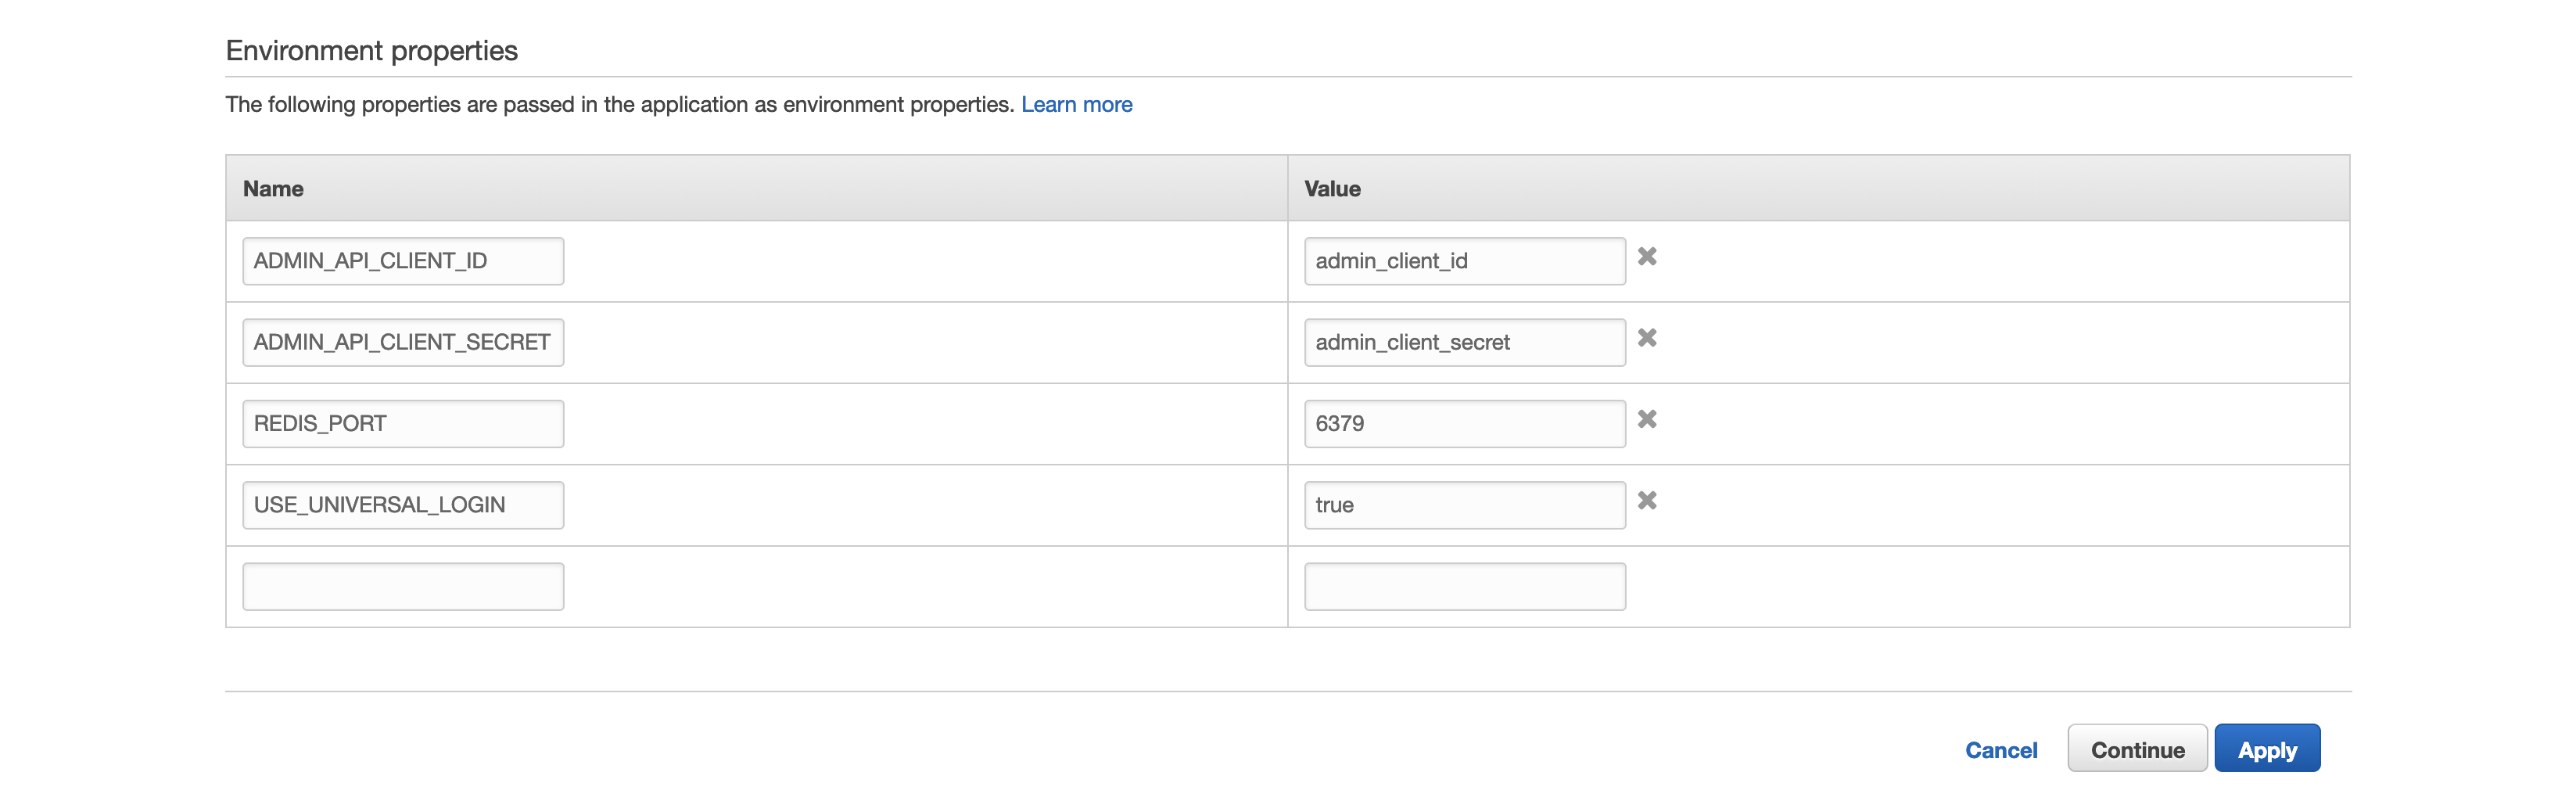
Also note that you can set Envs for Otoroshi in same page (see image below).
To finalise the creation process, hit Create app on the bottom right.
The Otoroshi app is now created, and it’s running which is cool, but we still don’t have neither a datastore nor https.
Create an Otoroshi datastore on AWS ElastiCache
By default Otoroshi uses non persistent memory to store it’s data, Otoroshi supports many kinds of datastores. In this section we will be covering Redis datastore.
Before starting, using a datastore hosted by AWS is not at all mandatory, feel free to use your own if you like, but if you want to learn more about ElastiCache, this section may interest you, otherwise you can skip it.
Go to AWS ElastiCache and hit Get Started Now.
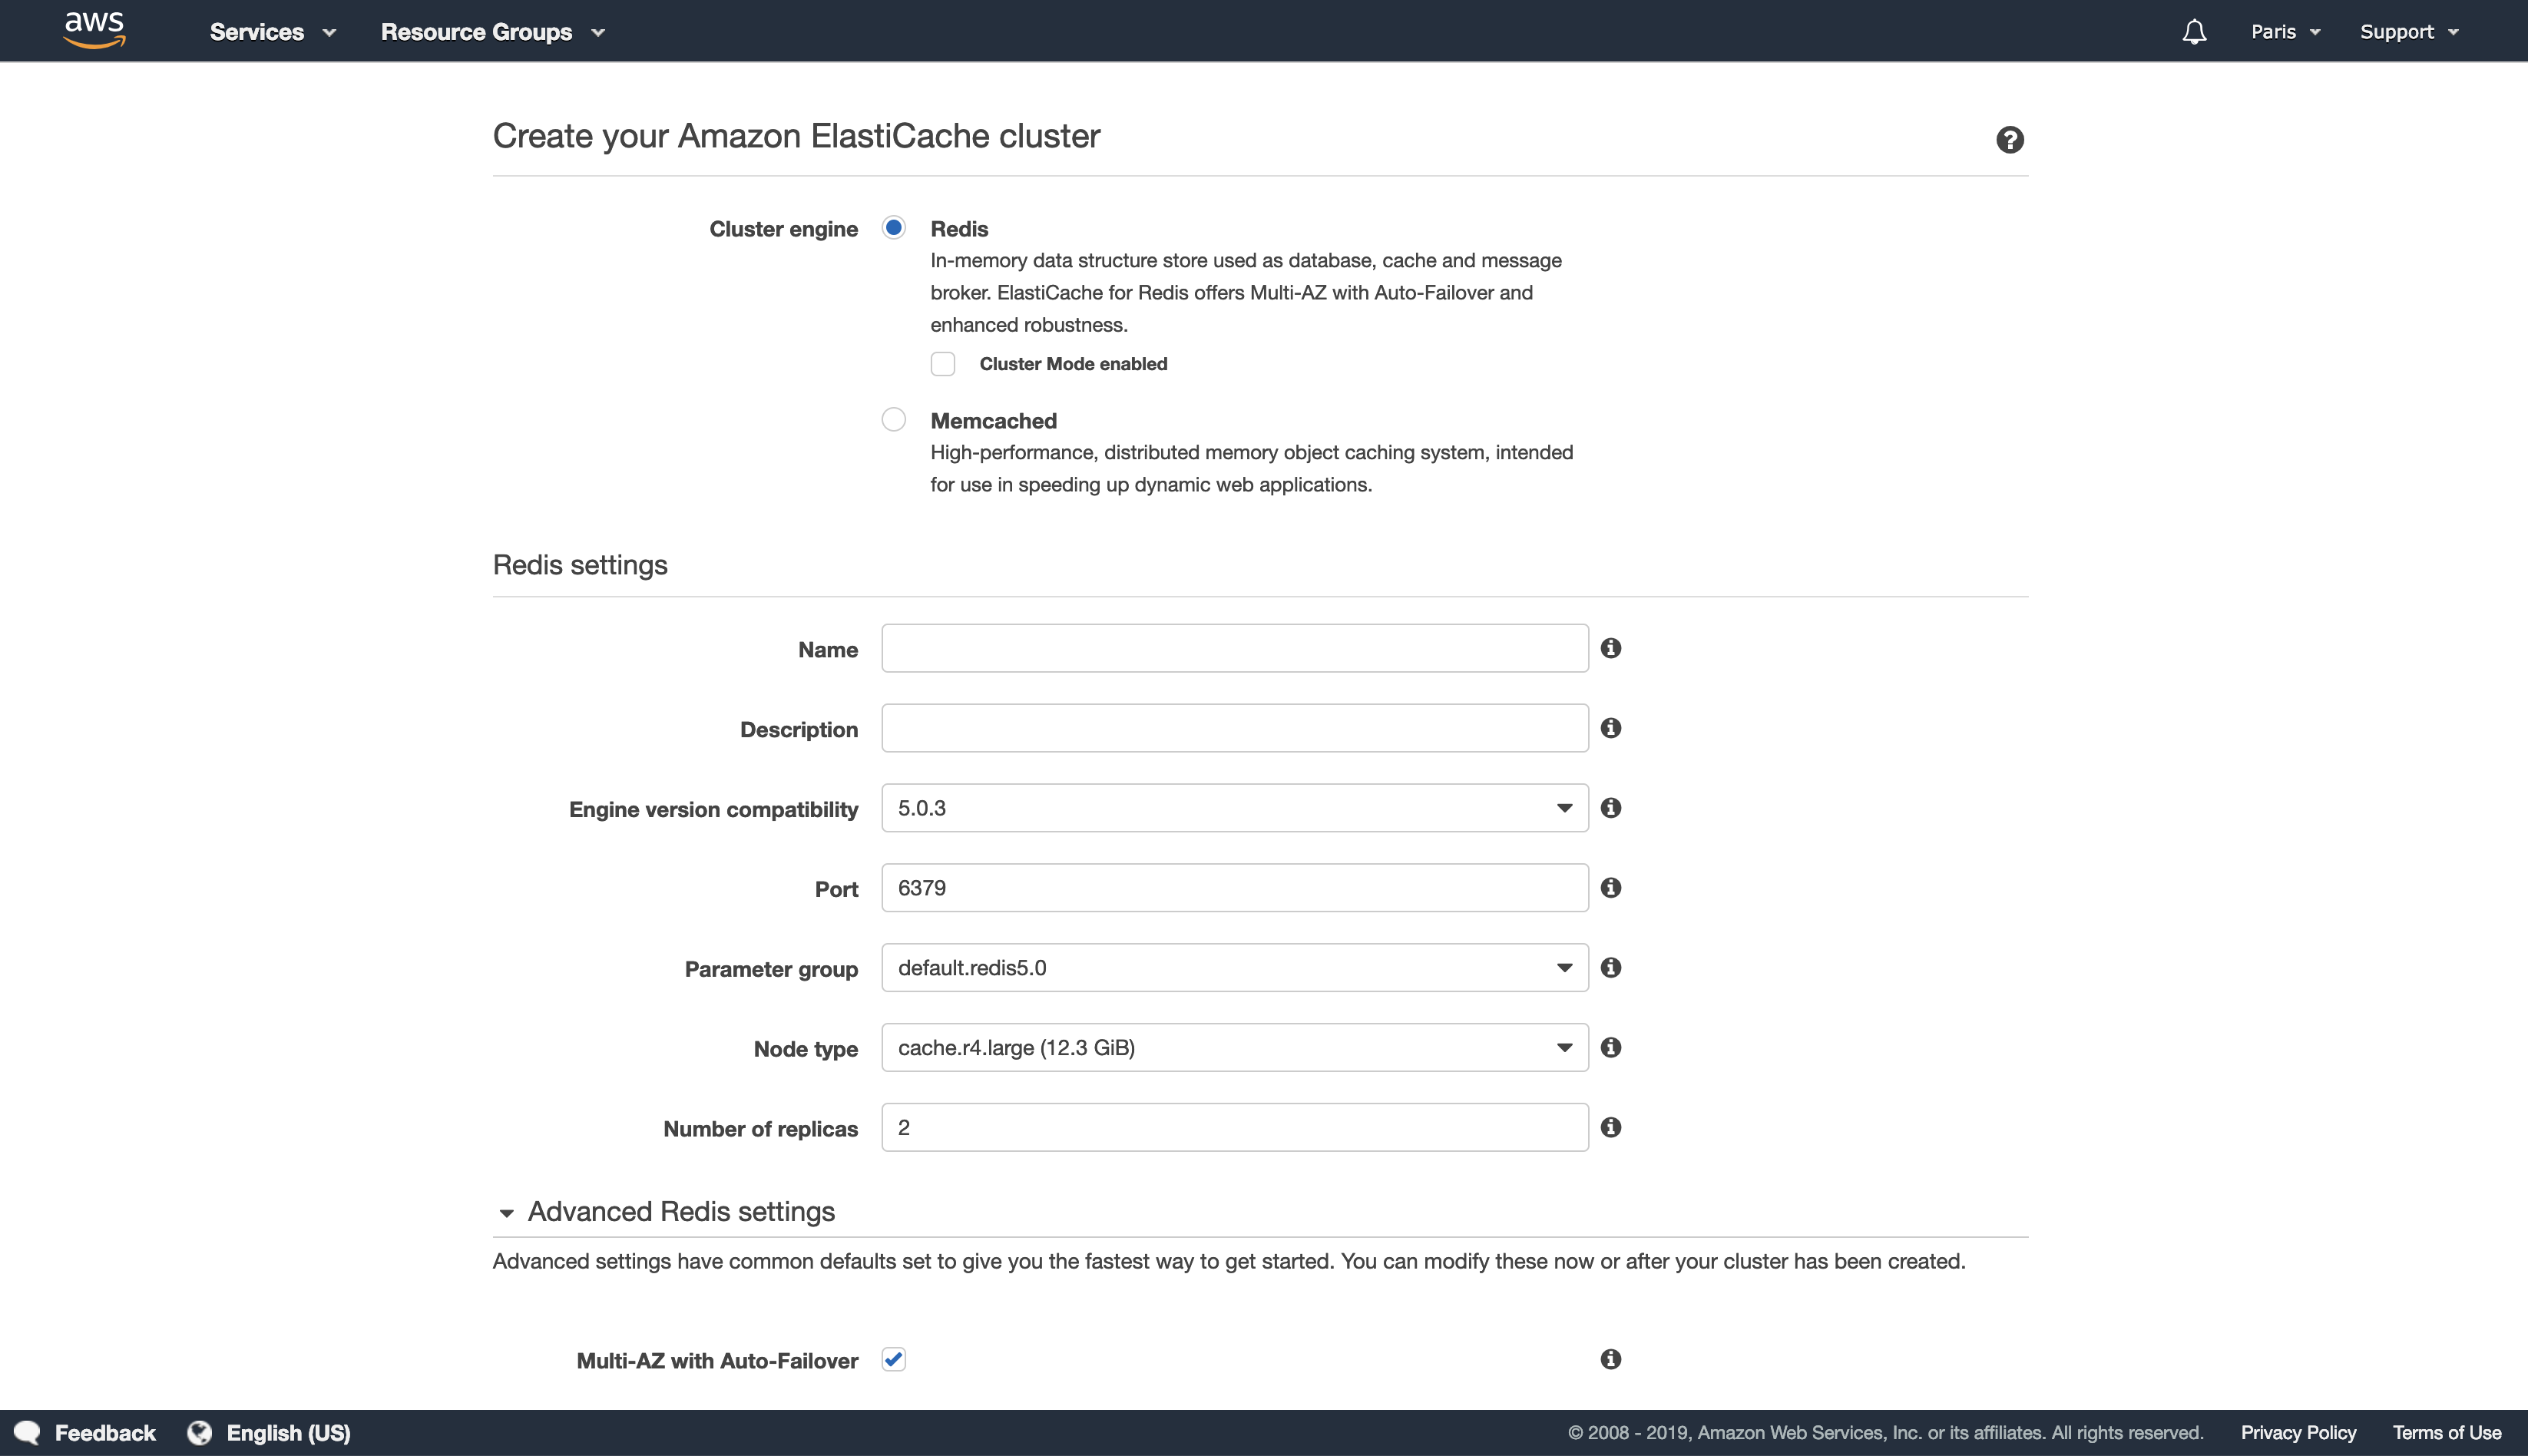
For Cluster engine keep Redis.
Choose a Name for your datastore, for instance otoroshi-datastore.
You can keep all the other default values and hit Create on the bottom right of the page.
Once your Redis Cluster is created, it would look like the image below.
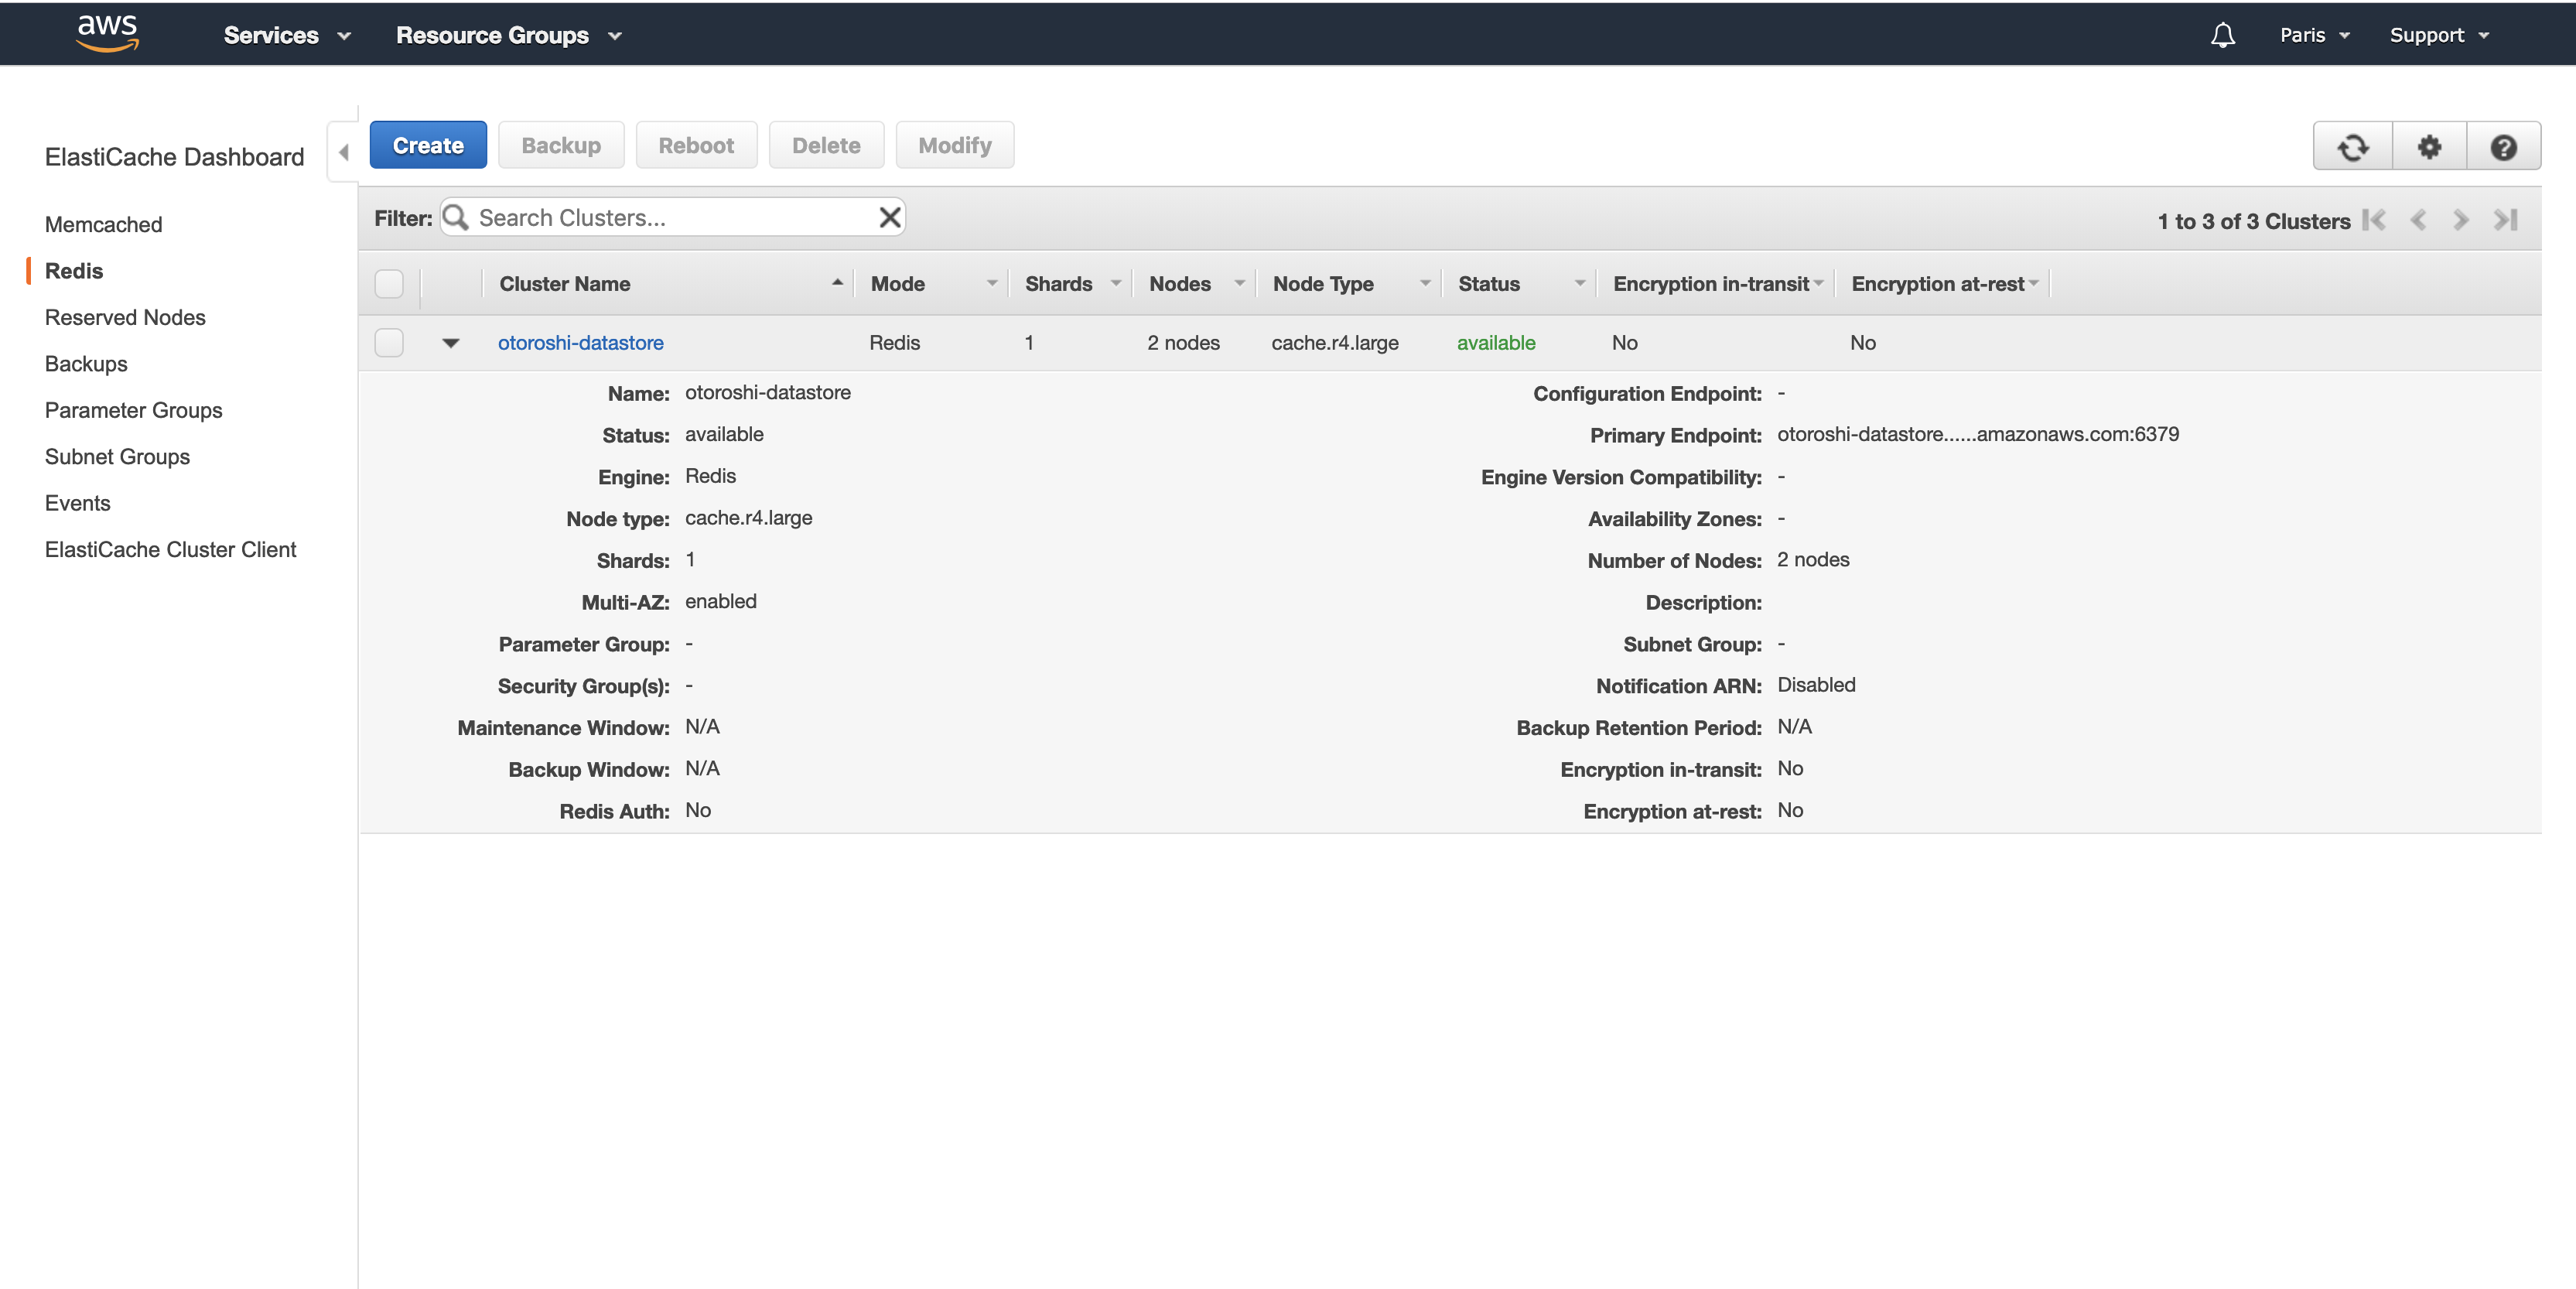
For applications in the same security group as your cluster, redis cluster is accessible via the Primary Endpoint. Don’t worry the default security group is fine, you don’t need any configuration to access the cluster from Otoroshi.
To make Otoroshi use the created cluster, you can either use Envs APP_STORAGE=redis, REDIS_HOST and REDIS_PORT, or set otoroshi.storage=redis, otoroshi.redis.host and otoroshi.redis.port in your otoroshi.conf.
Create SSL certificate and configure your domain
Otoroshi has now a datastore, but not yet ready for use.
In order to get it ready you need to :
- Configure Otoroshi with your domain
- Create a wildcard SSL certificate for your domain
- Configure Otoroshi AWS Elastic Beanstalk instance with the SSL certificate
- Configure your DNS to redirect all traffic on your domain to Otoroshi
Configure Otoroshi with your domain
You can use ENVs or you can use a custom otoroshi.conf in your Docker container.
For the second option your otoroshi.conf would look like this :
   include "application.conf"
   http.port = 8080
   otoroshi {
     env = "prod"
     domain = "mysubdomain.oto.tools"
     rootScheme = "https"
     snowflake {
       seed = 0
     }
     events {
       maxSize = 1000
     }
     backoffice {
       subdomain = "otoroshi"
       session {
         exp = 86400000
       }
     }

     storage = "redis"
     redis {
        host="myredishost"
        port=myredisport
     }

     privateapps {
       subdomain = "privateapps"
     }

     adminapi {
       targetSubdomain = "otoroshi-admin-internal-api"
       exposedSubdomain = "otoroshi-api"
       defaultValues {
         backOfficeGroupId = "admin-api-group"
         backOfficeApiKeyClientId = "admin-client-id"
         backOfficeApiKeyClientSecret = "admin-client-secret"
         backOfficeServiceId = "admin-api-service"
       }
       proxy {
         https = true
         local = false
       }
     }
     claim {
       sharedKey = "myclaimsharedkey"
     }
   }

   play.http {
     session {
       secure = false
       httpOnly = true
       maxAge = 2147483646
       domain = ".mysubdomain.oto.tools"
       cookieName = "oto-sess"
     }
   }
Create a wildcard SSL certificate for your domain
Go to AWS Certificate Manager.
Below Provision certificates hit Get started.
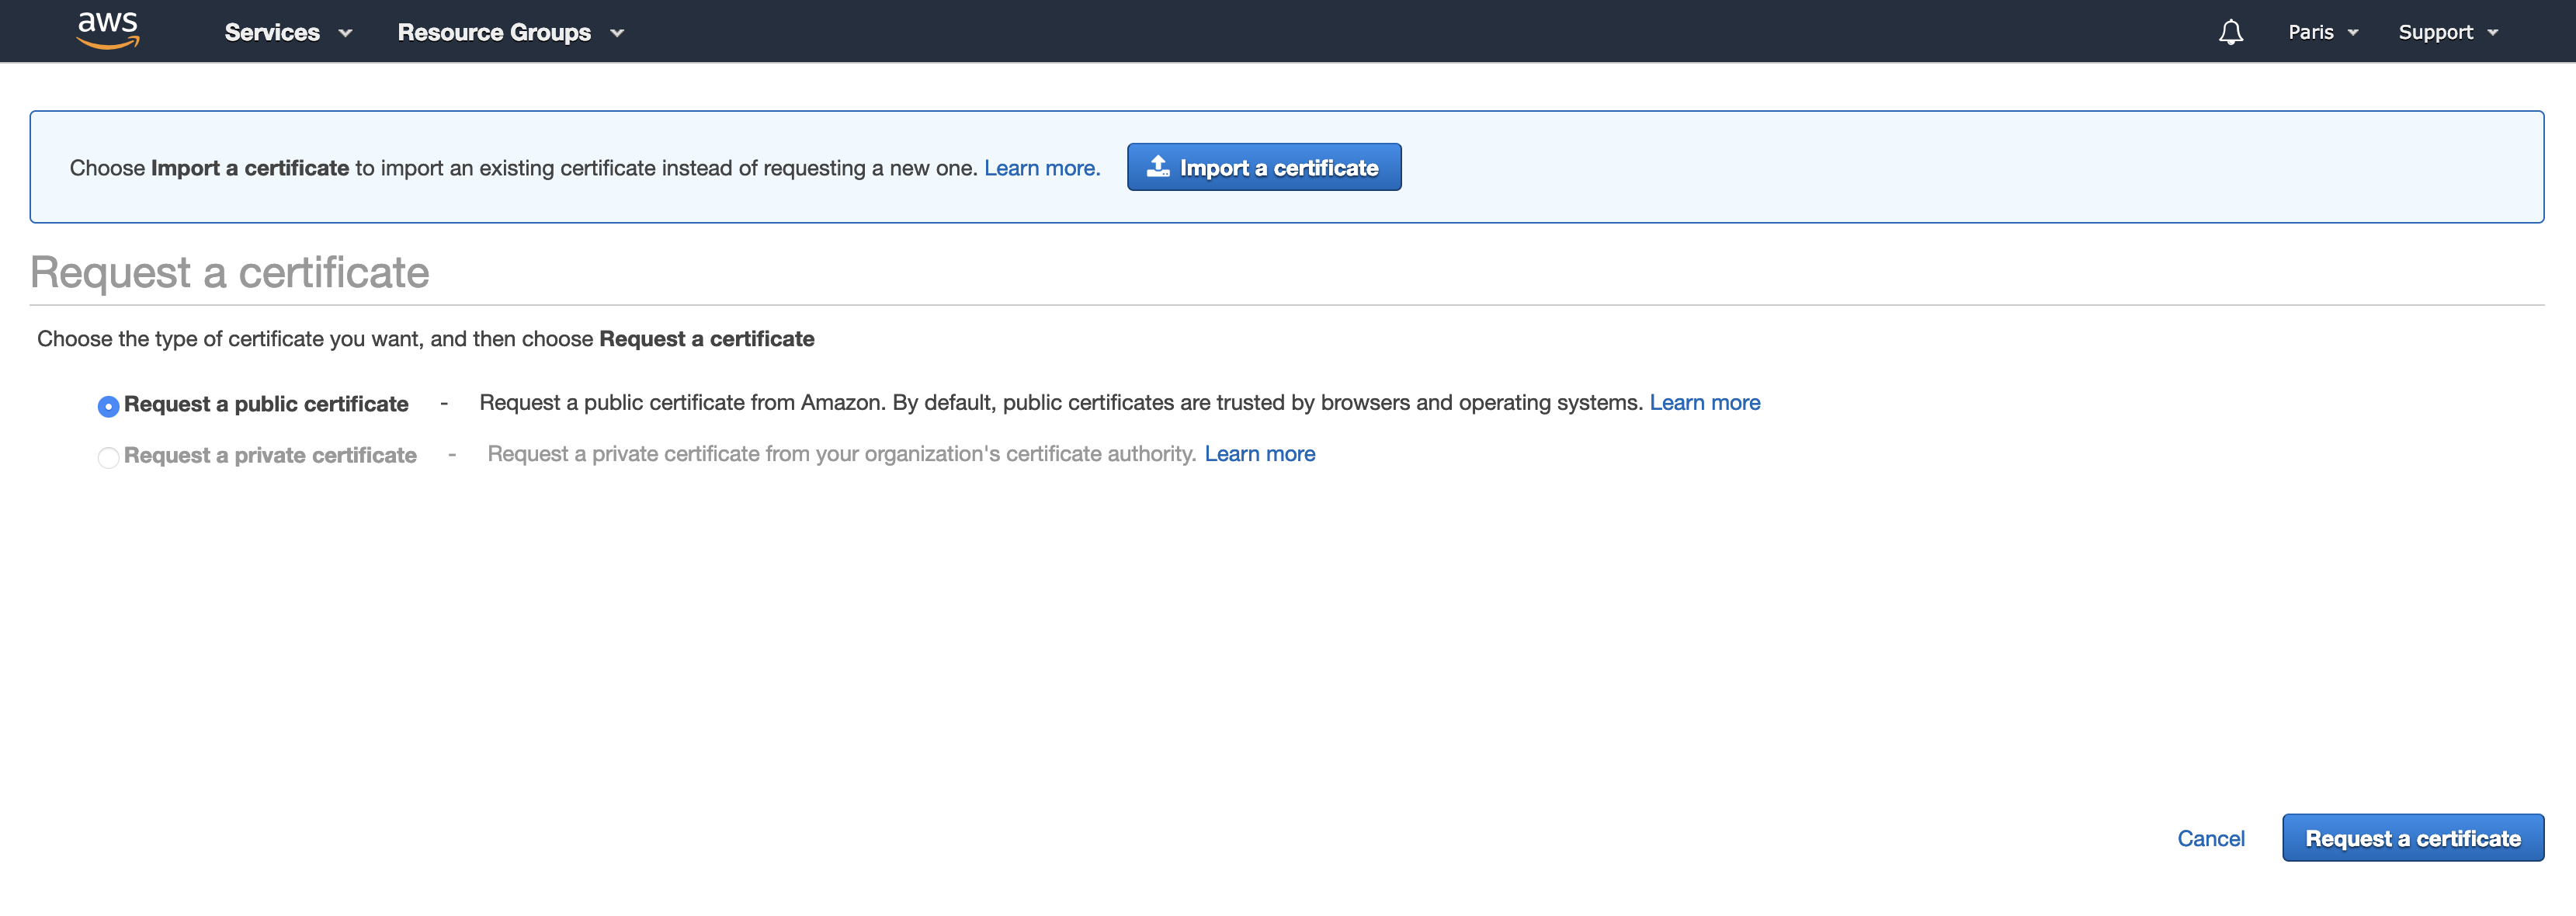
Keep the default selected value Request a public certificate and hit Request a certificate.
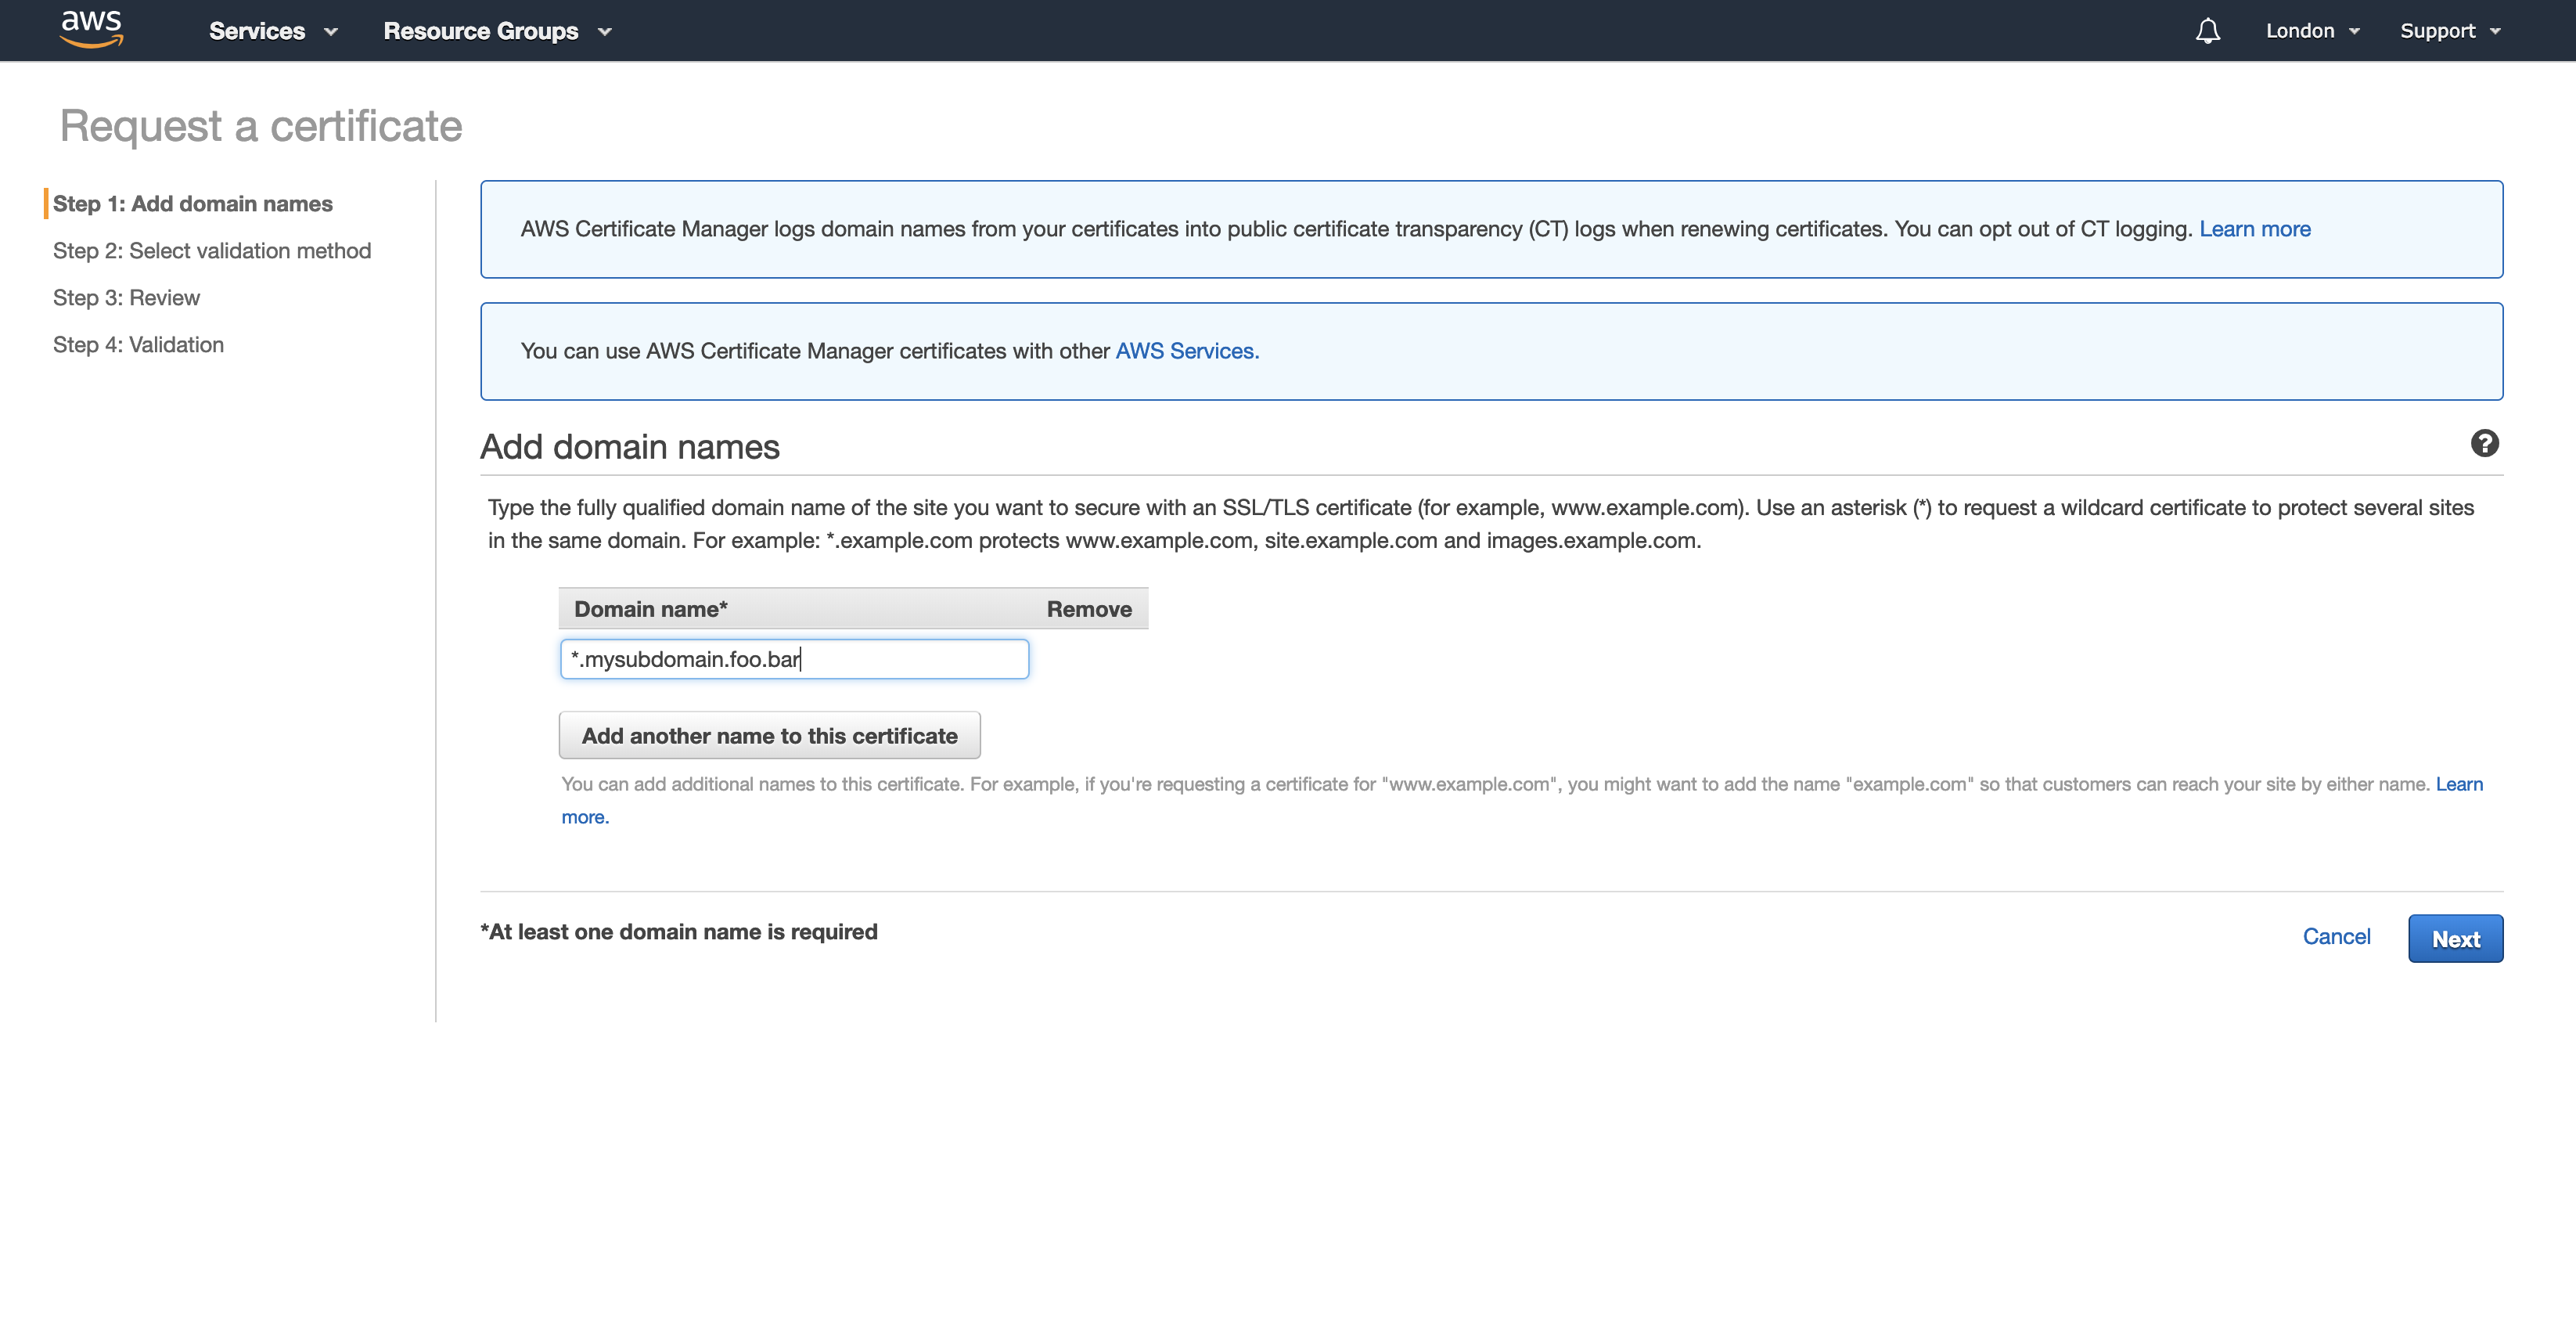
Put your Domain name, use *. for wildcard, for instance *.mysubdomain.oto.tools, then hit Next.
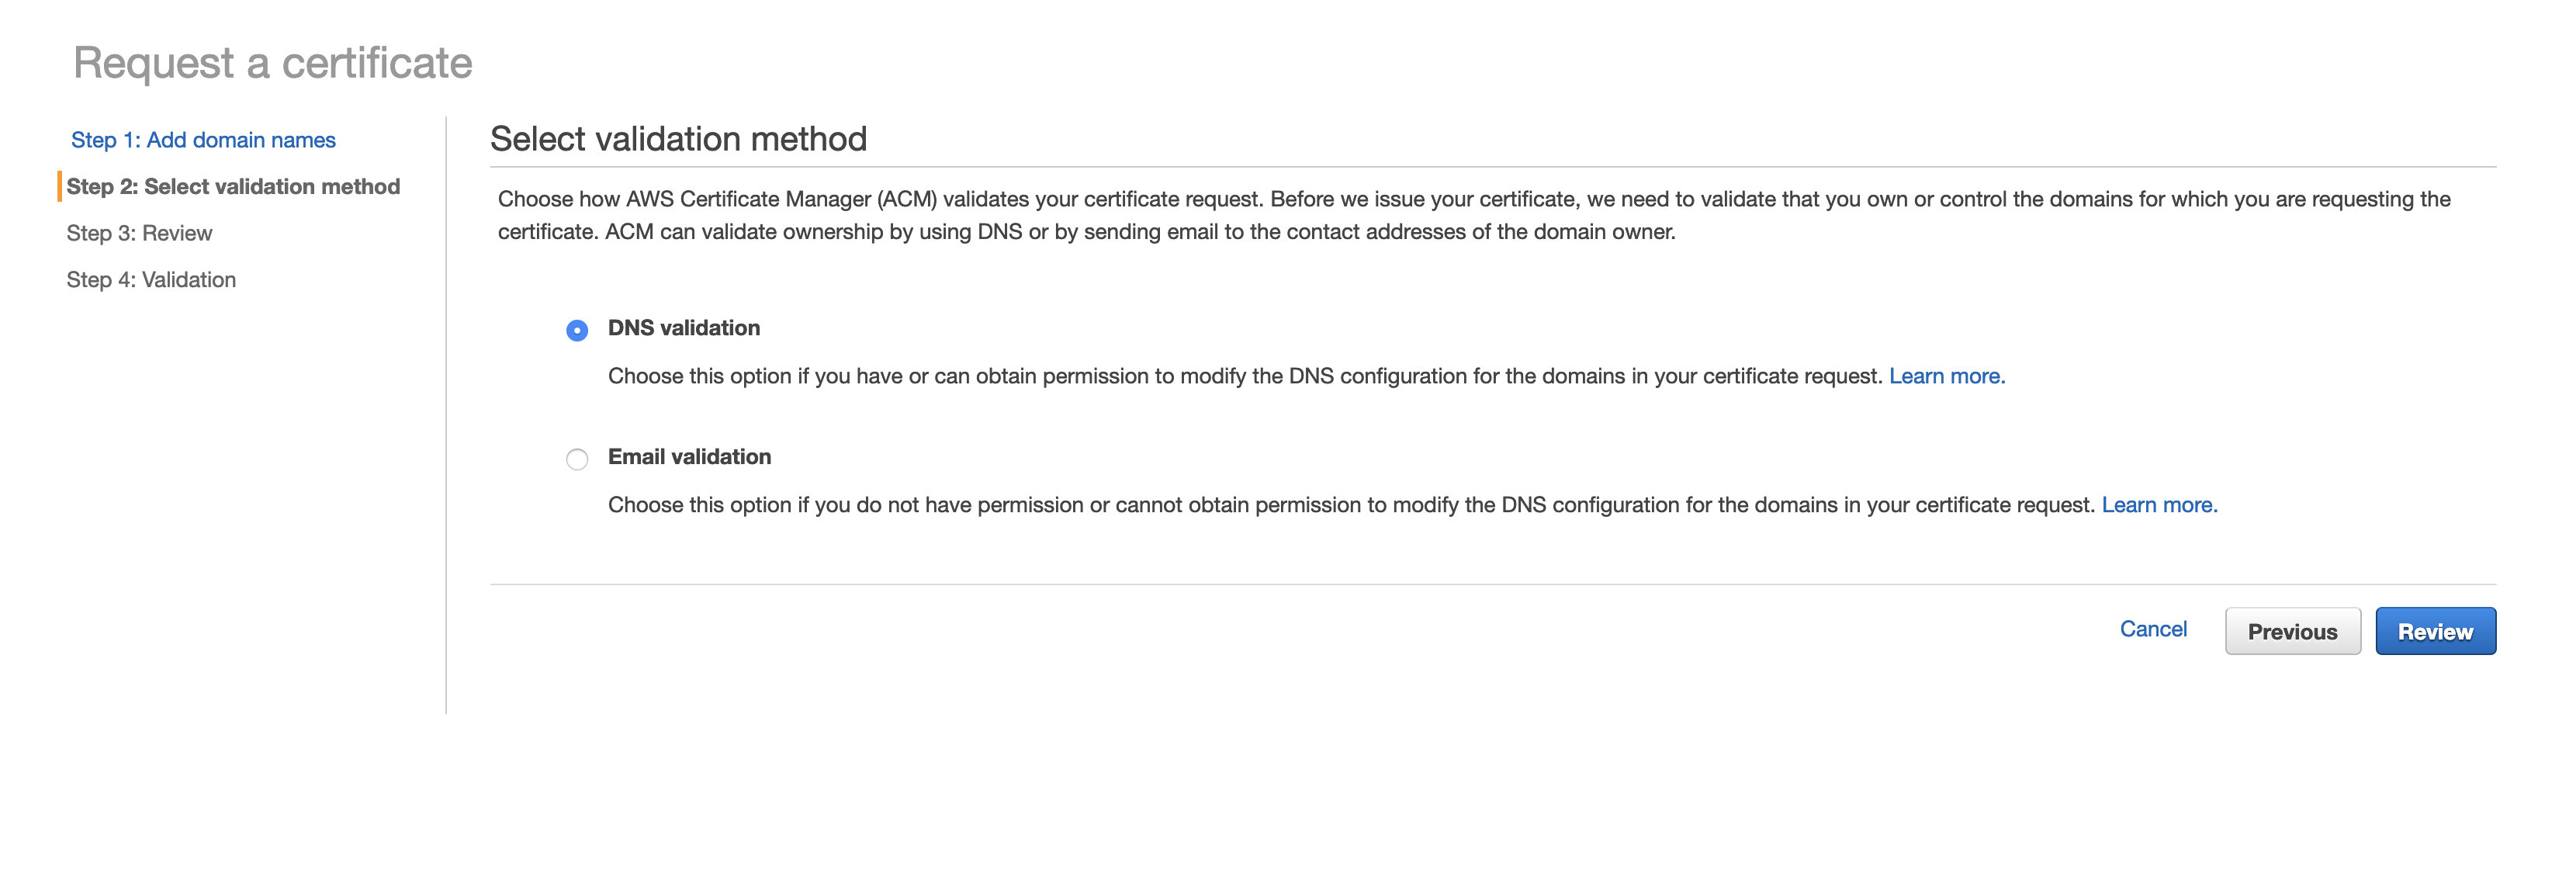
You can choose between Email validation and DNS validation, I’d recommend DNS validation, then hit Review.
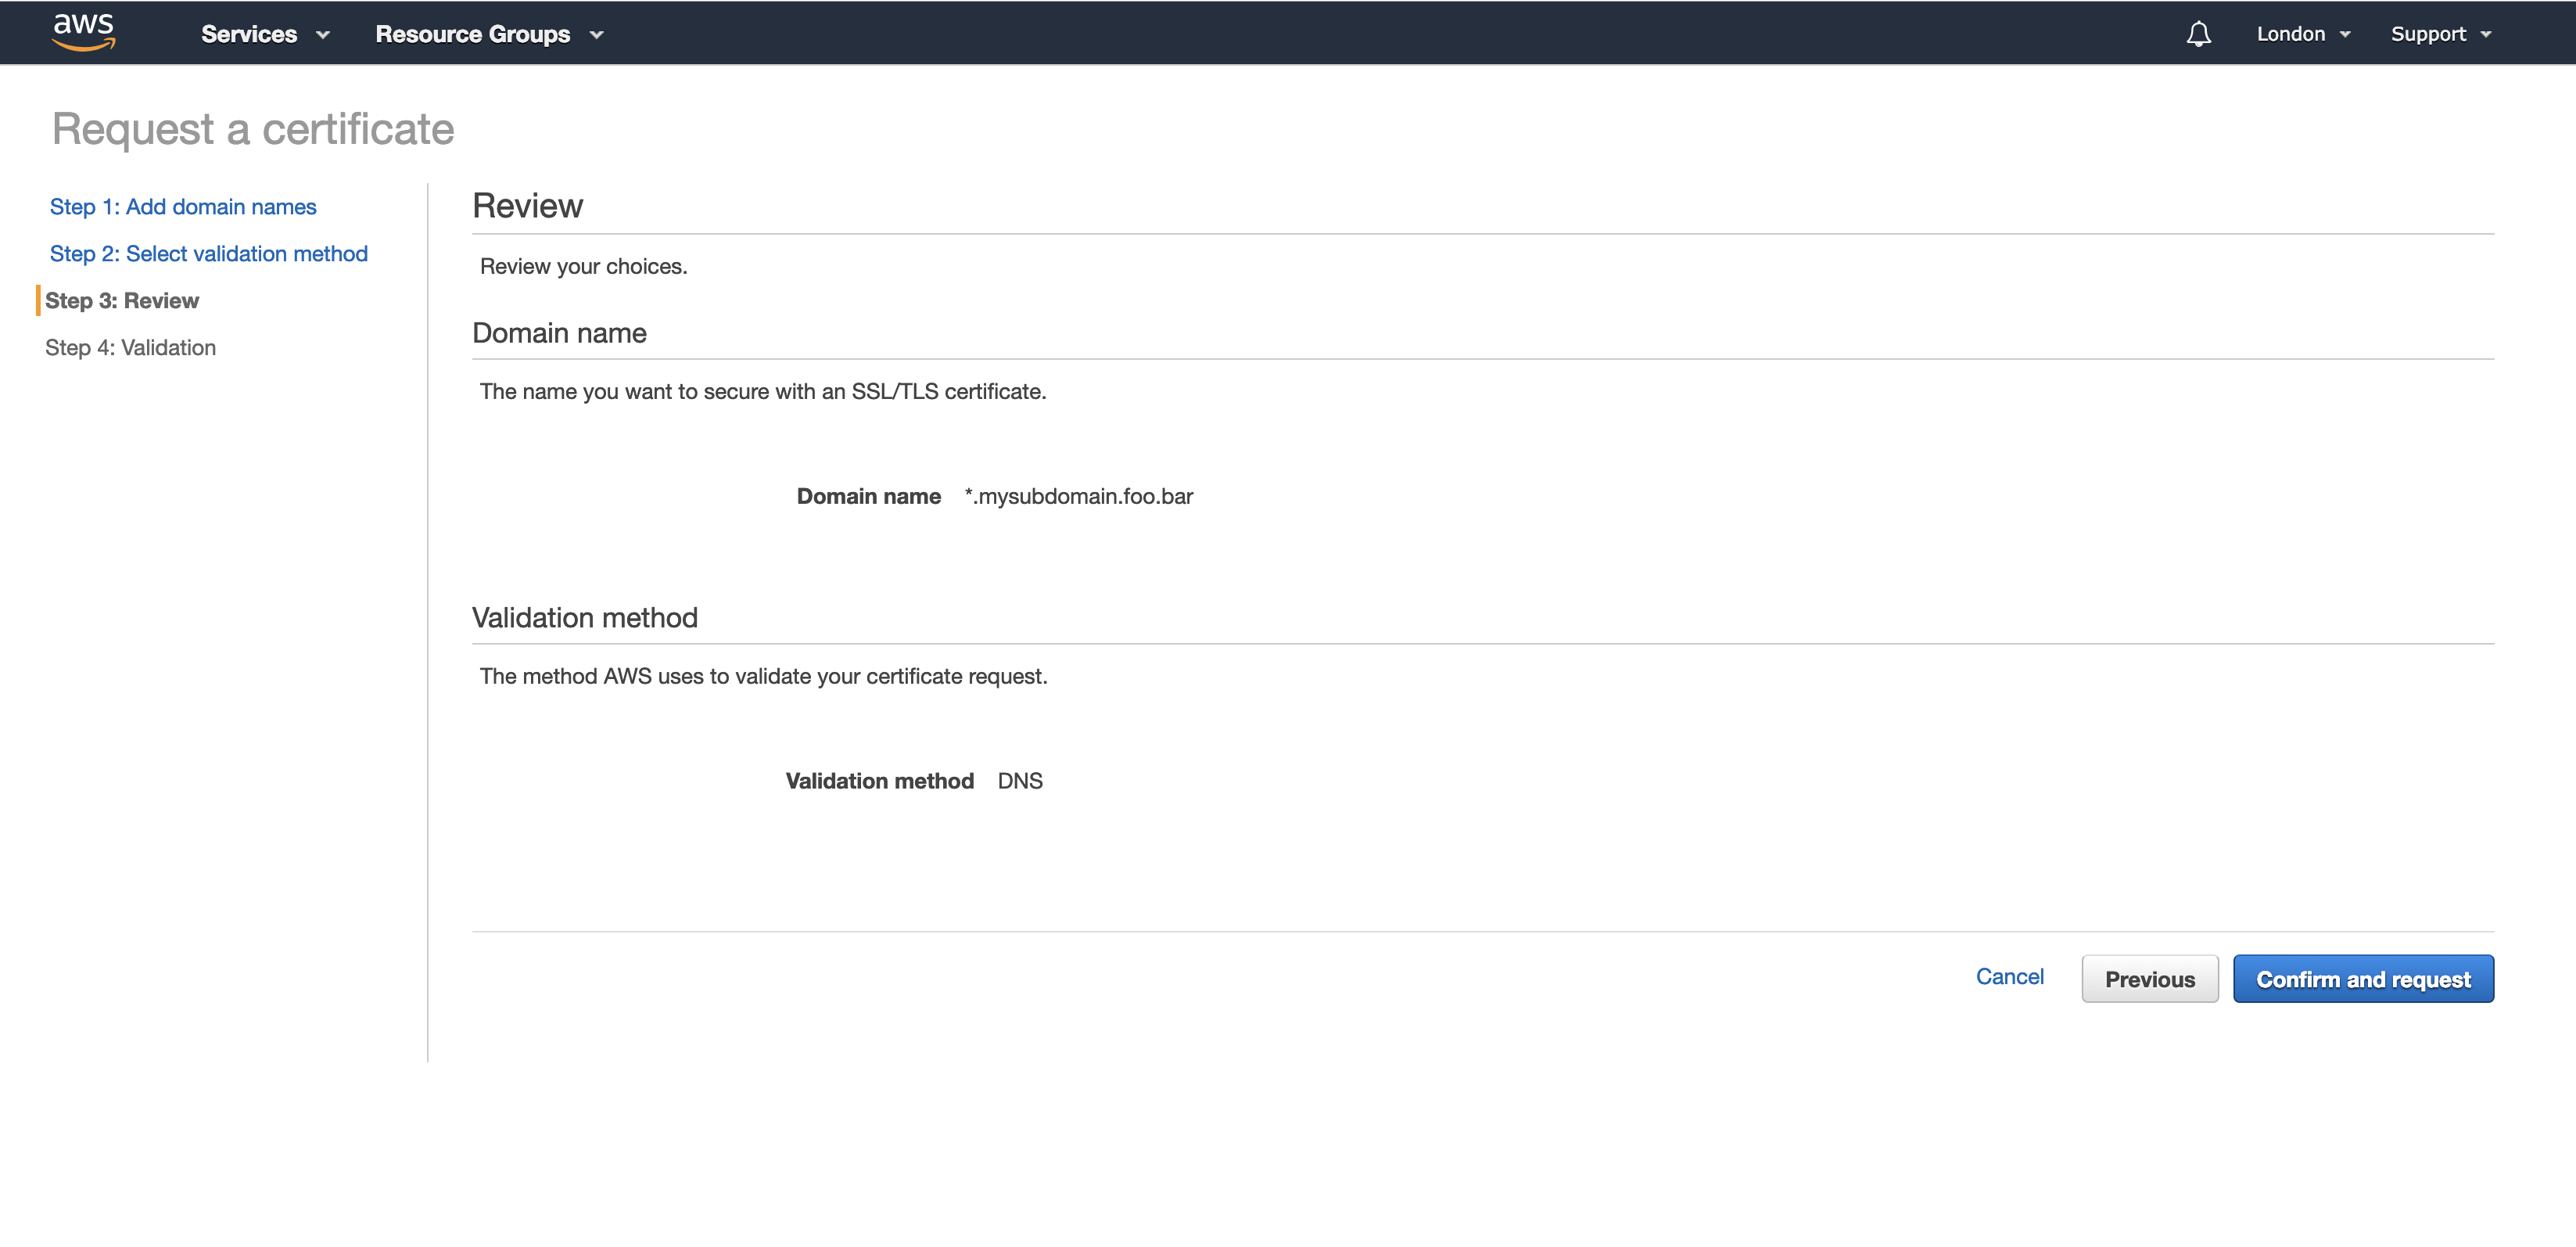
Verify that you did put the right Domain name then hit Confirm and request.
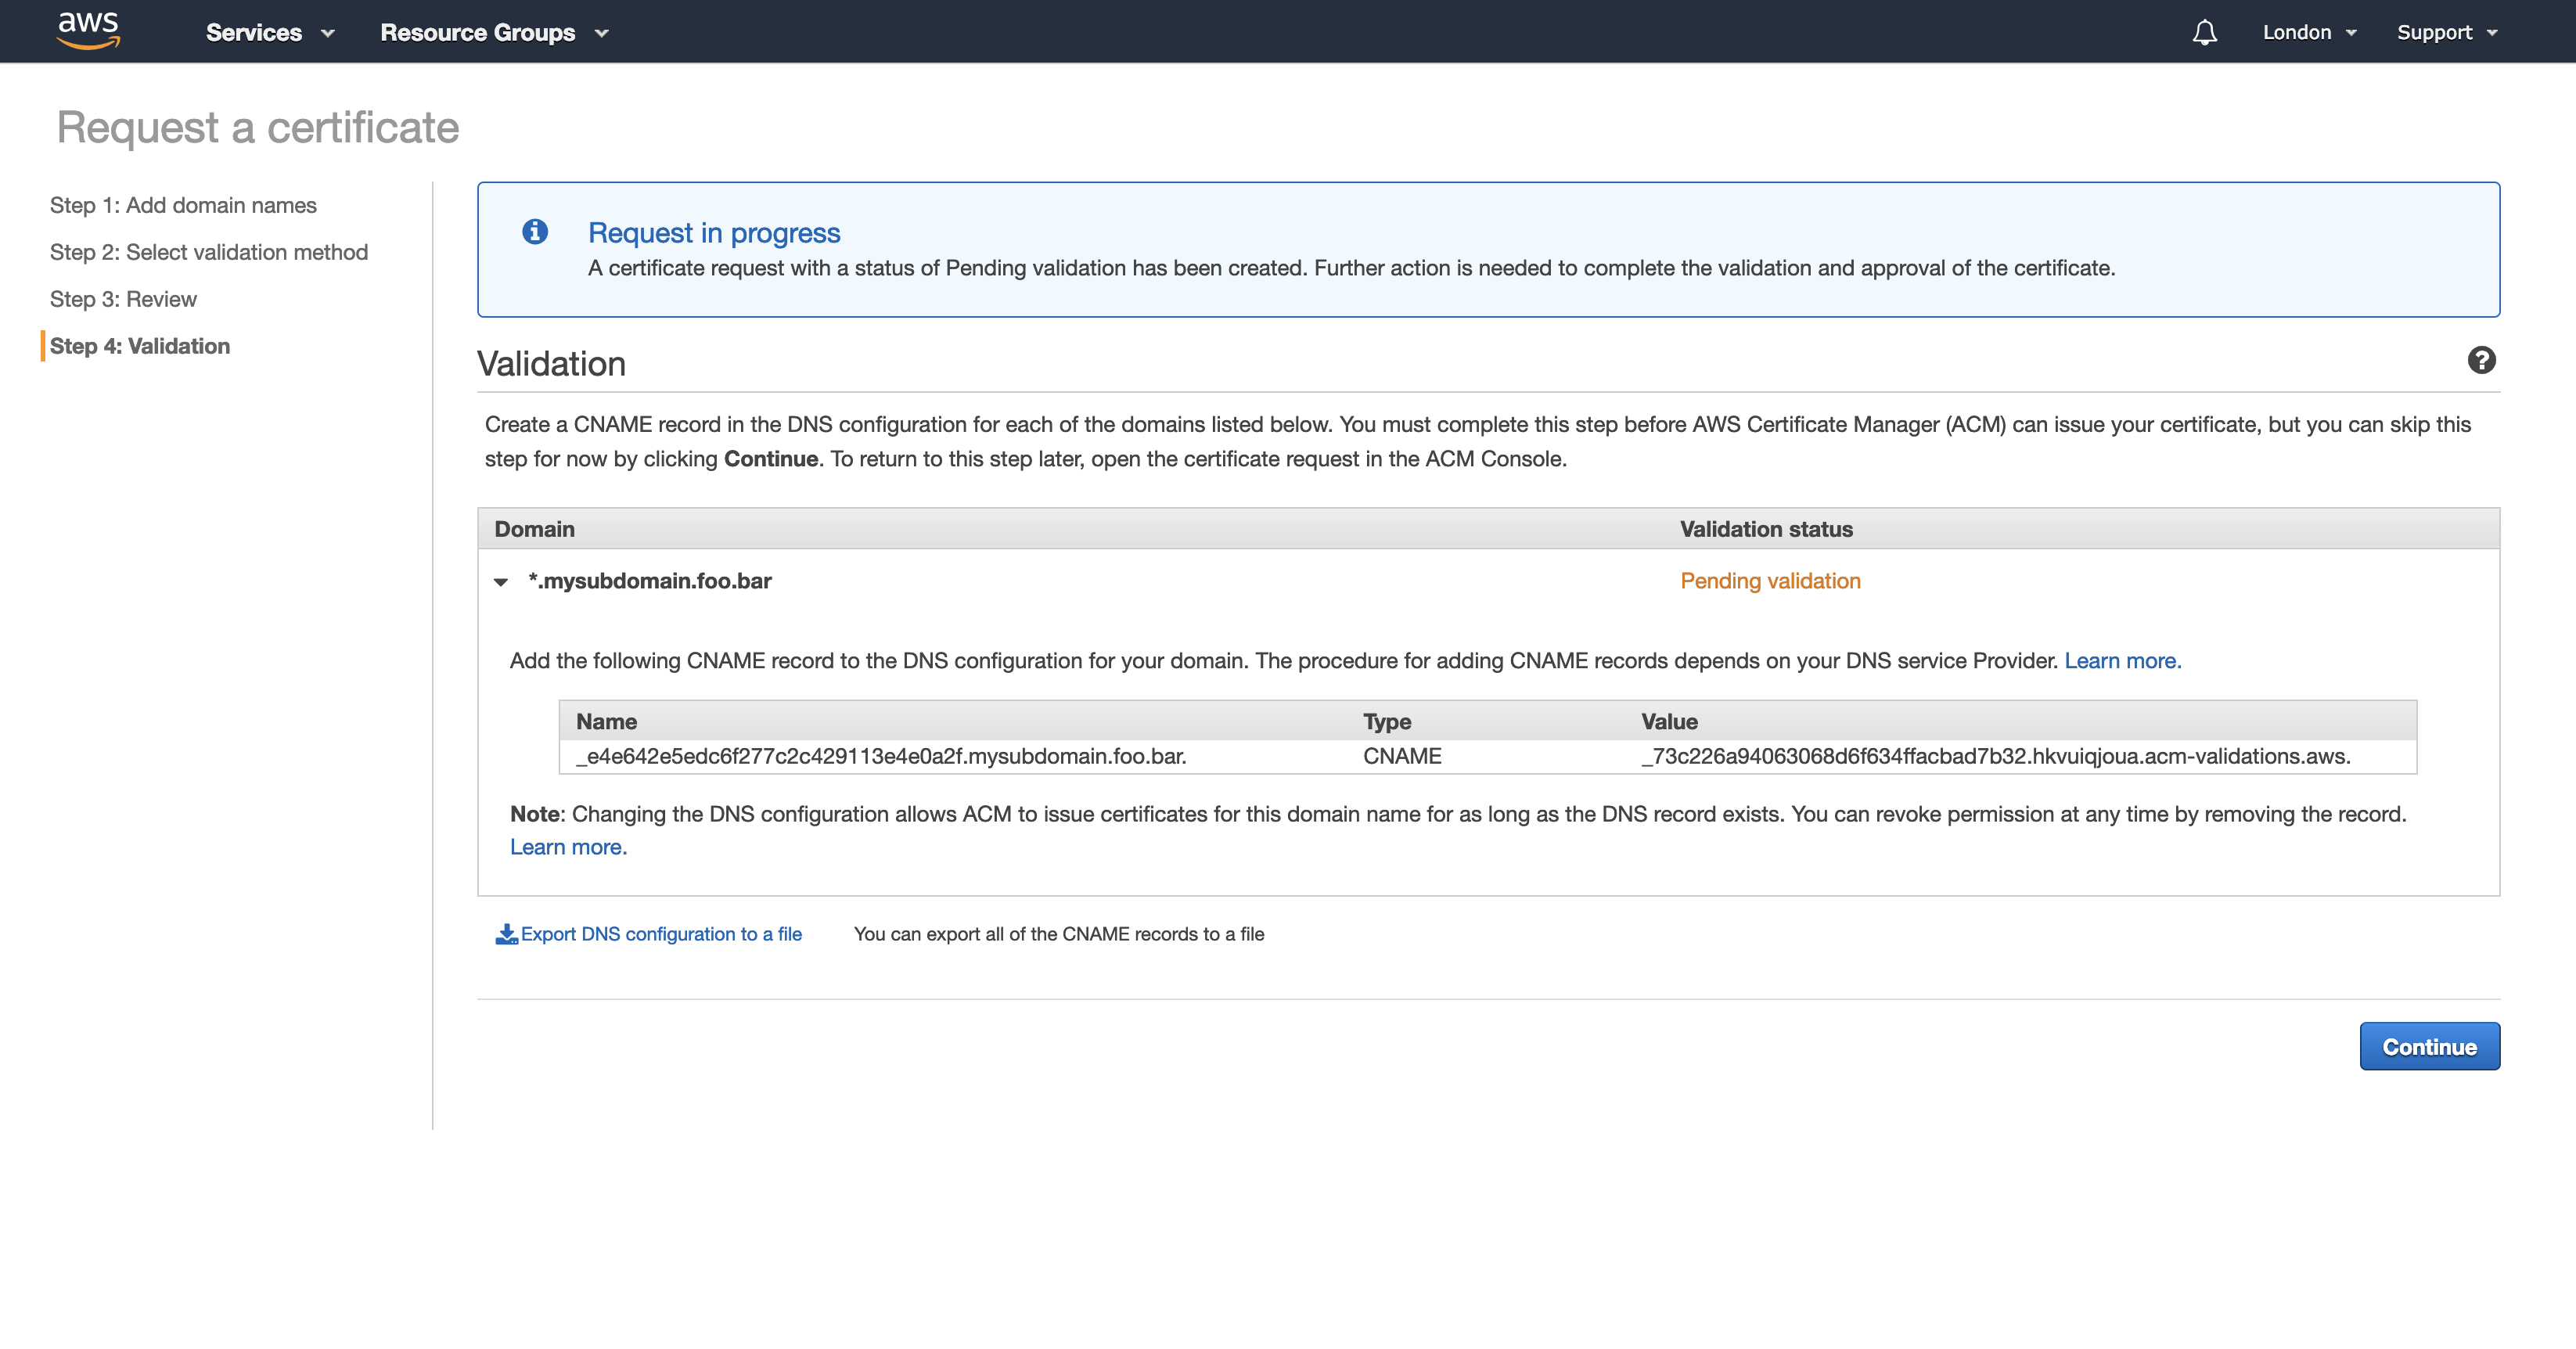
As you see in the image above, to let Amazon do the validation you have to add the CNAME record to your DNS configuration. Normally this operation takes around one day.
Configure Otoroshi AWS Elastic Beanstalk instance with the SSL certificate
Once the certificate is validated, you need to modify the configuration of Otoroshi-env to add the SSL certificate for HTTPS. For that you need to go to AWS Elastic Beanstalk applications, hit Otoroshi-env, then on the left side hit Configuration, then on the Load balancer card hit Modify.
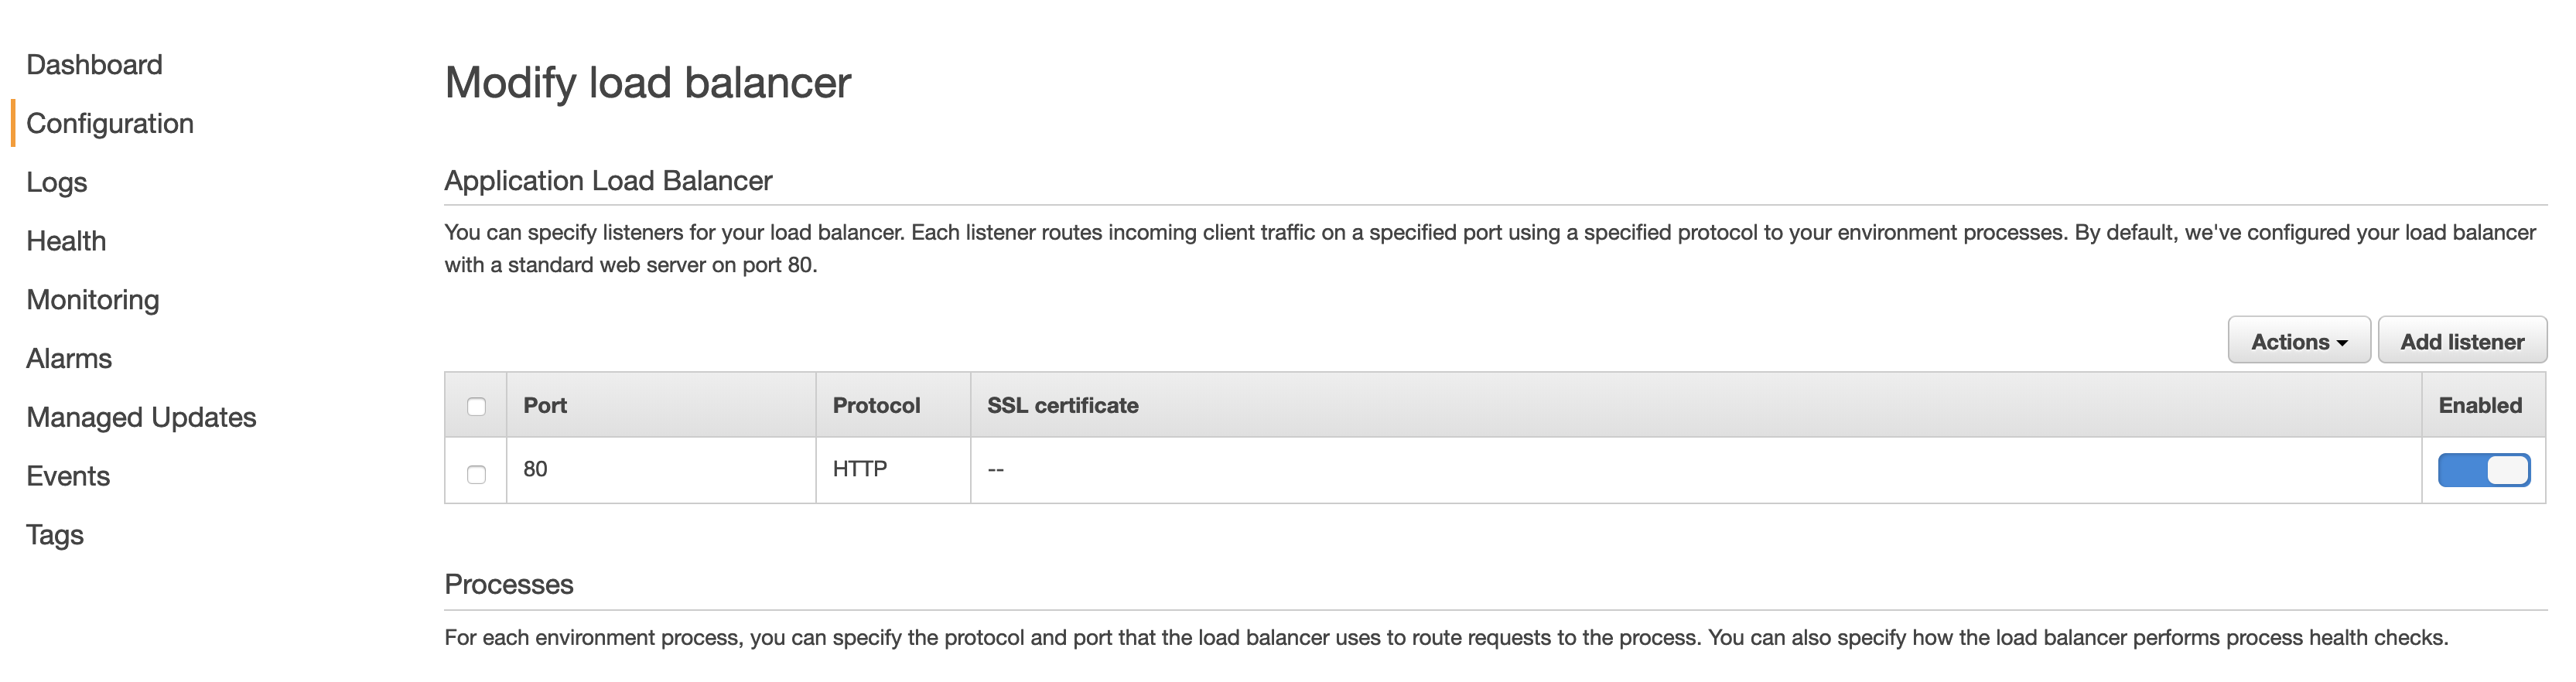
In the Application Load Balancer section hit Add listener.
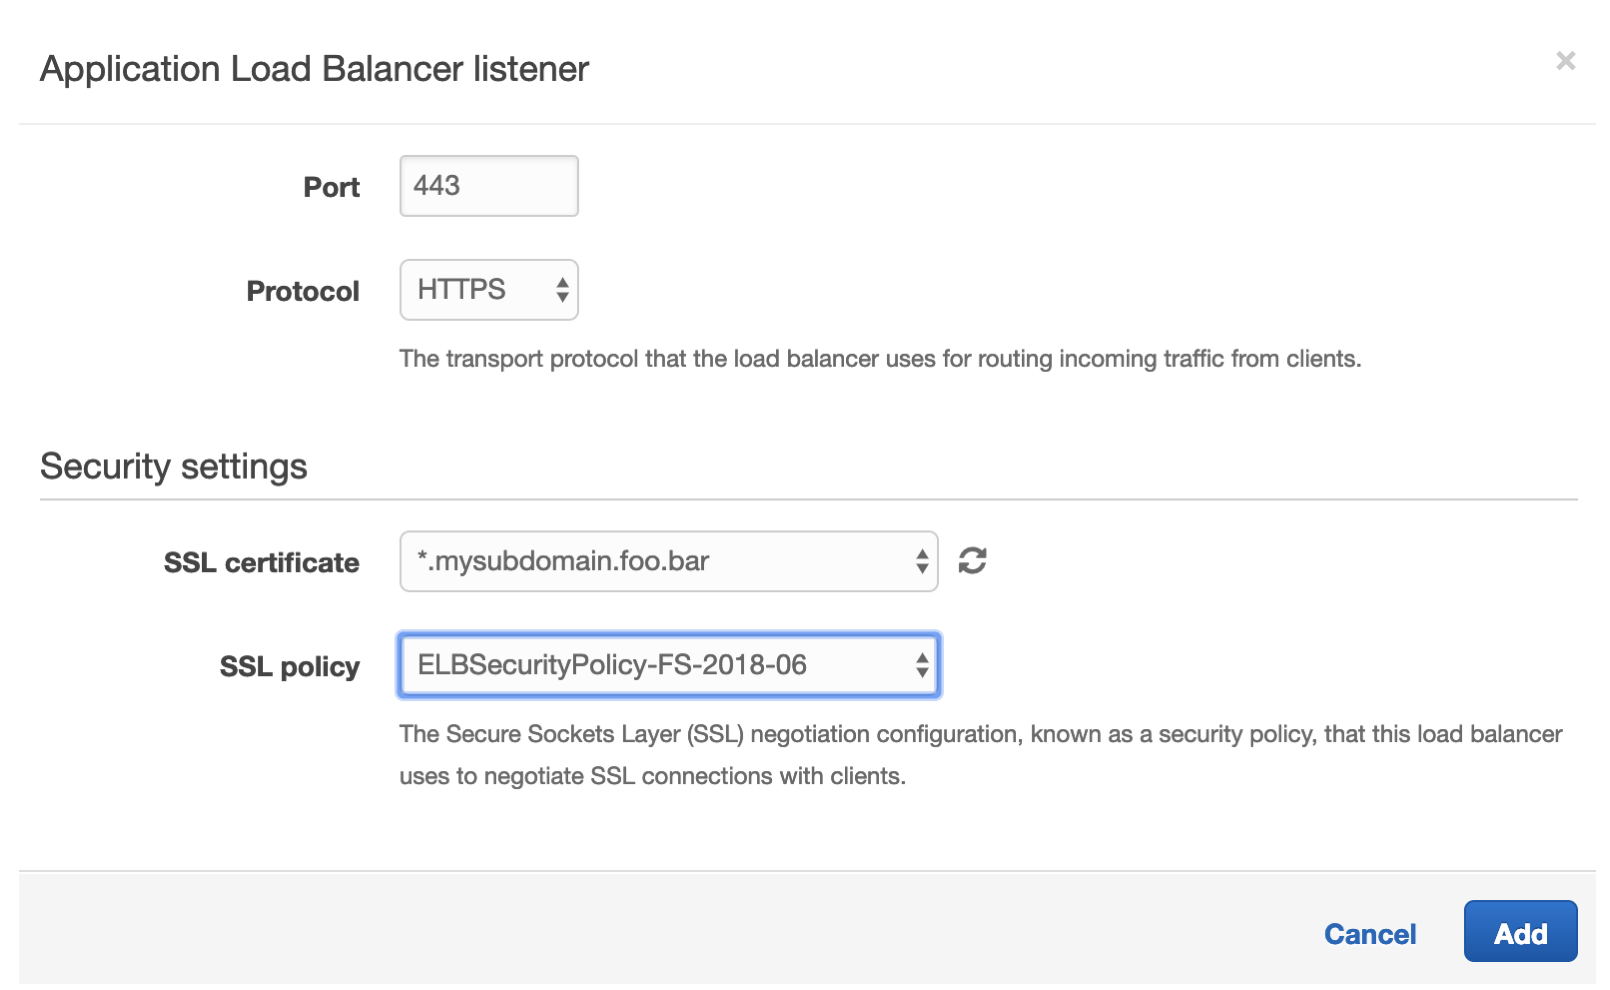
Fill the popup as the image above, then hit Add.
You should now be seeing something like this :
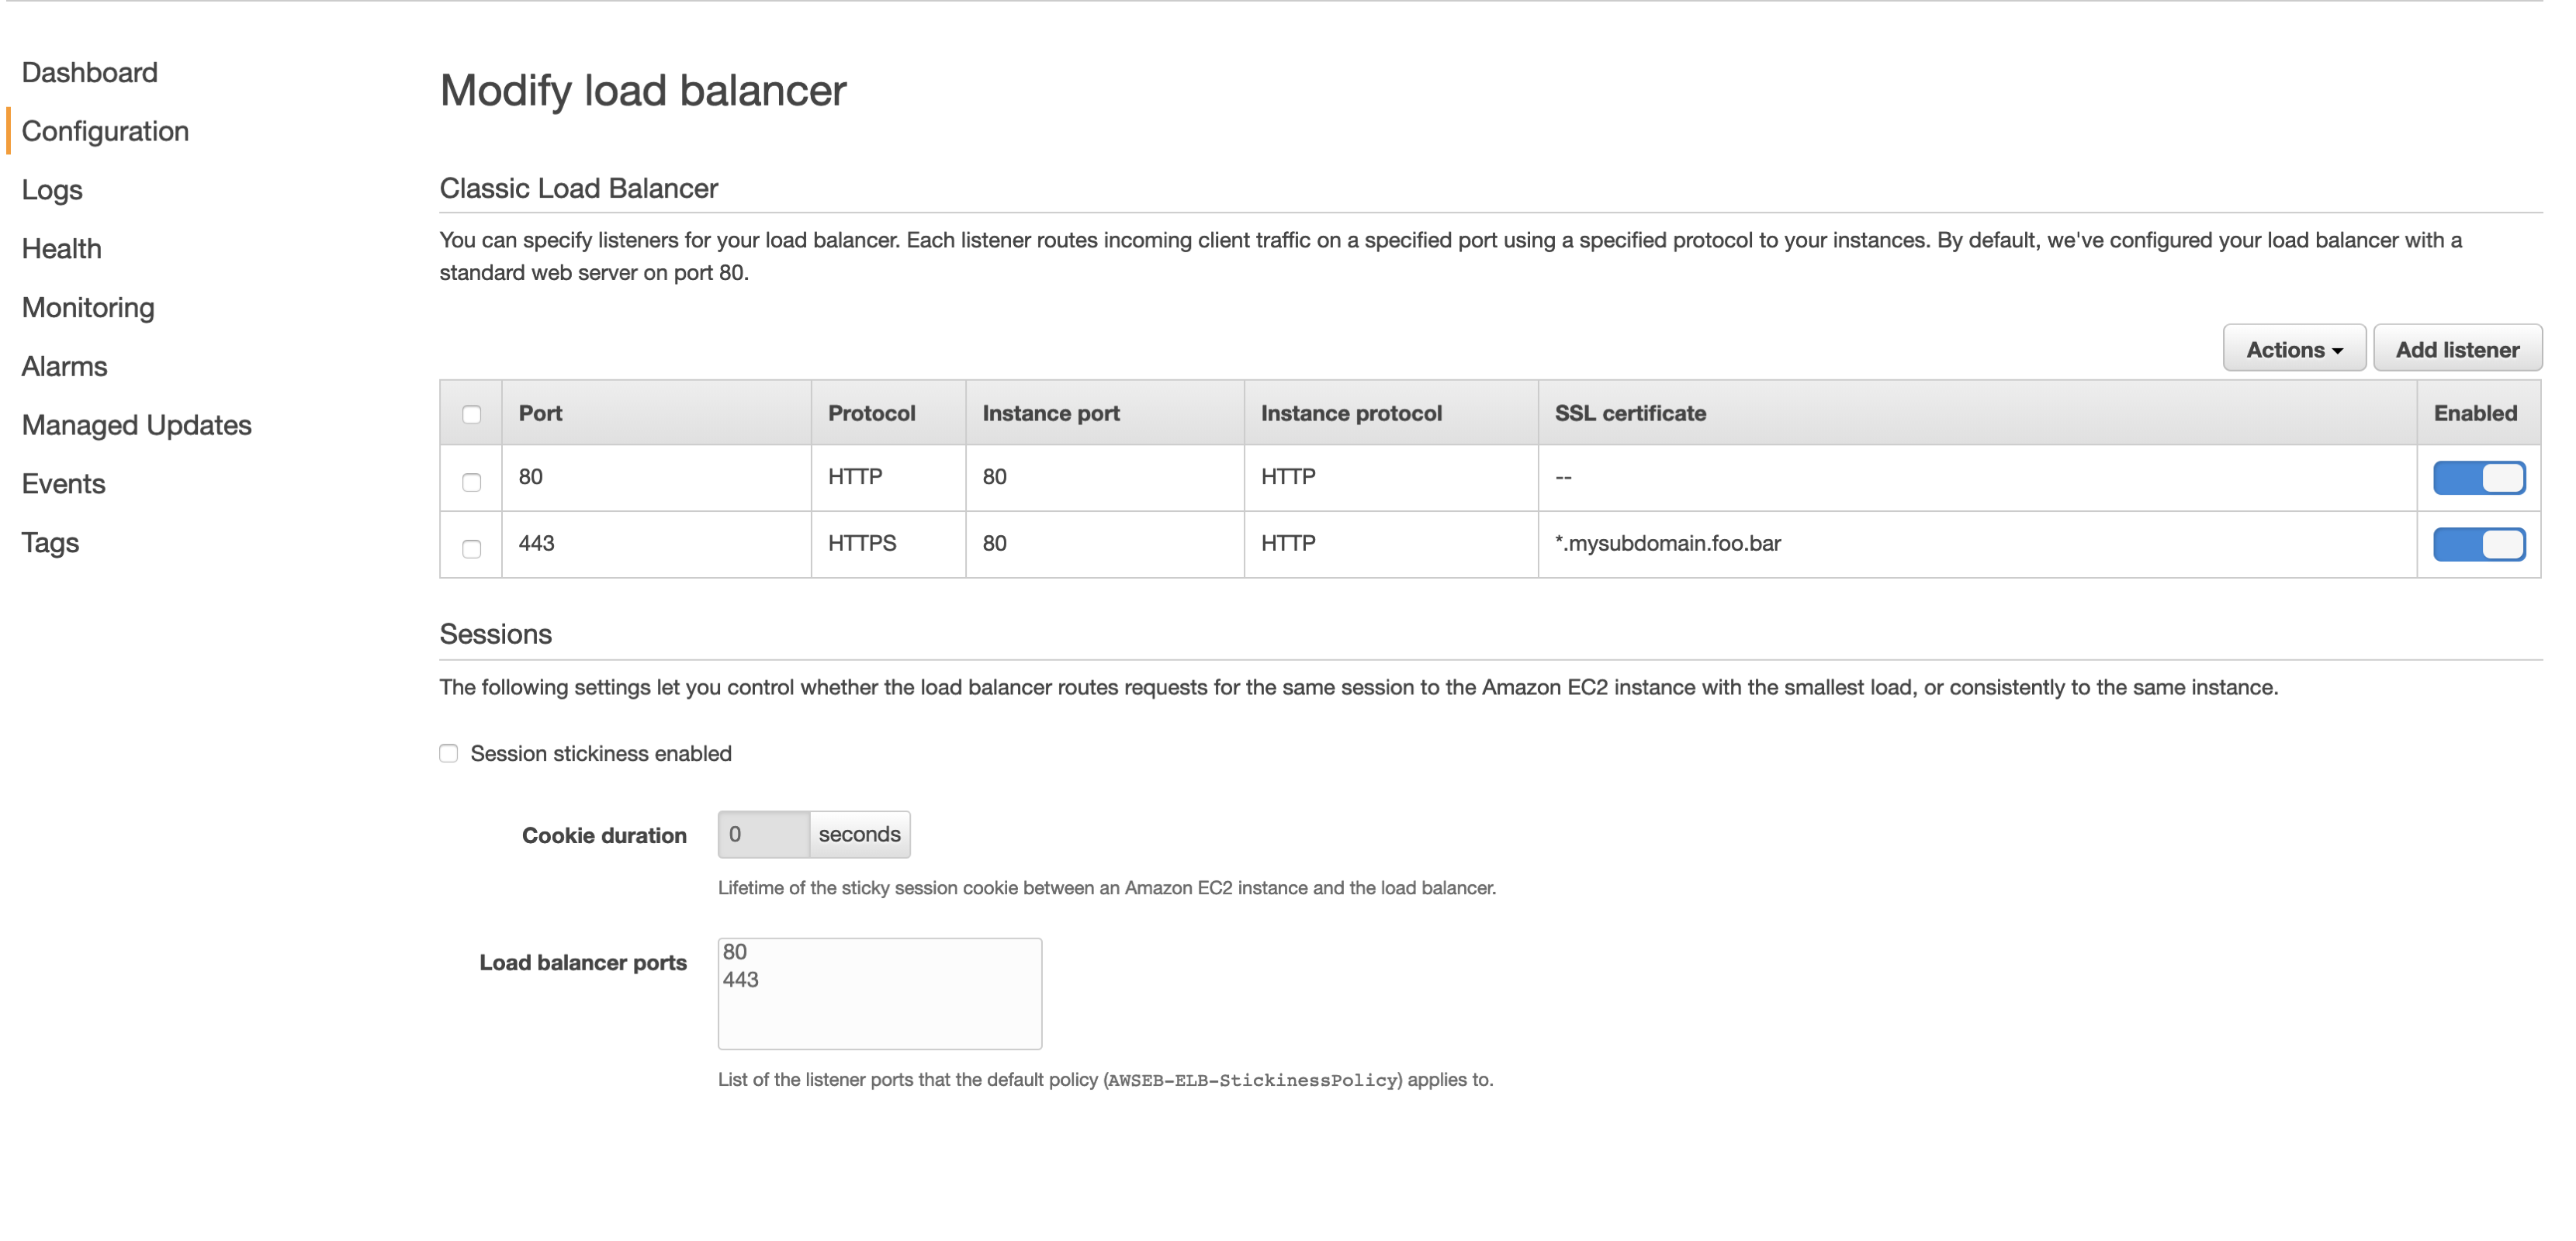
Make sure that your listener is enabled, and on the bottom right of the page hit Apply.
Now you have https, so let’s use Otoroshi.
Configure your DNS to redirect all traffic on your domain to Otoroshi
It’s actually pretty simple, you just need to add a CNAME record to your DNS configuration, that redirects *.mysubdomain.oto.tools to the DNS name of Otoroshi’s load balancer.
To find the DNS name of Otoroshi’s load balancer go to AWS Ec2
You would find something like this :
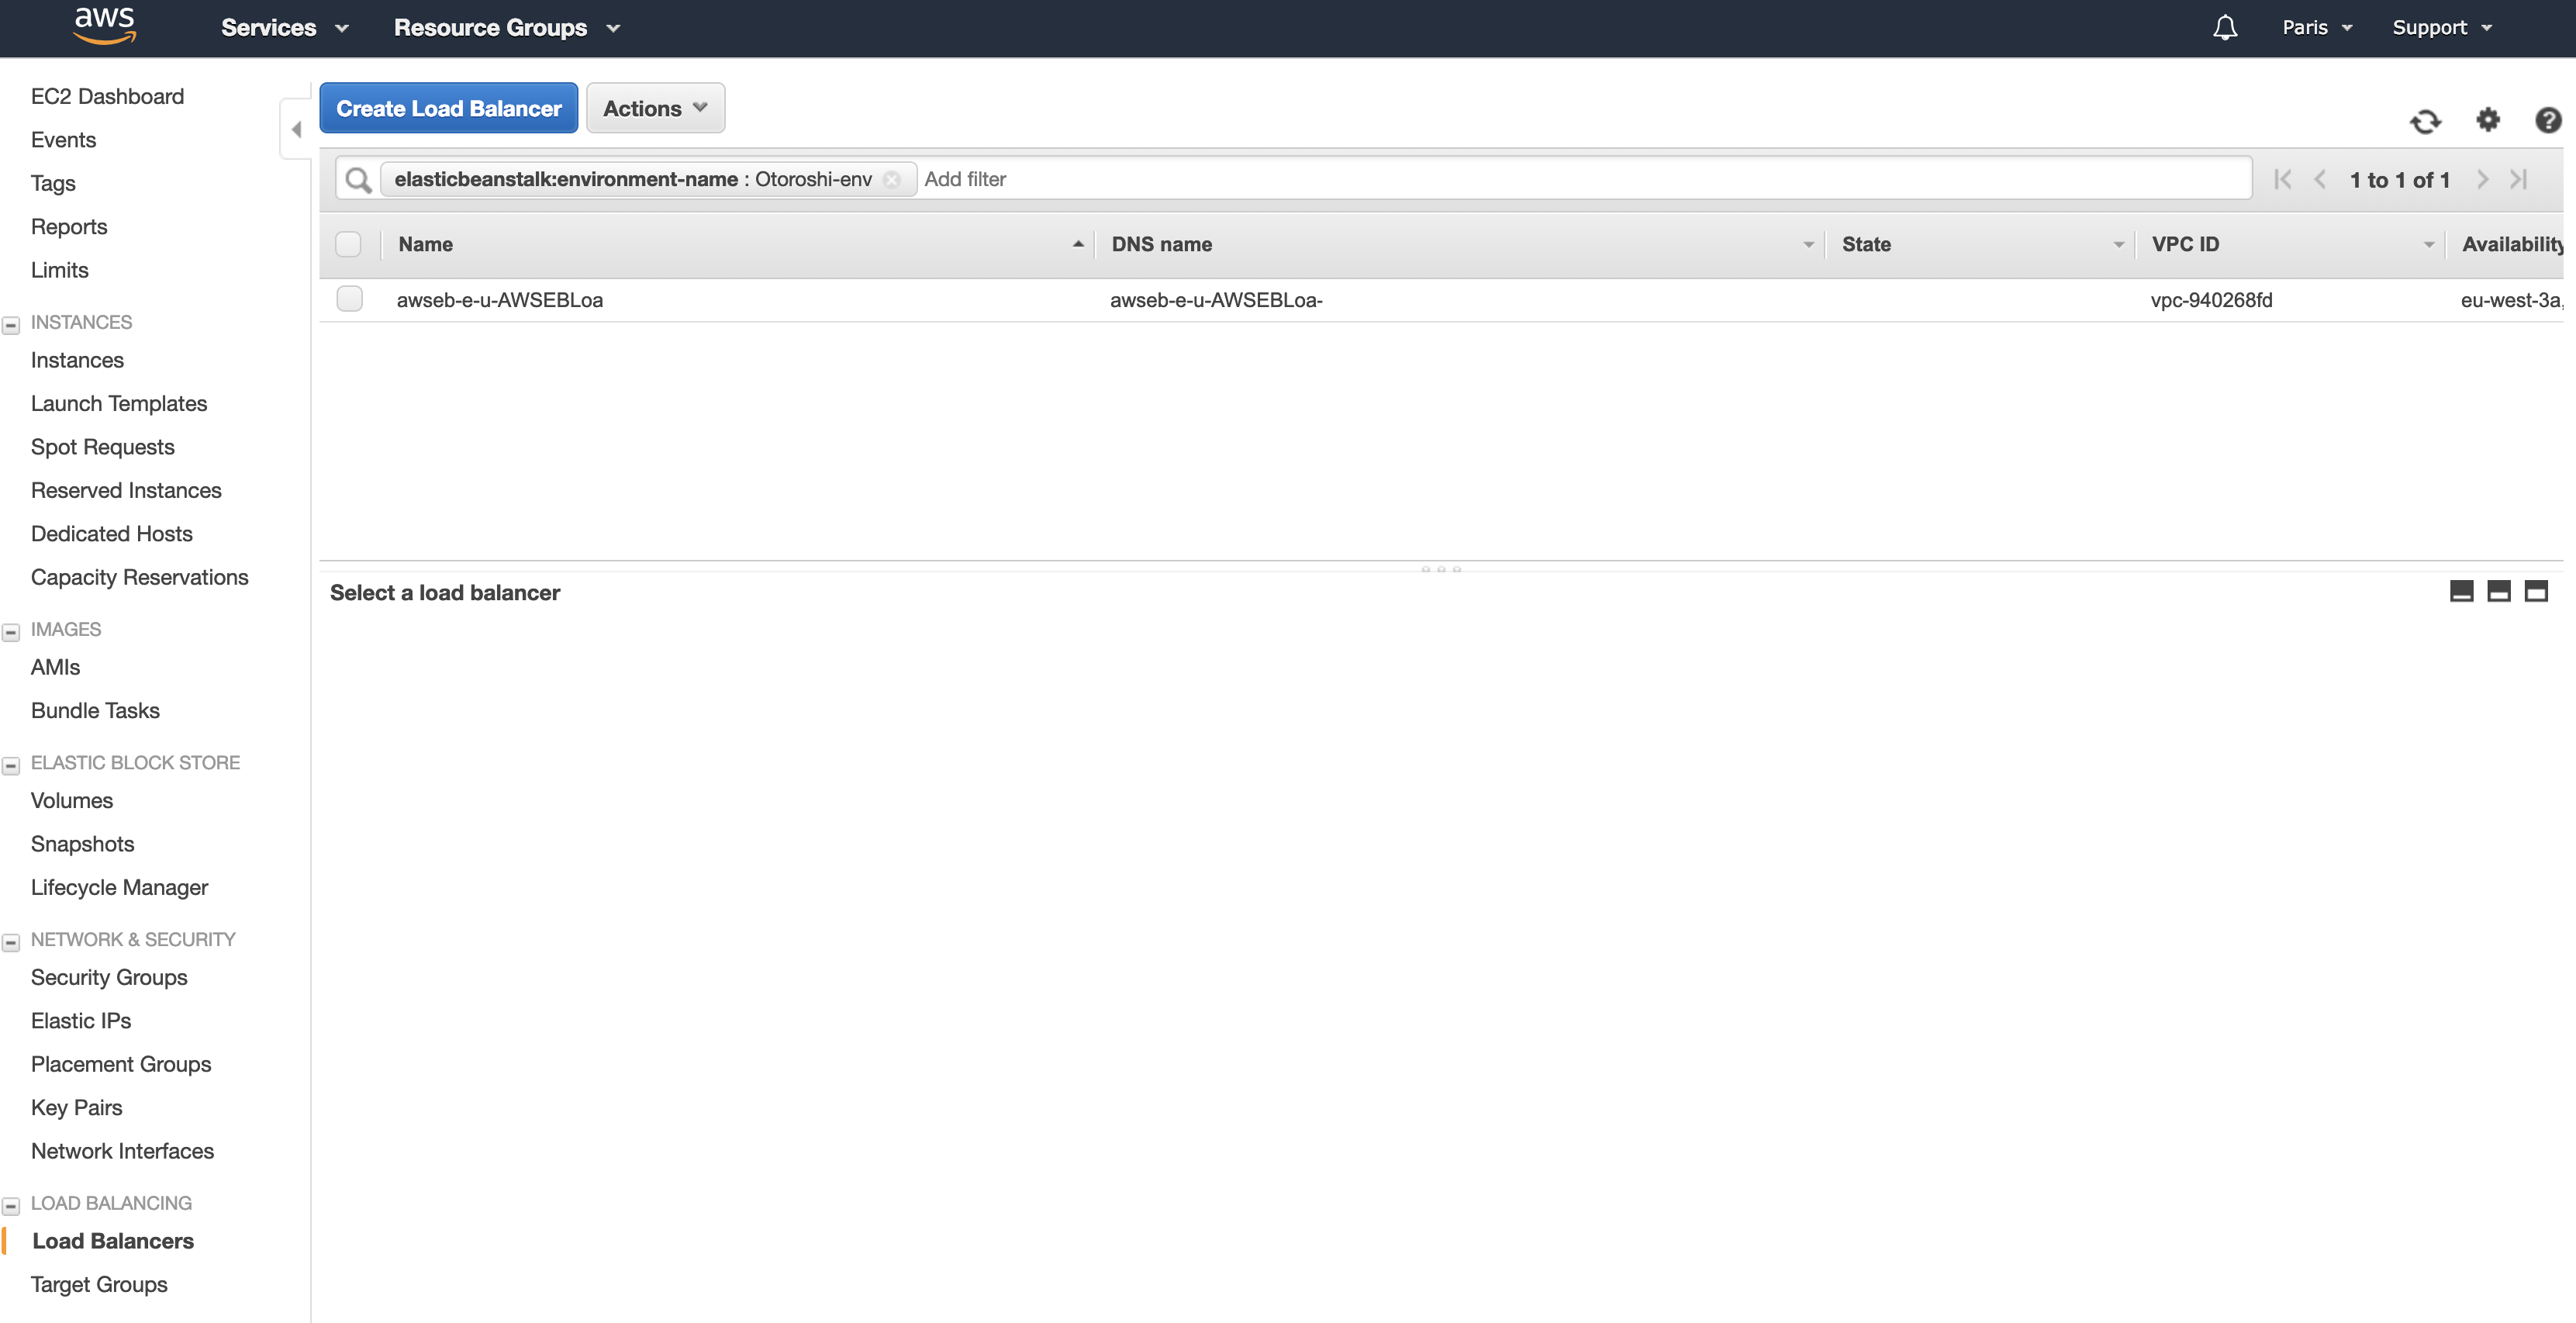
There is your DNS name, so add your CNAME record.
Once all these steps are done, the AWS Elastic Beanstalk Otoroshi instance, would now be handling all the requests on your domain. ;)