Informations
Installation
This project can be installed and compiled from source with this Cargo command:
$ cargo install daikoku
or
$ brew tap maif/daikoku
$ brew install daikoku
Additionally there are precompiled artifacts built on CI which are available for download as well.
Installation can be confirmed with:
$ daikoku version
Subcommands can be explored with:
$ daikoku help
Core commands
Daikokucli uses your home folder to store the list of projects inside a .daikoku file. Each project created with the CLI should contain a src folder and a .daikoku/.environments. This file will contain
You can start a new project from scratch
daikoku cms init --name=<PROJECT_NAME> --path=<PROJECT_PATH_OR_CURRENT_FOLDER>
or import an existing one
daikoku cms migrate --name=<PROJECT_NAME> --path=<PROJECT_PATH_OR_CURRENT_FOLDER> --server=<DAIKOKU_SERVER> --apikey=<CMS_APIKEY>
then add a default Daikoku environment
daikoku environments add --name=<ENVIRONMENT_NAME> --server=<ENVIROMNENT_SERVER> --apikey=<CMS_APIKEY>
The Daikoku server has to be reachable and will be checked before saving the configuration
you can sync the new project with your Daikoku instance and fetch mails, apis & tenant customization
daikoku pull apis
daikoku pull mails
daikoku pull customization
you can start to develop and watch file changes
daikoku watch
Common practices involve utilizing the directives within the Daikoku CMS to access private entities based on the connected user's permissions.
daikoku login
You can start to follow your changes using
daikoku watch --environment=<NAME_OF_YOUR_ENVIRONMENT>
or permanently by changing the default project or environment
daikoku environments switch --name=<NAME_OF_YOUR_ENVIRONMENT>
daikoku cms switch --name=<NAME_OF_YOUR_PROJECT>
you can view the currently used project and the others
daikoku cms list
At anytime, you can track an existing CMS folder or update its information
daikoku cms add --name=<NAME_OF_YOUR_PROJECT> --path=<PATH_TO_YOUR_PROJECT> --overwrite=<true|false>
Once ready, you can push your sources with the Daikoku environment
daikoku push
Start a new project by importing an existing one
If you already have a legacy CMS on your Daikoku, you can start by importing it
daikoku cms migrate --name=<NEW_NAME_OF_YOUR_PROJECT> \
                           --path=<PATH_TO_THE_NEW_PROJECT> \
                           --server=<DAIKOKU_SERVER_TO_PULL> \
                           --apikey=<CMS_APIKEY>
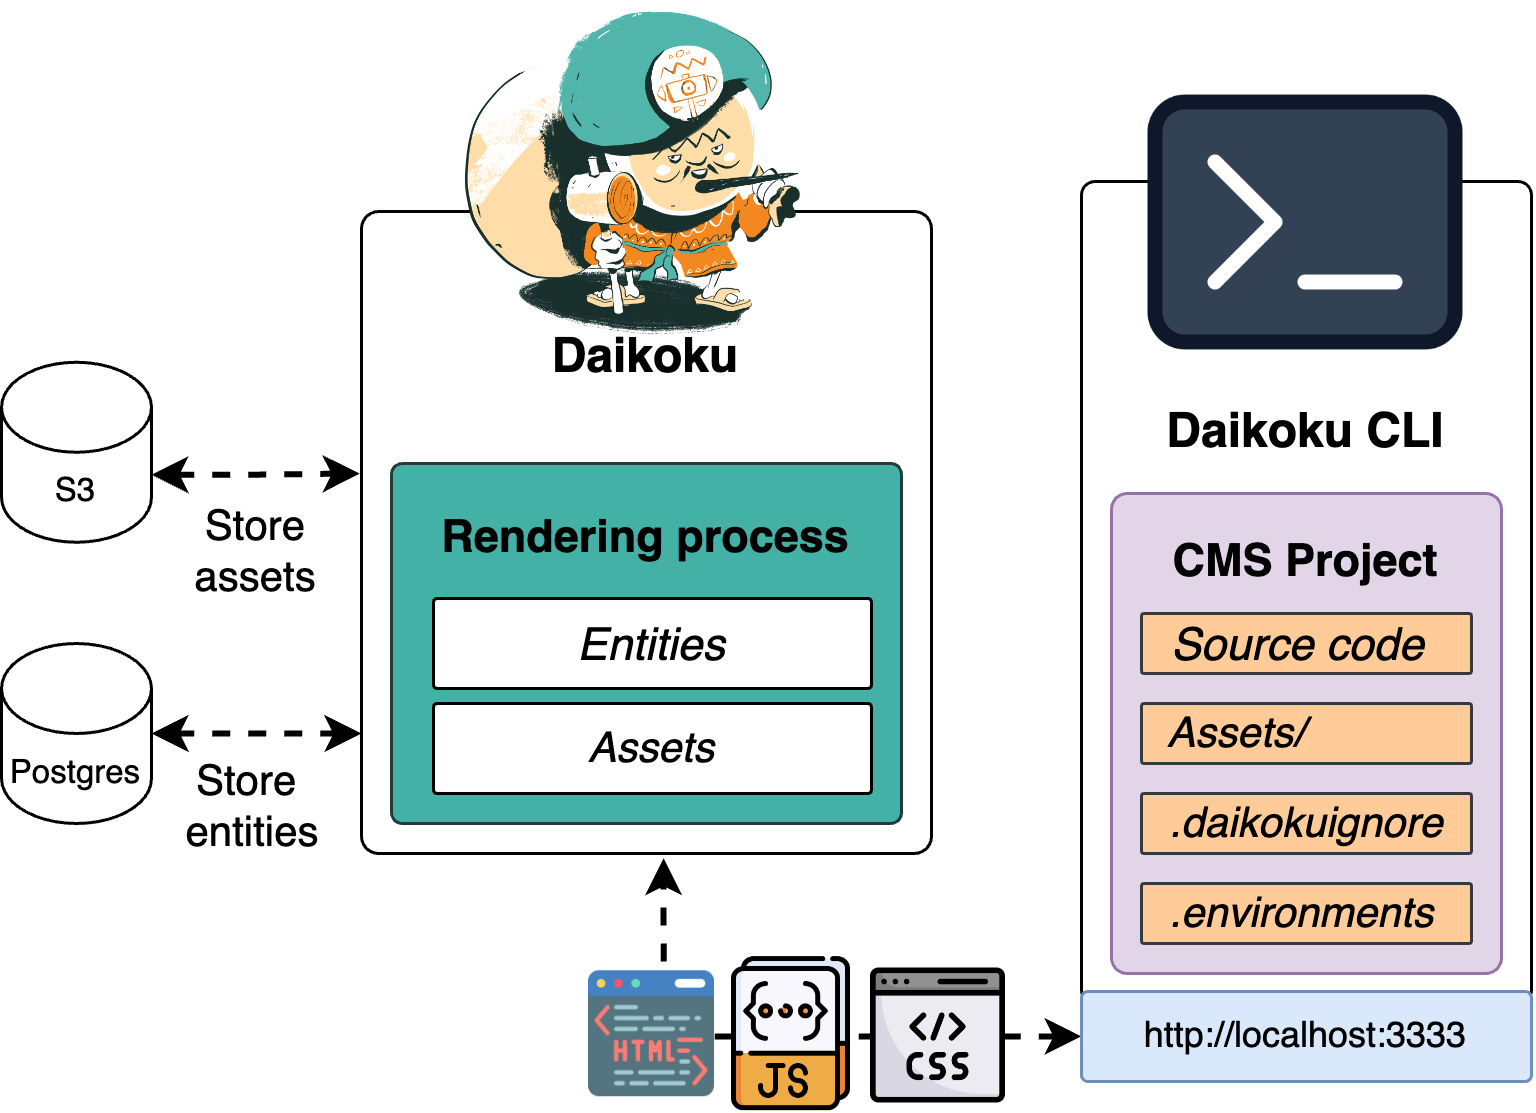
CMS Structure
The CMS projects adhere to the following strict file structure:
-
.daikoku: This hidden folder is used exclusively by Daikoku to store environments, secrets, and credentials. The only file you can edit here is the .daikokuignore, which allows you to exclude specific files from being pushed. -
assets: Files placed in this folder can be uploaded to the Daikoku S3 Bucket associated with your project. They can then be accessed using a generated slug. -
src: This folder contains all other source files, organized into the following subdirectories:apis: Lists all APIs available in your Daikoku. Each API has its own subfolder containing a header and description folder.data: Contains external data files such as JSON, YAML, CSV, and others.pages: Stores all source files that are not categorized under apis, data, scripts, mails, or styles.scripts: Contains JavaScript (JS) files.styles: Contains CSS files.documentations: Contains files that can be used as documentation page of APIs
Dynamic routes
The CLI uses file-system routing where folders are used to create nested routes. Each folder represents a route segment that maps to a URL segment.
You can create separate UIs for each route using page.html files. page.html is a special CLI file that contains html content.
To create a nested route, you can nest folders inside each other and add page.html files inside them. For example:
src/pages/page.html           -> mysite.com/
src/pages/invoices/page.html  -> mysite.com/invoices
src/pages/offres.html         -> mysite.com/offres
src/pages/apis/api/[apiId]    -> mysite.com/apis/api/any-kind-of-api (the apiId value can be use in the page as mustache variable using {{apiId}})
Manage your assets
You can manage your images, diagrams, or any type of files directly by creating a /assets folder inside your CMS project.
Each asset is save in the S3 of your Daikoku using the following command
daikoku assets push --filename=<ASSET_FILENAME> \
  --path=<ONLY_NESTED_FOLDER_BEHIND_ASSETS_FOLDER> \
  --desc=<ASSET_DESCRIPTION> \
  --title=<ASSET_TITLE>
  --slug=<ASSET_SLUG>
If you require a particular slug for your asset, you have the option to replace the automatically generated one by specifying the slug field. Additionally, you can exclude the path field, which is only necessary when creating an asset from a subfolder within the assets directory.
To delete your asset you have to give the filename and the slug iif it differs
daikoku assets remove --slug=<CUSTOM_SLUG> --filename=<ASSET_FILENAME>
As others commands, you can display all registered assets
daikoku assets list
If you prefer to synchronize all assets with a single command, it offers speed advantages over doing so individually, albeit with reduced configurability.
daikoku assets sync
Manage documentation pages
You already have many choices in Daikoku to create the APIs's documentation. But, with the release of the CMS, you can now write your documentation with it. The documentations pages have to be written in the src/documentations folder and can be named as you wish.
The recommended usage to create a new documentation page is to use the CLI as following :
daikoku generate documentation --filename=my-new-documentation-page \
                               --title="Title of the page" \
                               --desc="The description of this page"
CMS Directives
daikoku-user
Parameters
- string user id
{{#daikoku-user "{{userId}}"}}
  <div>
    <span>{{user.name}}</span>
    <img src="{{user.picture}}" />
  </div>
{{/daikoku-user}}
daikoku-owned-apis
Parameters
- visibility: can be Private | Public | All
{{#daikoku-owned-apis visibility="Private"}}
  <span>Mon api : {{api.name}}</span>
{{/daikoku-owned-apis}}
daikoku-owned-api
Parameters
- String API id
- The API version is optional, but it defaults to 1.0.0 when not specified.
{{#daikoku-owned-api "{{apiId}}" version="1.0.0"}}
  <span>Mon api : {{api.name}}</span>
{{/daikoku-owned-api}}
daikoku-json-owned-apis
Parameters
- Visibility : Private, Public or All
{{#daikoku-json-owned-apis visibility="Private"}}

{{/daikoku-json-owned-apis}}
daikoku-json-owned-api
Parameters
- The API id, string value expected
- The API version is optional, but it defaults to 1.0.0 when not specified.
{{#daikoku-json-owned-api "{{apiId}}" version="1.0.0"}}
{{/daikoku-json-owned-api}}
daikoku-owned-teams
{{#daikoku-owned-teams}}
  <span>Ma team : {{team.name}}
{{/daikoku-owned-teams}}
daikoku-owned-team
Parameters
- The team ID, string value expected
{{#daikoku-owned-team "{{teamId}}"}}
  <span>Mon team : {{team.name}}</span>
{{/daikoku-owned-team}}
daikoku-json-owned-teams
{{daikoku-json-owned-teams}}
daikoku-json-owned-team
Parameters
- The Team ID, String value expected
{{#daikoku-json-owned-team "{{teamId}}"}}

{{/daikoku-json-owned-team}}
tenant
{{tenant.name}} <li>{{tenant.style.description}}
is_admin
{{is_admin}}
connected
{{connected}}
user
When you have an user returned from directive, you can use the following fields
nameemail_id_humandReadableIdpictureisDaikokuAdminstarredApis
<div>
  {{user.name}} - {{user.email}}
</div>
request
<div>
  {{request.path}} - {{request.method}} - {{request.headers}}
</div>
daikoku-css
<div>
  {{daikoku-css}}
</div>
for
Parameters
- the fieldname used in the helper content
{{#for '{{team.users}}' field='myuser' }}
  {{myuser.userId}}
{{/for}}
size
{{size '{{team.users}}'}}
ifeq
{{#ifeq "{{plan.type}}" "FreeWithoutQuotas"}}
  You'll pay nothing and do whatever you want
{{/ifeq}}
ifnoteq
{{#ifnoteq "{{plan.type}}" "FreeWithoutQuotas"}}
  You'll pay nothing and do whatever you want
{{/ifnoteq}}
getOrElse
{{getOrElse "{{plan.customName}}" "Un plan"}}
translate
{{translate 'Logout'}}
daikoku-query-param
Parameters
- the name of the query param
{{daikoku-query-param 'my-query-param'}}
daikoku-template-wrapper
Parameters
- Block path
- List of key=value usable in content
{{#daikoku-template-wrapper '<wrapper-id>' <named-parameter>="<value>" }}

{{/daikoku-template-wrapper}}"
daikoku-apis
{{#daikoku-apis}}
  <span>Api : {{api.name}}</span>
{{/daikoku-apis}}
daikoku-api
Parameters
- API id, String value expected
{{#daikoku-api "{{apiId}}" version="1.0.0"}}
  <span>Mon api : {{api.name}}</span>
{{/daikoku-api}}"
daikoku-json-apis
{{daikoku-json-apis}}
daikoku-json-api
Parameters
- API Id, String value expected
{{#daikoku-json-api "{{apiId}}" version="1.0.0"}}

{{/daikoku-json-api}}
daikoku-teams
{{#daikoku-teams}}
  <span>Team : {{team.name}}</span>
{{/daikoku-teams}}
daikoku-team
Parameters
- Team Id, String value expected
{{#daikoku-team "{{<teamId>}}"}}
  <span>My team : {{team.name}}</span>
{{/daikoku-team}}
daikoku-json-teams
{{daikoku-json-teams}}
daikoku-json-team
Parameters
- Team Id, String value expected
{{#daikoku-json-team "{{<teamId>}}"}}

{{/daikoku-json-team}}
daikoku-documentations
Parameters
- API id, String value expected
{{#daikoku-documentations "{{<apiId>}}"}}
  <span>{{documentation.title}}</span>
{{/daikoku-documentations}}
daikoku-documentations-page
Parameters
- API ID, String value expected
- Page ID as String value
{{#daikoku-documentations-page "<apiId>" page="<pageId>"}}
  {{documentation.content}}
{{/daikoku-documentations-page}}
daikoku-documentations-page-id
Parameters
- Team ID, String value expected
- The named page parameter corresponding to the id of the expected page
{{#daikoku-documentations-page-id "<apiId>" page="<pageId>"}}
  {{content}}
{{/daikoku-documentations-page-id}}"
daikoku-plans
Parameters
- API ID
{{#daikoku-plans "<apiId>"}}
  <span>{{plan.type}}</span>
{{/daikoku-plans}}
License
This project is licensed under the Apache 2.0 license with the LLVM exception.
Commands
The following commands must be run, replacing <parameter> with --parameter=value.
PROJECT commands
daikoku cms init <NAME> <PATH>
daikoku cms migrate <NAME> <PATH> <SERVER> <APIKEY>

daikoku cms list
daikoku cms add <NAME> <PATH> <OVERWRITE>
daikoku cms switch <NAME>
daikoku cms remove <NAME> <REMOVE_FILES>
daikoku cms clear <FORCE>
PUSH commands
daikoku push <DRY_RUN> <FILEPATH>
ASSETS commands
daikoku assets push <FILENAME> <TITLE> <DESC> <PATH> <SLUG>
daikoku assets remove <FILENAME> <PATH> <SLUG>
daikoku assets list
daikoku assets sync
ENVIRONMENTS commands
daikoku environments clear <FORCE>
daikoku environments add <NAME> <SERVER> <OVERWRITE>
daikoku environments switch <NAME>
daikoku environments remove <NAME>
daikoku environments info <NAME> <FULL>
daikoku environments list
daikoku environments config <APIKEY>
GENERATE commands
daikoku generate documentation <FILENAME> <TITLE> <DESC>
LOGIN
daikoku login
PULL commands
daikoku pull apis
daikoku pull mails
daikoku pull customization
VERSION commands
daikoku version
WATCH commands
daikoku watch
Contribution
Unless you explicitly state otherwise, any contribution intentionally submitted for inclusion in this project by you, as defined in the Apache-2.0 license, shall be licensed as above, without any additional terms or conditions.
Run tests
cargo test --test <filename> -- --nocapture --test-threads 1